
“`html
There is something truly magical about the Red Velvet Wreath Whoopie Pies Recipe that combines festive charm with irresistible flavor. Imagine tender, vibrant red velvet cookies shaped like delicate wreaths, sandwiched with a luxuriously creamy cream cheese filling, then topped with cheerful green icing and red sprinkles that bring holiday joy to every bite. These whoopie pies are not only a feast for the eyes but an absolute crowd-pleaser, perfect for celebrations or just because you deserve a special treat!
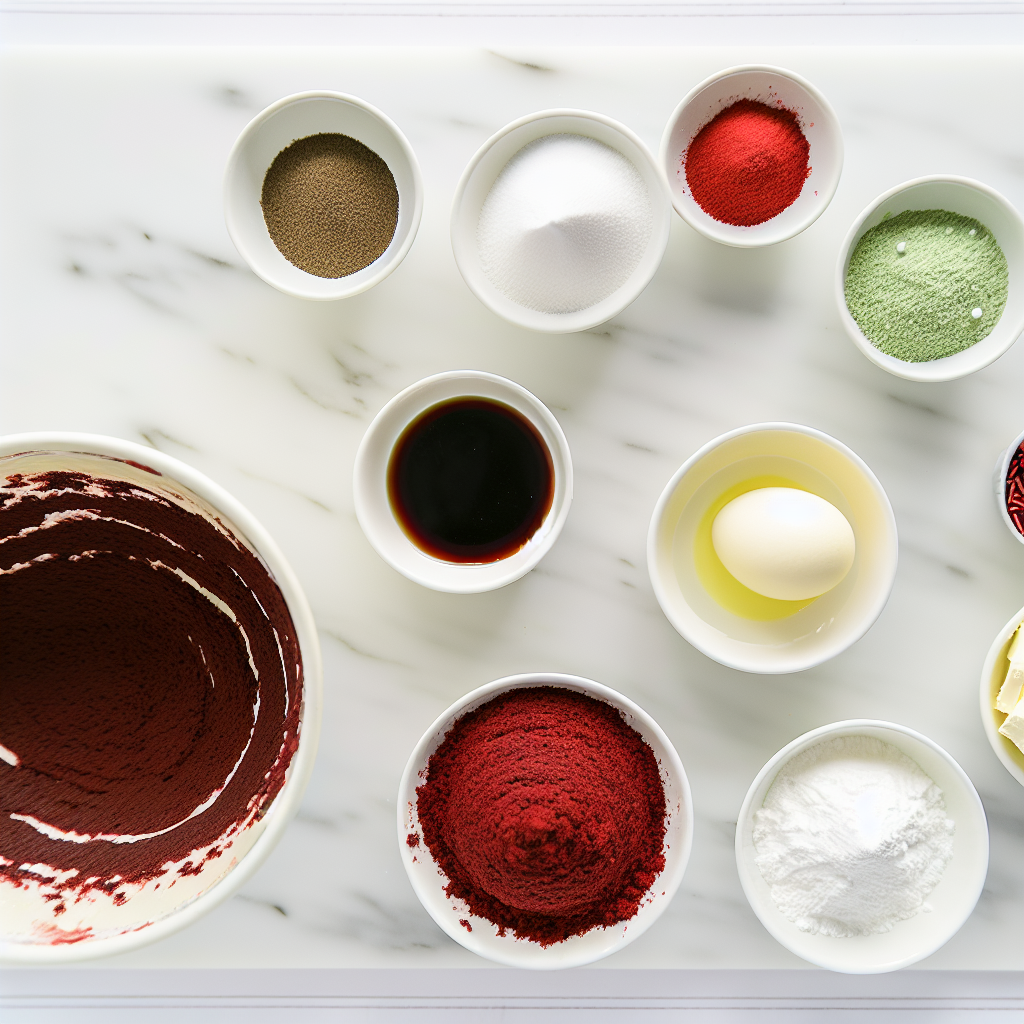
Ingredients You’ll Need
Gathering the right ingredients is the first step to nailing this Red Velvet Wreath Whoopie Pies Recipe. Each component plays a vital role, from the rich cocoa powder that deepens the red velvet flavor to the tangy buttermilk adding moisture and tenderness. The cream cheese filling ties everything together with its smooth, dreamy texture that’s simply irresistible.
- 2 cups all-purpose flour: The base that gives structure to our soft whoopie pies.
- 1/4 cup cocoa powder: Adds subtle chocolate notes essential to classic red velvet flavor.
- 1 teaspoon baking powder: Helps the cakes rise and stay light.
- 1/2 teaspoon baking soda: Supports leavening for that perfect cake texture.
- 1/4 teaspoon salt: Balances sweetness and enhances flavor.
- 1/2 cup unsalted butter, softened: Brings richness and moisture.
- 1 cup granulated sugar: Sweetens and helps with the texture.
- 1 large egg: Binds the ingredients together beautifully.
- 1 teaspoon vanilla extract: Adds warmth and depth to the batter.
- 1 cup buttermilk: Tenderizes the crumb and adds a subtle tang.
- 1 tablespoon red food coloring: Gives that iconic, festive red color.
- 8 ounces cream cheese, softened: The star of the filling, delightfully creamy.
- 1/2 cup unsalted butter, softened: Adds smoothness and richness to the filling.
- 2 cups powdered sugar: Sweetens the filling to perfection.
- 1 teaspoon vanilla extract: Flavors the filling with a lovely aromatic note.
- Green icing: For festive decorating and added color pop.
- Red sprinkles or sugar pearls: Adds a playful touch of holiday cheer on top.
How to Make Red Velvet Wreath Whoopie Pies Recipe
Step 1: Prepare Your Oven and Baking Sheets
Start by preheating your oven to 350°F (175°C) and lining your baking sheets with parchment paper. This simple preparation ensures the whoopie pies bake evenly and come off the sheets easily, making cleanup a breeze.
Step 2: Mix the Dry Ingredients
In a medium bowl, whisk together the flour, cocoa powder, baking powder, baking soda, and salt. Combining these dry ingredients now helps create a uniform batter that will give your whoopie pies consistent texture and flavor.
Step 3: Cream the Butter and Sugar
In a separate large bowl, beat the softened butter and granulated sugar until light and fluffy. This step is crucial as it incorporates air into the batter, yielding those soft, tender whoopie pies you’re aiming for. Then, add the egg and vanilla extract, mixing until everything is well combined and smooth.
Step 4: Combine Wet and Dry Mixtures
Gradually add the dry ingredients alternately with the buttermilk to your creamed butter mixture. This alternating helps maintain the batter’s smooth consistency. Once combined, stir in the red food coloring for that captivating red velvet hue.
Step 5: Shape the Wreaths
Here’s where the fun starts! Pipe or spoon the batter onto the parchment-lined sheets in small wreath shapes, leaving a little hole in the middle for authenticity. The batter’s consistency should allow you to form these delicate circles easily.
Step 6: Bake to Perfection
Pop your baking sheets into the oven and bake for 8 to 10 minutes. Keep an eye on them so they stay tender and moist without overbaking. Once done, let the wreaths cool completely on a wire rack to ensure the filling won’t melt when applied.
Step 7: Prepare the Cream Cheese Filling
While the whoopie pies cool, beat the cream cheese and softened butter together until silky smooth. Then, gradually add the powdered sugar and vanilla extract, mixing until the filling is creamy and spreadable—this luscious layer makes the pies truly unforgettable.
Step 8: Assemble the Wreath Whoopie Pies
Take one cookie and pipe or spread the cream cheese filling generously on its flat side. Gently sandwich it with another wreath cookie, pressing lightly so the filling peeks through the center hole, creating that charming wreath effect.
Step 9: Add Festive Finishing Touches
Decorate your assembled whoopie pies with green icing to mimic the look of pine branches and sprinkle red sugar pearls or sprinkles for that joyful holiday sparkle. These final touches make your Red Velvet Wreath Whoopie Pies Recipe as picturesque as they are delicious.
How to Serve Red Velvet Wreath Whoopie Pies Recipe
Garnishes
Adding garnishes like green icing and red sprinkles not only enhances the festive appeal but also adds a delightful texture contrast. You can get creative and use edible glitter or small candy holly leaves to amp up the visual impact for your guests.
Side Dishes
These whoopie pies pair wonderfully with a glass of cold milk or a warm cup of spiced chai tea, balancing the sweetness and adding a cozy vibe to your snack time or dessert course. For a holiday party, serving alongside fresh fruit or a simple whipped cream dip uplifts the whole dessert table.
Creative Ways to Present
Arrange the whoopie pies in a circular pattern on a festive platter to highlight the wreath shape, or stack them on a tiered dessert stand for an impressive centerpiece. Wrapping individual pies in clear cellophane tied with a ribbon also makes charming gifts for friends and family!
Make Ahead and Storage
Storing Leftovers
Once decorated, your Red Velvet Wreath Whoopie Pies Recipe treats can be stored in an airtight container in the refrigerator for up to 3 days. Keeping them chilled preserves the cream cheese filling’s freshness and ensures the cookies stay soft and delicious.
Freezing
If you want to prepare these whoopie pies ahead of time, they freeze exceptionally well. Freeze the cooled, undecorated cookies and the filling separately. When ready to serve, assemble and decorate them for a freshly made look. Properly wrapped, they can keep for up to a month in the freezer.
Reheating
Whoopie pies are best enjoyed chilled or at room temperature, but if you prefer a slightly warm treat, let them sit out for about 10 minutes before serving. Avoid microwaving, as it can affect the texture of the cream cheese filling and cause the icing to melt.
FAQs
Can I substitute the buttermilk?
Absolutely! If you don’t have buttermilk on hand, simply mix 1 cup of milk with 1 tablespoon of lemon juice or white vinegar, let it sit for 5 minutes, and you’ll have a great substitute for this recipe.
What if I want to make mini whoopie pies?
Feel free to pipe smaller wreaths and reduce baking time slightly, checking for doneness around 6 to 8 minutes. Mini versions make delightful bite-sized treats for parties.
Can I use a different food coloring?
Yes, you can use gel or liquid food coloring, but gel tends to give a more vibrant and consistent red color without thinning the batter as much.
Do I have to decorate with green icing and red sprinkles?
Not at all! While these decorations enhance the festive look, you can get creative and try white chocolate drizzle or even a dusting of powdered sugar for a different style.
How long do these whoopie pies keep fresh?
When refrigerated in an airtight container, they stay fresh for about 3 days. Beyond that, the texture of the cream cheese filling may start to change, so it’s best to consume them relatively soon.
Final Thoughts
There’s something so joyful about making and sharing the Red Velvet Wreath Whoopie Pies Recipe. These charming treats are more than just desserts; they’re little bursts of holiday spirit that bring smiles and warmth. Whether for a festive party or a cozy day at home, I wholeheartedly encourage you to give this recipe a whirl. You’ll find it’s as rewarding to create as it is to enjoy!
“`
Print
Red Velvet Wreath Whoopie Pies Recipe
- Prep Time: 20 minutes
- Cook Time: 10 minutes
- Total Time: 30 minutes
- Yield: 10 whoopie pies
- Category: Dessert
- Method: Baking
- Cuisine: American
Description
These Red Velvet Wreath Whoopie Pies are a festive and show-stopping treat perfect for holiday celebrations. Featuring moist red velvet cakes shaped like wreaths, sandwiched with a creamy vanilla-cream cheese filling and decorated with green icing and red sprinkles, they combine classic flavors with a playful holiday design. Ideal for sharing and impressing guests or family.
Ingredients
Dry Ingredients
- 2 cups all-purpose flour
- 1/4 cup cocoa powder
- 1 teaspoon baking powder
- 1/2 teaspoon baking soda
- 1/4 teaspoon salt
Wet Ingredients for Cakes
- 1/2 cup unsalted butter, softened
- 1 cup granulated sugar
- 1 large egg
- 1 teaspoon vanilla extract
- 1 cup buttermilk
- 1 tablespoon red food coloring
Filling
- 8 ounces cream cheese, softened
- 1/2 cup unsalted butter, softened
- 2 cups powdered sugar
- 1 teaspoon vanilla extract
Decoration
- Green icing
- Red sprinkles or sugar pearls
Instructions
- Preheat Oven: Preheat your oven to 350°F (175°C) and line baking sheets with parchment paper to prepare for baking.
- Mix Dry Ingredients: In a bowl, whisk together the all-purpose flour, cocoa powder, baking powder, baking soda, and salt until evenly combined.
- Cream Butter and Sugar: In a separate large bowl, beat the softened unsalted butter and granulated sugar together until the mixture is light and fluffy. Then add the egg and vanilla extract, mixing well to combine.
- Combine Wet and Dry Ingredients: Gradually add the dry ingredient mixture alternately with buttermilk into the butter mixture, mixing until smooth. Finish by stirring in the red food coloring to achieve the vibrant red velvet color.
- Shape Wreaths: Pipe or spoon the batter onto the prepared baking sheets in small wreath shapes, ensuring to leave a small hole in the center to resemble a wreath.
- Bake: Bake the wreaths for 8 to 10 minutes. Remove from oven and transfer to a wire rack to cool completely.
- Make Filling: Beat the softened cream cheese and butter together until smooth. Gradually add the powdered sugar and vanilla extract, mixing until the filling is creamy and fluffy.
- Assemble Whoopie Pies: Pipe the cream cheese filling onto the flat side of one cooled wreath cake, then sandwich it with another cake.
- Decorate: Finish by decorating the assembled whoopie pies with green icing and red sprinkles or sugar pearls to create a festive wreath look.
Notes
- Make sure cakes are completely cool before assembling to prevent the filling from melting.
- Use gel-based red food coloring for a more vibrant color without thinning the batter.
- For sturdier wreaths, refrigerate the assembled whoopie pies briefly before serving.
- Green icing can be made from royal icing or store-bought decorating gel.
- Store in an airtight container in the refrigerator for up to 3 days.


