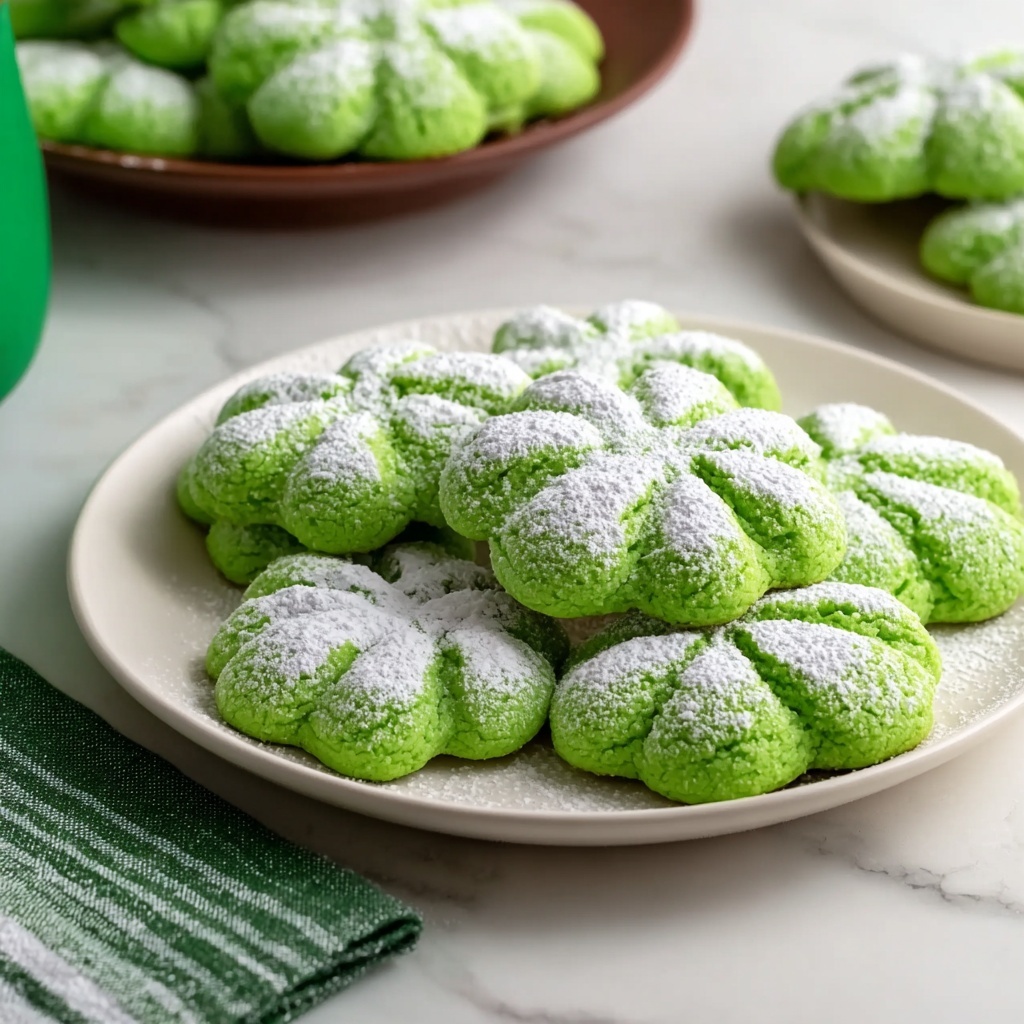
Ready to infuse your St. Patrick’s Day celebration with a burst of color and sweetness? The Lucky Green St. Patrick’s Day Cookies Recipe delivers a fun, festive treat that’s as delightful to bake as it is to eat. These vibrant green cookies are soft, tender, and perfectly sweet with a beautiful crinkled sugar coating that invites smiles at first glance. Whether you’re hosting a party or just want a spirited snack, these cookies are guaranteed to bring a little luck and lots of joy to your holiday table.
Ingredients You’ll Need
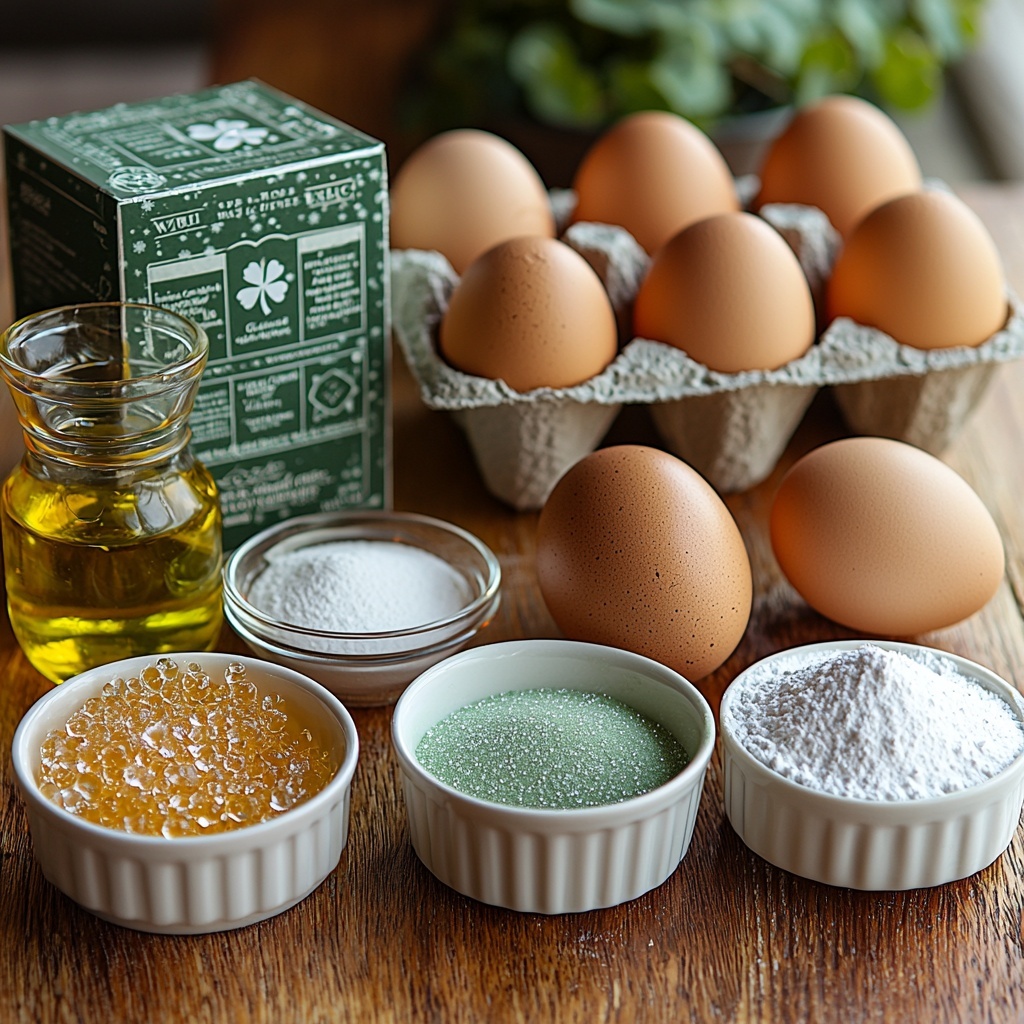
Simple ingredients come together to create these charming cookies, each playing a crucial role in the final flavor, texture, and festive color. You don’t need complicated pantry items—just a few basics that deliver big on fun and taste.
- White cake mix: This is the foundation, giving the cookies a soft, cakey texture that’s irresistible.
- Large eggs: Binders that also add richness and moisture to the dough.
- Vegetable oil: Keeps the cookies tender and moist throughout baking.
- Kelly green gel food coloring: Provides that vibrant, true green glow for St. Patrick’s Day without altering the dough’s consistency.
- Granulated sugar: Adds sweet crunch and helps create the signature cookie crackle.
- Powdered sugar: Softens the outer coating with a delicate sweetness and helps the cookies stand out visually.
How to Make Lucky Green St. Patrick’s Day Cookies Recipe
Step 1: Mix the Dough
Start by combining the white cake mix, eggs, and vegetable oil in a large bowl until the dough comes together sticky but manageable. Stir in the Kelly green gel food coloring thoroughly to ensure the vibrant green hue is evenly spread throughout the dough—this is what makes these cookies truly festive!
Step 2: Chill for Perfect Texture
Cover your dough and pop it into the refrigerator for 30 minutes. This chilling step isn’t just about convenience; it helps the dough firm up, preventing your cookies from spreading too thin and losing their enticing cakey fluffiness once they bake.
Step 3: Prep for Baking
While the dough chills, preheat your oven to 350°F (175°C) and line a baking sheet with parchment paper to prevent sticking. Prepare two shallow bowls—one filled with granulated sugar and the other with powdered sugar—to roll the cookies in before baking.
Step 4: Sugar Coat the Dough Balls
Scoop out tablespoon-sized portions of the chilled dough. Roll each ball first in the granulated sugar, ensuring a crunchy sugar crust forms, then immediately roll in powdered sugar for a soft, frosted effect. This double sugar coating creates the signature crackled look once baked.
Step 5: Arrange and Bake
Place your coated dough balls on the prepared baking sheet, spacing them about 2 inches apart. Bake for 9 to 12 minutes until the cookies develop a crinkled surface and remain soft in the center. The timing ensures a tender chew with a lovely contrast between the crispy edges and cakey middle.
Step 6: Cool and Enjoy
Let the cookies cool on the baking sheet for 5 minutes to set up properly, then transfer them to a wire rack to cool completely. Watching them cool is the perfect moment to anticipate the first bite of these lucky, green delights!
How to Serve Lucky Green St. Patrick’s Day Cookies Recipe
Garnishes
To amp up the festive look, sprinkle a few edible gold sprinkles or tiny shamrock-shaped candies on top just before baking. These simple additions add sparkle and whimsy that’ll catch everyone’s eye and make your cookies look like pure holiday magic.
Side Dishes
Pair these Lucky Green St. Patrick’s Day Cookies Recipe treats with a cup of warm Irish breakfast tea or a frothy mug of vanilla latte. The mellow bitterness of the drinks balances the cookie’s sweetness, creating a harmonious festive snack experience.
Creative Ways to Present
Arrange your cookies in the shape of a shamrock on a festive platter for a charming centerpiece. Alternatively, stack a few cookies in clear cellophane bags tied with green ribbons to give as adorable homemade gifts that spread St. Patrick’s cheer.
Make Ahead and Storage
Storing Leftovers
Keep your leftover cookies fresh by storing them in an airtight container at room temperature. They’ll stay soft and delicious for up to a week, making it easy to enjoy their luck well after St. Patrick’s Day ends.
Freezing
If you want to save the fun for later, freeze your baked cookies by layering them between sheets of parchment paper inside a sealed freezer bag. Frozen cookies maintain their texture and flavor for up to two months, perfect for spontaneous celebrations.
Reheating
When ready to enjoy frozen cookies, let them thaw at room temperature. For that fresh-baked warmth, pop them in a 300°F oven for about 5 minutes. This brief reheating refreshes their softness and brings back that irresistible just-baked aroma.
FAQs
Can I use a different food coloring for these cookies?
Absolutely! While Kelly green gel is perfect for that classic St. Patrick’s Day green, you can experiment with other shades or even liquid food coloring. Just be mindful—gel types usually provide more vibrant color without affecting dough texture.
Is it possible to make these cookies gluten-free?
Yes, you can substitute the cake mix with a gluten-free white cake mix. Just ensure the blend you choose is suitable for cookies and follow the package instructions closely. The texture might vary slightly but will still be deliciously festive.
Why do the cookies need to chill before baking?
Chilling the dough firms it up and prevents excessive spreading during baking. This step helps the cookies keep a soft, cakey texture instead of becoming too flat or crispy, which wouldn’t capture the essence of this Lucky Green St. Patrick’s Day Cookies Recipe.
Can I make the dough ahead of time?
Definitely! You can prepare the dough a day in advance and keep it covered in the refrigerator. This allows the flavors to meld beautifully and makes baking day quicker and easier.
How do I achieve that perfect crackled sugar look?
The secret lies in rolling the dough balls first in granulated sugar, then powdered sugar, before baking. The granulated sugar adds crunch and crackling, while the powdered sugar softens and whitens the surface, giving that gorgeous festive appearance.
Final Thoughts
The Lucky Green St. Patrick’s Day Cookies Recipe is the perfect way to add bright, merry sweetness to your holiday festivities. Simple to make with a handful of ingredients, these cookies bring a cheerful pop of green and a light, tender bite that blossoms joy with every nibble. Whether you’re making them for family, friends, or just yourself, these charming cookies are a delightful way to celebrate luck and good times. Give them a try—you’ll be so glad you did!
Print
Lucky Green St. Patrick’s Day Cookies Recipe
- Prep Time: 10 minutes
- Cook Time: 12 minutes
- Total Time: 52 minutes
- Yield: About 24 cookies
- Category: Dessert
- Method: Baking
- Cuisine: American
Description
Celebrate St. Patrick’s Day with these fun and festive Lucky Green Cookies! Made with a white cake mix base and vibrant green gel food coloring, these soft and crinkly cookies are a colorful holiday treat perfect for sharing and enjoying the spirit of the season.
Ingredients
Cookie Dough
- 1 box (15.25 oz) white cake mix
- 2 large eggs
- ⅓ cup vegetable oil
- ¼ teaspoon Kelly green gel food coloring
Coating
- 3 tablespoons granulated sugar
- 6 tablespoons powdered sugar
Instructions
- Mix the Dough: In a large bowl, combine the white cake mix, eggs, and vegetable oil until a sticky dough forms. Add the Kelly green gel food coloring and stir until the color is evenly distributed throughout the dough.
- Chill the Dough: Cover the bowl with plastic wrap and refrigerate the dough for 30 minutes. This helps the dough firm up and reduces spreading during baking.
- Prepare for Baking: Preheat your oven to 350°F (175°C). Line a baking sheet with parchment paper. Place the granulated sugar in one bowl and the powdered sugar in another for coating the cookies.
- Shape and Coat: Scoop tablespoon-sized balls of dough. First roll each ball in granulated sugar, then coat it by rolling in powdered sugar, ensuring an even sugary layer.
- Arrange on Baking Sheet: Place the coated dough balls on the prepared baking sheet, spacing them about 2 inches apart to allow room for spreading.
- Bake Cookies: Bake in the preheated oven for 9 to 12 minutes, or until the cookies are set, crinkled on top but still soft in the center.
- Cool: Allow the cookies to cool on the baking sheet for 5 minutes before transferring them to a wire rack to cool completely.
Notes
- Using gel food coloring helps achieve vibrant green without altering dough consistency.
- Chilling the dough is important to prevent excessive spreading in the oven.
- You can double-coat the cookies with sugar for an extra sparkly and sweet exterior.
- Store cookies in an airtight container at room temperature for up to 4 days.
- For a fun twist, add green sprinkles during the coating step.

