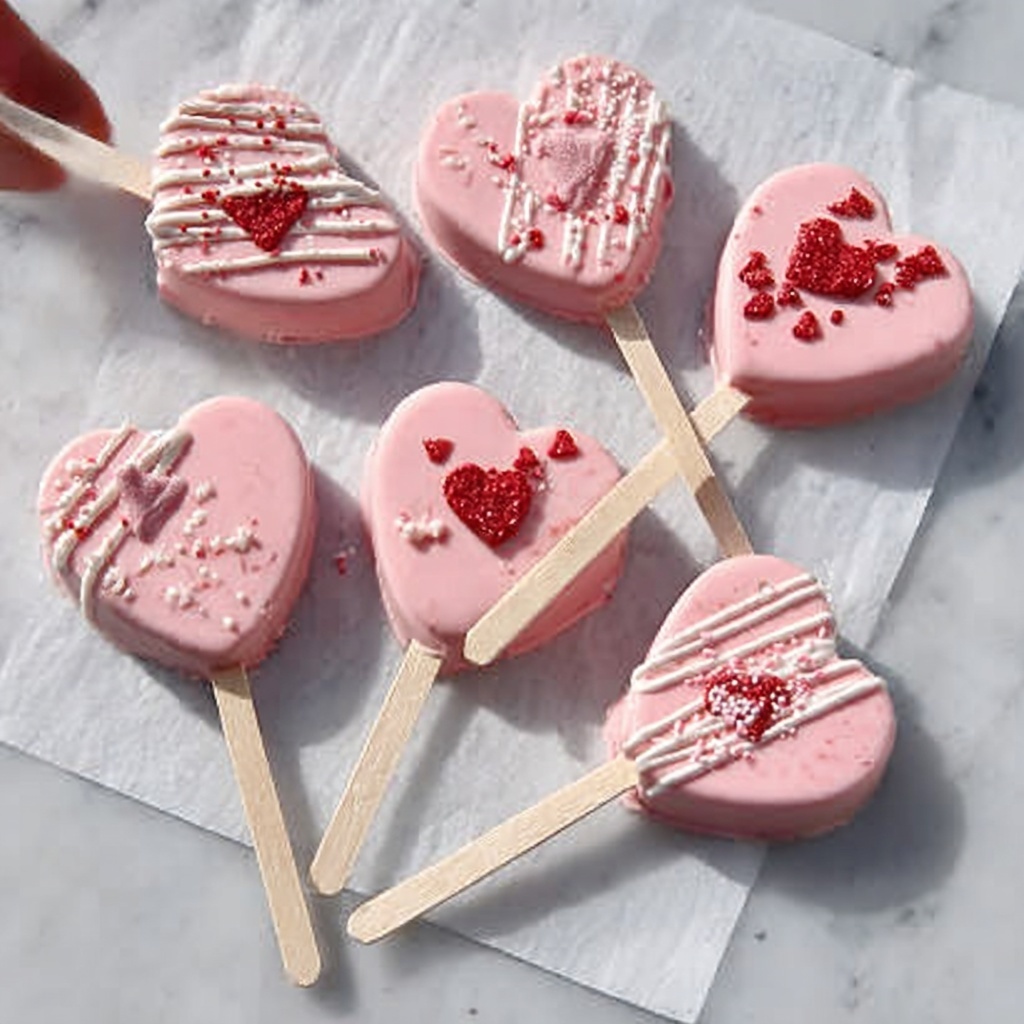
There is something utterly delightful about sharing sweet treats with the special people in your life, especially when those treats are as charming as the Valentine’s Day Heart-Shaped Cake Pops Recipe. These adorable heart-shaped cake pops bring together fluffy vanilla cake and luscious frosting, all coated in smooth candy melts for that perfect bite-sized indulgence. Whether you’re celebrating a romantic evening or just want to surprise someone with a sweet gesture, this recipe is guaranteed to make hearts flutter and smiles blossom.

Ingredients You’ll Need
Each ingredient in this recipe is simple yet essential, coming together to create a perfect balance of flavor, texture, and that beautiful pop of color. From the fragrant vanilla cake to the luscious frosting and vibrant candy melts, every element plays a starring role in your Valentine’s Day Heart-Shaped Cake Pops Recipe.
- Vanilla cake mix: The base of your cake pops, ensuring a soft and flavorful crumb that crumbles easily.
- Oil, water, and eggs: Typical cake mix ingredients that bring moisture and structure to your cake.
- Unsalted butter: Adds richness and smoothness to your frosting, making it perfect for binding the cake crumbs.
- Powdered sugar: Sweetens and thickens the frosting for that ideal creamy consistency.
- Vanilla extract: Enhances the overall flavor with a warm, familiar note.
- Milk: Adjusts the frosting’s texture to be just right—not too thick or runny.
- Heart-shaped silicone mold: The magic tool that shapes your cake pops into adorable hearts.
- Lollipop sticks: Perfect for holding and presenting your delightful cake pops.
- Candy melts (red, white, pink): Provide a smooth, colorful coating that hardens beautifully around your cake hearts.
- Vegetable shortening (optional): Helps to thin the candy melts if needed for a smoother dip.
- Optional decorations: Heart-shaped sprinkles, edible glitter, colored sugar, and white chocolate drizzle add festive flair and extra sweetness.
How to Make Valentine’s Day Heart-Shaped Cake Pops Recipe
Step 1: Bake and Cool the Cake
First things first, prepare your vanilla cake mix exactly as directed on the box. This step is straightforward but important because the cake needs to cook fully through and then cool completely. Cooling ensures the cake doesn’t crumble too much and holds together well when you mix it with frosting later. Patience here really pays off!
Step 2: Crumble the Cake
Once your cake is completely cool, crumble it into a large mixing bowl. This is where the magic begins—adding 1/3 cup of frosting and folding it in transforms loose crumbs into a moist, dough-like mixture that’s easy to shape. If the mixture seems too dry or falls apart, gently mix in more frosting a tablespoon at a time until it sticks together without becoming overly sticky.
Step 3: Shape Using a Silicone Heart Mold
Press your cake-and-frosting mixture firmly into the heart-shaped silicone molds. Make sure to smooth the tops flat for a polished look. For stability, dip one end of each lollipop stick into melted candy coating and insert it into the bottom of each heart-shaped cake. This little trick ensures your pops hold firm once coated. After filling the molds, pop them in the freezer for at least an hour to set and firm up before dipping.
Step 4: Melt the Candy Coating
While your cake hearts chill, get started on the candy melts. Heat them gently in a microwave-safe bowl in 30-second intervals, stirring well in between. If the coating feels thick and difficult to dip, stir in a teaspoon of vegetable shortening for that perfectly smooth and silky consistency—key to an even, flawless coating on your cake pops.
Step 5: Dip the Cake Pops
Carefully remove your chilled cake hearts from the silicone mold. One by one, dip them fully into the melted candy coating, making sure each heart is completely covered. Gently tap off any excess coating to avoid drips, then stand the pops upright in a styrofoam block or cake pop stand. This keeps them stable while the coating hardens to a glossy finish.
Step 6: Decorate
The moment to get creative is here! While the candy coating is still soft, sprinkle on heart-shaped sprinkles, edible glitter, or colored sugar. You can also drizzle contrasting melted white chocolate over the tops for an elegant touch. Let the decorated cake pops set at room temperature or refrigerate briefly until firm before serving or packaging.
How to Serve Valentine’s Day Heart-Shaped Cake Pops Recipe
Garnishes
Adding simple garnishes like heart-shaped sprinkles or edible glitter elevates the cake pops from cute to absolutely charming. These little finishing touches catch the light and add appealing texture, perfect for making your dessert table shimmer on Valentine’s Day.
Side Dishes
Pair your cake pops with complementary treats such as fresh berries or a dollop of whipped cream for a well-rounded presentation. You might also serve alongside a rich hot chocolate or a sparkling glass of pink lemonade to enhance the festive feel.
Creative Ways to Present
Presentation is half the fun with these adorable heart-shaped cake pops. Arrange them beautifully in a decorative vase filled with colored sugar or candy beads, or wrap them individually in clear cellophane tied with red or pink ribbon for sweet gifts. Displaying them on a tiered cake stand adds an extra wow factor at any celebration.
Make Ahead and Storage
Storing Leftovers
If you have leftovers, store your Valentine’s Day Heart-Shaped Cake Pops in an airtight container in the refrigerator. This keeps them fresh for up to 3 days, preserving the texture of the cake and the shine of the candy coating.
Freezing
You can freeze these pops to enjoy later—just wrap each one individually in plastic wrap and place them in an airtight container or freezer bag. They keep well for up to 1 month. When you’re ready to enjoy, thaw them overnight in the refrigerator to maintain their shape and flavor.
Reheating
Reheating cake pops is not recommended since the candy coating may become sticky or lose its smooth texture. Instead, let frozen or refrigerated pops come to room temperature before serving to enjoy their full deliciousness.
FAQs
Can I use a different cake flavor for this Valentine’s Day Heart-Shaped Cake Pops Recipe?
Absolutely! While vanilla is classic and versatile, chocolate, red velvet, or even strawberry cake mixes work wonderfully to customize flavor and color. Just make sure the cake is fully cooled before crumbling.
Do I have to use a heart-shaped silicone mold?
While the heart-shaped mold adds the perfect Valentine’s theme, you can use any small silicone mold or even shape the cake mixture by hand with a little patience. Just be sure the shape is sturdy enough to hold the stick and coating.
What if I don’t have vegetable shortening to thin the candy melts?
If you don’t have shortening, you can use a small amount of coconut oil or even butter to thin out the candy melts. Add a tiny bit at a time until the coating reaches the right consistency for dipping.
How long do cake pops typically last?
Stored properly in the refrigerator, cake pops will stay fresh and tasty for up to 3 days. Beyond that, the quality might start to decline, so it’s best to enjoy them sooner rather than later.
Can I prepare these cake pops ahead of time for a party?
Definitely! Make them a day or two in advance, store them in an airtight container in the fridge, and they’ll be ready to delight your guests. For longer storage, freeze and thaw as needed.
Final Thoughts
There is nothing quite like the joy of sharing homemade treats that show a little extra love, and this Valentine’s Day Heart-Shaped Cake Pops Recipe is just the thing to brighten any celebration. The combination of soft vanilla cake, creamy frosting, and dazzling candy coating turns simple ingredients into an irresistible, heartfelt gift. I can’t wait for you to make these and see the smiles they bring — trust me, they’re just as fun to create as they are to enjoy!
Print
Valentine’s Day Heart-Shaped Cake Pops Recipe
- Prep Time: 30 minutes
- Cook Time: 1 hour
- Total Time: 1 hour 30 minutes
- Yield: 20 cake pops
- Category: Dessert
- Method: No-Cook
- Cuisine: American
Description
Celebrate Valentine’s Day with these adorable and delicious Heart-Shaped Cake Pops. Made from moist vanilla cake and creamy frosting, these cake pops are molded into festive heart shapes, dipped in colorful candy coating, and decorated with sprinkles and edible glitter for a perfect romantic treat.
Ingredients
For the Cake:
- 1 box vanilla cake mix
- Ingredients as listed on the box (typically oil, water, and eggs)
For the Frosting:
- 1/2 cup unsalted butter, softened
- 1 1/2 cups powdered sugar
- 1 tsp vanilla extract
- 1–2 tbsp milk
- OR 1 cup store-bought frosting
For the Cake Pops:
- 1 baked and cooled cake
- 1/3 to 1/2 cup frosting
- Heart-shaped silicone mold
- Lollipop sticks
For the Candy Coating:
- Candy melts (red, white, pink)
- 1–2 tsp vegetable shortening (optional, for thinning)
Optional Decorations:
- Heart-shaped sprinkles
- Edible glitter
- Colored sugar
- White chocolate drizzle
Instructions
- Bake and Cool the Cake: Prepare the vanilla cake mix according to the package instructions. Once baked, allow the cake to cool completely to ensure it is firm enough to crumble and form into pops later without crumbling excessively.
- Crumble the Cake: Using clean hands or a fork, crumble the cooled cake into a large mixing bowl. Add 1/3 cup of frosting and mix until the mixture forms a soft dough-like consistency. If the mixture is too dry to hold together when pressed, add more frosting a tablespoon at a time but avoid making it sticky.
- Shape Using the Silicone Heart Mold: Firmly press the cake-frosting mixture into the heart-shaped silicone molds, smoothing the surfaces flat. Dip the tip of each lollipop stick into melted candy coating to help it adhere, then insert the stick into the base of each heart-shaped cake mixture in the mold. Freeze the filled molds for at least 1 hour to let the shapes set firmly.
- Melt the Candy Coating: Place candy melts in a microwave-safe bowl and heat in 30-second intervals, stirring thoroughly between intervals until fully melted and smooth. If the coating is too thick for dipping, add 1 teaspoon of vegetable shortening and stir well to thin it out.
- Dip the Cake Pops: Remove the set cake pops from the molds carefully. Dip each heart-shaped pop into the melted candy coating, covering it entirely, then gently tap off excess coating. Stand the dipped pops upright in a styrofoam block or cake pop stand to dry and harden the coating.
- Decorate: While the coating is still wet, apply your choice of optional decorations such as heart-shaped sprinkles, edible glitter, colored sugar, or drizzle with melted white chocolate for contrast. Allow the decorated cake pops to set at room temperature or chill in the refrigerator for 10–15 minutes until the coating is fully firm.
Notes
- You can use store-bought frosting to save time or make your own for a fresher flavor.
- Ensure the cake is completely cooled before crumbling to avoid a mushy texture.
- Vegetable shortening helps thin candy melts for easier dipping but is optional.
- Refrigerate cake pops after decorating if you want them firm quickly.
- Use silicone molds for easy removal and consistent shapes.


