
If you’ve ever dreamed of a dessert that perfectly balances tart, sweet, creamy, and crunchy textures, then you are going to adore this Chocolate Covered Caramel Apple Slices Recipe. These delightful treats capture the classic magic of caramel apples but are much easier to enjoy and share, plus they look absolutely stunning. Imagine crisp apple slices generously dipped in smooth chocolate, drizzled with luscious caramel, and finished with a sprinkle of your favorite toppings. Whether you’re making them for a cozy family afternoon or an autumn gathering, this recipe delivers pure joy with every bite.
Ingredients You’ll Need
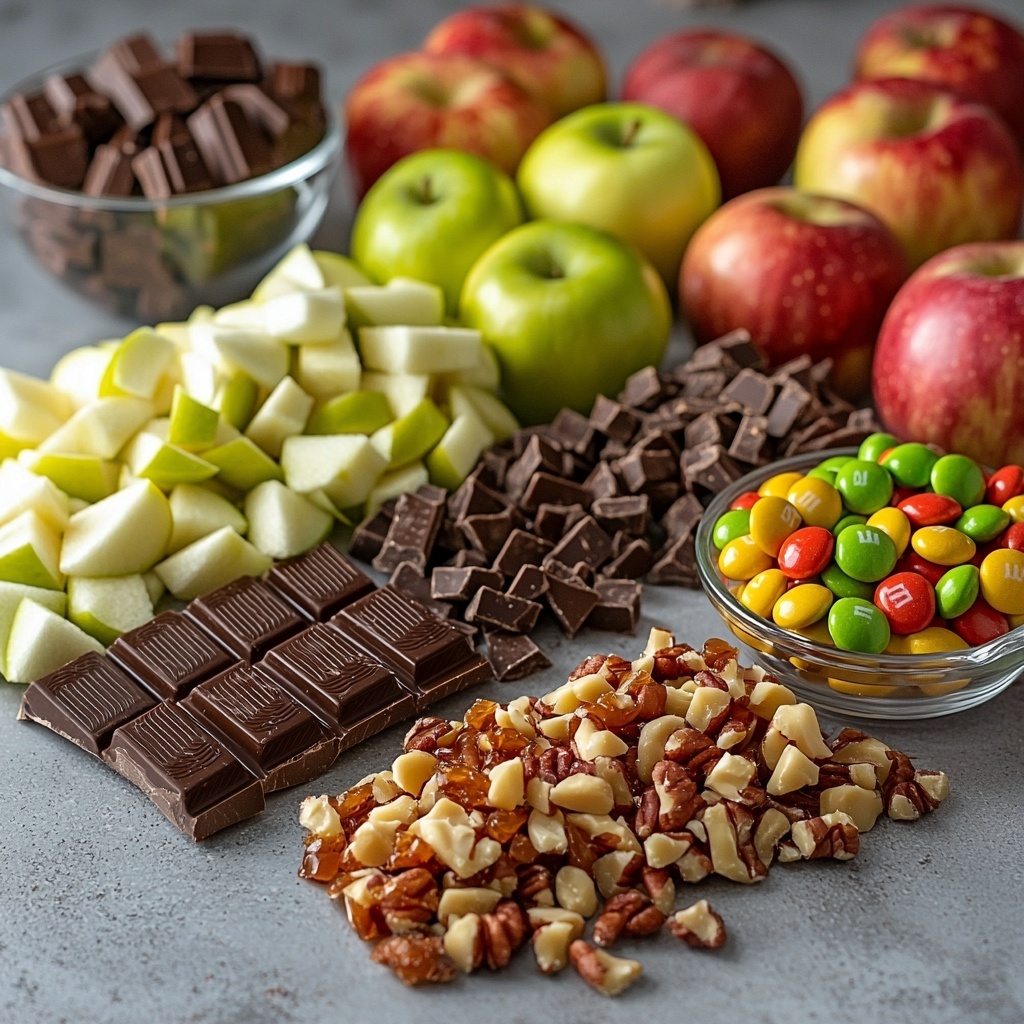
For this Chocolate Covered Caramel Apple Slices Recipe, the ingredient list is refreshingly simple, yet each item plays a crucial role in creating that perfect combination of flavors and textures. Crisp apples provide a fresh, juicy bite, creamy caramel adds richness, and smooth chocolate brings a silky finish—all topped off with a bit of crunch and color from optional toppings.
- 3 large Granny Smith or Honeycrisp apples: Choose firm, crisp apples for the best texture and balance between tartness and sweetness.
- 10 ounces milk or dark chocolate melting wafers: These provide the smooth, glossy coating that encloses the apple slices in decadent flavor.
- 8 ounces soft caramel squares (about 1 cup): They melt beautifully to create a luscious, creamy caramel drizzle.
- 2 tablespoons heavy cream: Helps achieve that perfectly smooth caramel consistency.
- 1 cup complementary variety chocolate melting wafers (optional): Use these for drizzling decorative chocolate accents on top.
- Mini M&Ms, chopped nuts, and/or assorted small toppings: These add texture, color, and a personalized touch to your apple slices.
How to Make Chocolate Covered Caramel Apple Slices Recipe
Step 1: Prepare Your Workspace
Start by lining a sheet pan with parchment paper or a silicone baking mat. This step may seem small, but it’s essential because it prevents your beautifully dipped apple slices from sticking as they set. Having everything ready before you dive into dipping makes the process smooth and enjoyable.
Step 2: Slice the Apples
Carefully cut each apple vertically into 4 or 5 slices, about half an inch thick, or up to 3/4 inch if you prefer a chunkier bite. Use a melon baller and a paring knife to neatly remove the stems and carve out the seeds without piercing through the slice. This attention to detail ensures each slice will hold together well and provide the perfect surface for dipping.
Step 3: Insert Popsicle Sticks
Place a food-grade wooden popsicle stick halfway through the bottom center of each apple slice. If the apple flesh resists, a small slit can guide the stick in smoothly. These sticks aren’t just practical for handling—they also give your apple slices that classic, charming look that kids and adults alike adore.
Step 4: Melt the Chocolate
Melt your chocolate wafers using a double boiler or microwave, following the package instructions carefully to avoid burning. Before dipping, pat the apple slices dry to make sure the chocolate adheres nicely without slipping off. This step guarantees a beautiful, even chocolate coating.
Step 5: Dip the Apple Slices
Dip each apple slice fully into the melted chocolate, stopping just past where the stick enters the fruit. Let any excess chocolate drip off, then lay the slices in a single layer on your prepared sheet pan. Refrigerate for about 5 to 10 minutes until the chocolate firms up—this gives you a solid base for the caramel topping.
Step 6: Prepare the Caramel Sauce
Combine the unwrapped caramel squares and heavy cream in a microwave-safe bowl. Heat them in 20 to 30 second bursts, stirring between intervals until the mixture is smooth and silky. Let the caramel cool slightly until it’s warm but not hot, perfect for drizzling without melting the chocolate coat on your apple slices.
Step 7: Melt Extra Chocolate (Optional)
If you want to add a further decorative drizzle, melt your complementary chocolate wafers using the same method. Allow both the caramel and extra chocolate to cool until warm and fluid. This step lets you create artistic swirls and adds an elegant finishing touch.
Step 8: Drizzle and Decorate
Spoon the luscious caramel over your chocolate-coated apple slices, then drizzle the extra melted chocolate if using. While everything’s still soft and sticky, sprinkle on your chosen mini M&Ms, chopped nuts, or other small toppings. Pop the pan back in the fridge for another 10 to 15 minutes to let the toppings and caramel set beautifully.
Step 9: Serve and Enjoy
These delicious Chocolate Covered Caramel Apple Slices are best served within a few hours for maximum freshness and flavor. Keep refrigerated until you’re ready to enjoy—prepping them just a little ahead of time ensures the best texture and crunch delight every time.
How to Serve Chocolate Covered Caramel Apple Slices Recipe
Garnishes
Add a pop of texture and color by topping your slices with an assortment of mini M&Ms, rainbow sprinkles, crushed nuts, or even a sprinkle of sea salt. Each garnish brings something special—sweet, salty, crunchy—that elevates the friendly flavors in your Chocolate Covered Caramel Apple Slices Recipe.
Side Dishes
These apple slices pair wonderfully with a scoop of vanilla ice cream or a dollop of whipped cream to balance the rich caramel and chocolate. For a cozy twist, serve alongside a warm spiced cider or a cup of rich hot chocolate. These accompaniments make your treat feel like a party with every bite.
Creative Ways to Present
Consider arranging your completed apple slices on a festive platter lined with autumn leaves or a rustic wooden board for an eye-catching display. Wrapping individual slices in cellophane and tying them with colorful ribbons turns them into delightful grab-and-go party favors—perfect for sharing this fantastic recipe’s joy.
Make Ahead and Storage
Storing Leftovers
Store any leftover Chocolate Covered Caramel Apple Slices in an airtight container in the refrigerator. Keeping them cool preserves the crispness of the apples and the firmness of both the chocolate and the caramel for up to two days without losing that fresh-baked magic.
Freezing
Though tempting, freezing these apple slices isn’t recommended because apples can become watery and mushy after thawing, affecting the luscious textures you worked so hard to create. For best taste, enjoy them fresh within their storage lifetime.
Reheating
This recipe is best served cold or at room temperature, so reheating isn’t necessary. If the chocolate or caramel feels too firm after refrigeration, simply let the slices sit at room temperature for about 10 minutes to soften slightly before indulging.
FAQs
Can I use red apples instead of green for this recipe?
Absolutely! Red apples like Fuji or Gala are a sweeter alternative and work beautifully if you prefer a milder contrast to the caramel and chocolate. Just keep in mind their natural sweetness when choosing chocolate and toppings.
What if I don’t have a double boiler to melt the chocolate?
No worries! You can melt chocolate wafers safely in a microwave using short bursts of 20 to 30 seconds, stirring well between each interval to avoid burning and ensure smooth melting for perfect dipping.
Can I substitute caramel squares with homemade caramel sauce?
Yes, homemade caramel sauce can add a wonderfully personal touch. Just make sure it’s thick enough to drizzle without running off the apple slices too quickly, and cool it to a warm consistency similar to melted caramel squares for best results.
How do I prevent the apple slices from browning?
Patting the apple slices dry is key to good chocolate adhesion, but to keep browning at bay, you can briefly soak the slices in a lemon water bath before drying. This simple trick preserves the fruit’s vibrant look while keeping flavors bright.
Can I customize the toppings for dietary restrictions?
Definitely! Swap out nuts or candies for allergy-friendly options such as coconut flakes, seeds, or dried fruit pieces. The beauty of this Chocolate Covered Caramel Apple Slices Recipe is how effortlessly you can tailor it to your taste and needs.
Final Thoughts
There’s just something so irresistible about the combination of crisp apples, silky chocolate, and buttery caramel all in one bite. This Chocolate Covered Caramel Apple Slices Recipe is a guaranteed crowd-pleaser that brings warmth, fun, and a little bit of nostalgia to your kitchen. Grab your apples, melt that chocolate, and let yourself enjoy the sweet magic that happens when these flavors come together. Trust me, once you make these, they’ll become a beloved favorite you’ll want to share again and again!
Print
Delicious Recipe
- Prep Time: 15 minutes
- Cook Time: 20 minutes
- Total Time: 35 minutes
- Yield: 12 servings
- Category: Dessert
- Method: No-Cook
- Cuisine: American
Description
Delight your taste buds with these irresistible Chocolate Covered Caramel Apple Slices. Crisp Granny Smith or Honeycrisp apples are sliced and dipped in smooth melted chocolate, then drizzled with rich caramel and finished with your favorite toppings like mini M&Ms and chopped nuts. Perfect for parties, snacks, or a festive treat, these bite-sized delights combine tart fruit, sweet caramel, and luscious chocolate in every bite.
Ingredients
Apple Slices
- 3 large Granny Smith or Honeycrisp apples, washed and dried well
- 10 ounces milk or dark chocolate melting wafers (e.g., Ghirardelli)
- 10 mm wide food-grade wooden popsicle sticks
Caramel Sauce
- 8 ounces soft caramel squares (1 cup), unwrapped (e.g., Kraft)
- 2 tablespoons heavy cream
Optional Toppings
- 1 cup complementary variety chocolate melting wafers (optional)
- Mini M&Ms, chopped nuts, and/or assorted small toppings of your choice
Instructions
- Prepare the Work Surface: Line a sheet pan with parchment paper or a silicone baking mat to prevent the dipped apple slices from sticking when setting.
- Slice the Apples: Cut each apple vertically into 4 or 5 slices, about 1/2-inch thick or up to 3/4-inch if preferred. Use a melon baller and a paring knife to carefully remove stems and carve out the seeds without piercing through the apple slice.
- Insert Popsicle Sticks: Place a 10 mm wide food-grade wooden popsicle stick into the bottom center of each apple slice, pushing it halfway through. Make a small slit if necessary to ease insertion.
- Melt the Chocolate: Melt the milk or dark chocolate wafers using a double boiler or microwave according to package instructions. Make sure apple slices are well dried before dipping.
- Dip the Apples: Fully dip each apple slice into the melted chocolate up to just past where the stick meets the fruit. Let excess chocolate drip off, then place the slices in a single layer on the prepared sheet pan. Refrigerate for 5–10 minutes until the chocolate sets.
- Prepare the Caramel Sauce: Combine the unwrapped caramel squares and heavy cream in a microwave-safe bowl. Microwave in 20–30 second intervals, stirring after each until smooth and melted. Set aside to cool slightly.
- Melt Extra Chocolate (Optional): If using, melt the complementary chocolate wafers similarly, allowing both the caramel and extra chocolate to cool until warm but still fluid to prevent melting the chocolate coating on the apples.
- Drizzle and Top: Spoon the caramel over the chocolate-dipped apple slices. Drizzle with the extra melted chocolate if using. Immediately sprinkle with mini M&Ms, chopped nuts, or other toppings of your choice. Refrigerate an additional 10–15 minutes to allow toppings and caramel to set.
- Serve and Store: Serve the chocolate covered caramel apple slices within a few hours for the best flavor and texture. Keep refrigerated until ready to enjoy. Avoid preparing the slices the night before assembly to maintain freshness and quality.
Notes
- Use firm apples like Granny Smith or Honeycrisp for the best texture and tartness to balance the sweet coatings.
- Make sure apple slices are dried thoroughly before dipping to ensure chocolate adheres properly.
- Adjust thickness of apple slices according to preference, but 1/2-inch works well for easy handling and dipping.
- Use food-grade popsicle sticks for safe insertion and comfortable holding while eating.
- Store leftovers in an airtight container in the refrigerator and consume within 1-2 days for optimal freshness.
- Feel free to customize toppings with sprinkles, crushed cookies, or sea salt for extra flavor contrast.


