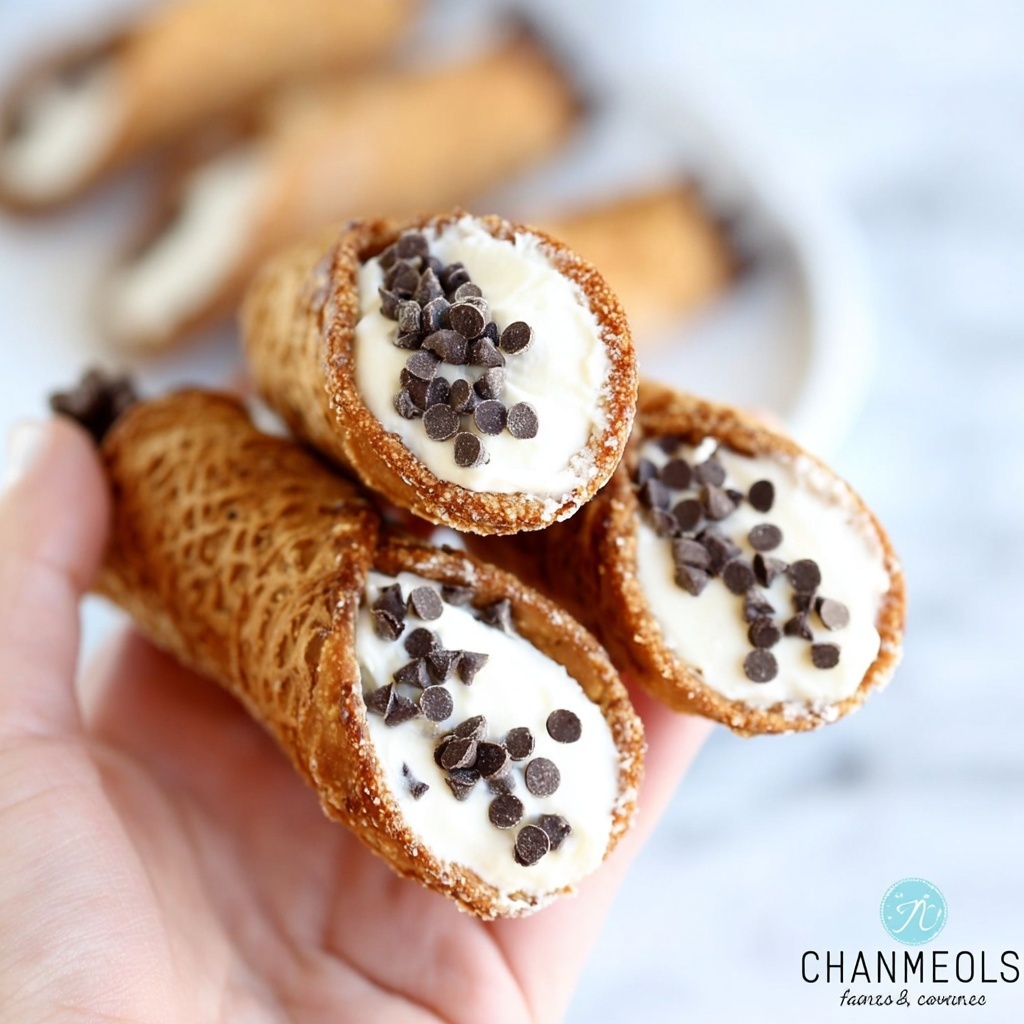
If you’ve ever swooned over crisp, golden cannoli shells filled with smooth, sweetened ricotta, then you know that the star of this beloved Italian treat is really all about the shell. The magic lies in the perfect crunch combined with subtle hints of cinnamon and Marsala wine, creating a delicate balance of flavor and texture. This Homemade Cannoli Shells Recipe brings that tradition straight to your kitchen, inviting you to craft these irresistible shells from scratch. Once you master this recipe, the pride and joy of serving cannoli made entirely by you will be simply unbeatable.
Ingredients You’ll Need
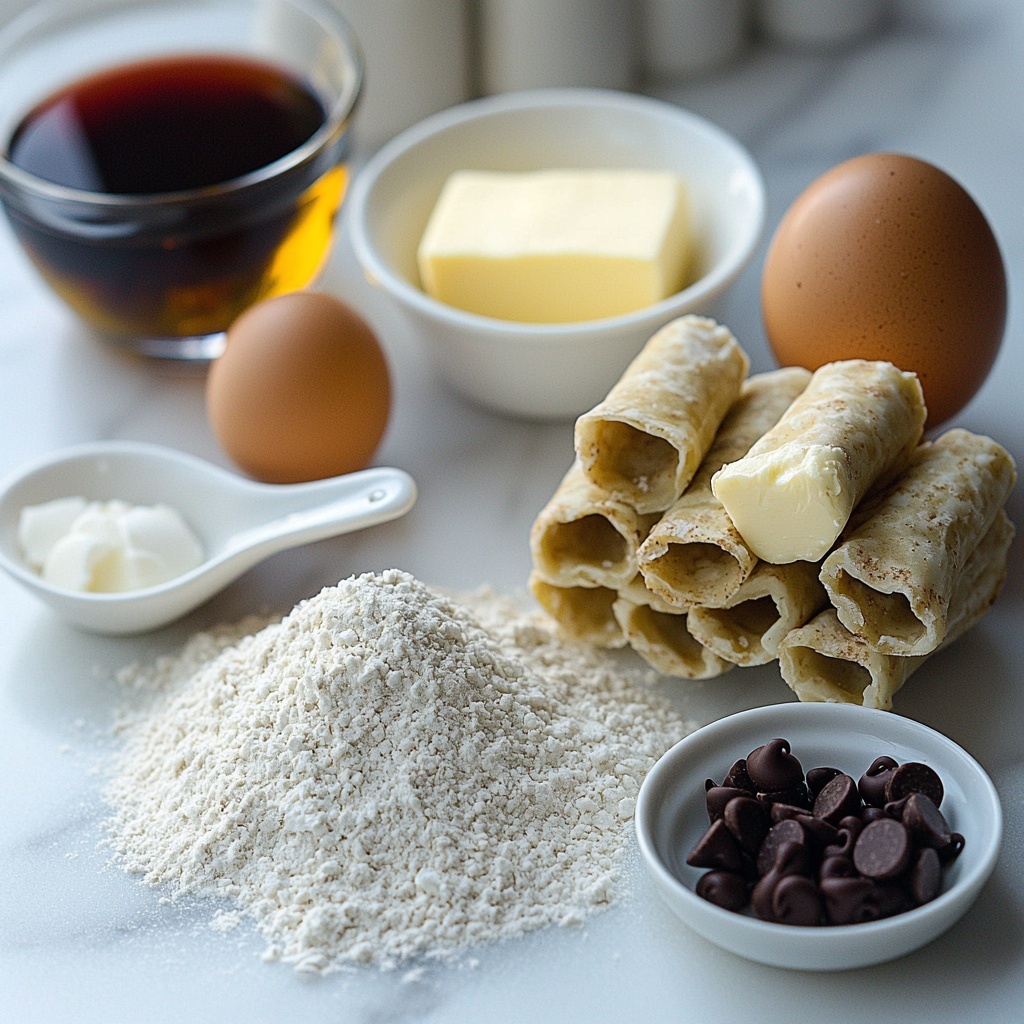
The beauty of this Homemade Cannoli Shells Recipe is that it uses simple, pantry-friendly ingredients, each chosen for its role in building flavor and texture. From the richness of butter to the warm touch of cinnamon and the moisture-binding powers of egg and Marsala wine, every element counts toward the perfect shell.
- 1 ½ cups all-purpose flour: Provides structure and the chewiness essential for that crisp texture.
- 2 Tablespoons granulated sugar: Adds just enough sweetness to balance the spices.
- ½ teaspoon ground cinnamon: Gives a warm, aromatic hint that’s classic in cannoli shells.
- Pinch salt: Enhances all the flavors and balances sweetness.
- 3 Tablespoons butter (cold and cut into 6 pieces): Creates flakiness and richness in the dough.
- 1 large egg: Binds the dough together and adds tenderness.
- 3 Tablespoons Marsala cooking wine (chilled): Adds authentic flavor and helps tenderize the dough.
- 1 large egg white: Used as a glue to seal the dough around the cannoli forms.
- Vegetable oil or peanut oil for frying: The high heat oil that crisps the shells evenly.
- 1 cup semi-sweet chocolate chips (melted): For dipping the ends, adding a luscious chocolate finish.
How to Make Homemade Cannoli Shells Recipe
Step 1: Preparing the Dough
Start by combining the flour, granulated sugar, cinnamon, and salt in a food processor. Add the cold, cubed butter next, pulsing until the mix looks like small pebbles—this little step helps build the flaky texture that’s so crucial to a good cannoli shell.
Step 2: Binding the Dough
Next, add the egg and chilled Marsala cooking wine, pulsing carefully just until the dough starts to hold together. Transfer it onto a floured surface and knead gently until smooth, about 3 to 4 minutes. The dough should feel soft but not sticky.
Step 3: Chilling the Dough
Wrap your dough tightly in plastic wrap and refrigerate it for at least one hour. This resting period lets the gluten relax, making your dough easier to roll and ensuring the shells stay crisp when fried.
Step 4: Rolling Out the Dough
Once chilled, lightly flour your work surface and rolling pin, then roll your dough as thin as you can manage—aim for about 1/8-inch thickness. Thin dough is key to that satisfying crunch.
Step 5: Cutting and Shaping
Use a 4-inch round cookie cutter to punch out circles, then gently stretch each into an oval about 5 inches long. Don’t worry about imperfections here; rustic shapes work beautifully. Keep gathering scraps, kneading, and cutting until you have 12 ovals ready.
Step 6: Preparing for Frying
Set aside the egg white in a small bowl—this will be your dough “glue.” Heat your chosen oil in a heavy-bottomed pot to between 350 and 380 degrees Fahrenheit. A candy thermometer helps keep the temperature steady for perfect frying.
Step 7: Wrapping the Shells
Wrap each dough oval snugly around a cannoli form or a 1-inch-diameter wooden dowel. Brush one end with egg white, then fold and press the other end over it to seal securely. This step creates that classic tubular shape essential to cannoli.
Step 8: Frying to Perfection
Using tongs, gently lower the wrapped dough into the hot oil. Fry for 2 to 3 minutes, turning carefully to get an even golden brown. Move the cooked shells to a paper towel-lined plate to drain excess oil and cool.
Step 9: Removing the Forms
When the shells are cool enough to handle, carefully slide the molds out—if you wait too long, the shell may stick or crack. Repeat frying in batches until all your shells are done.
Step 10: Adding the Chocolate Finish
Dip the cooled ends of each cannoli shell into melted semi-sweet chocolate, then let them dry completely. This luscious touch not only adds flavor contrast but also seals the edges, helping to keep the shells crisp once filled.
How to Serve Homemade Cannoli Shells Recipe
Garnishes
Once your homemade shells are filled with your favorite fillings—usually a sweet ricotta mixture—you can decorate the ends with chopped pistachios, mini chocolate chips, or candied orange peel. These garnishes add texture and bursts of flavor that elevate your dessert to the next level.
Side Dishes
Pair your cannoli with a cup of robust espresso or a creamy cappuccino to complement their sweetness. For a larger dessert spread, serve alongside fresh fruit or a light almond biscotti to round out the Italian-inspired experience.
Creative Ways to Present
Try serving your cannoli in a rustic wooden box lined with parchment paper for a charming homemade vibe, or elegantly stand them upright in a glass filled with sugar or beans to display the beautiful chocolate-dipped ends. No matter how you style them, these shells can really wow your guests!
Make Ahead and Storage
Storing Leftovers
Because these shells are fried crisp, it’s best to keep them airtight at room temperature for up to two days. Moisture is their enemy, so a sealed container keeps them crunchy and ready for filling when you need.
Freezing
If you want to save these delightful Homemade Cannoli Shells Recipe for longer, you can freeze them in an airtight container for up to a month. Just be sure to bring them back to room temperature before filling, so they don’t crack or lose that perfect snap.
Reheating
To revive slightly softened shells, place them on a baking sheet in a preheated 300-degree oven for 5 to 7 minutes. This brings back their crispness without overcooking or burning them.
FAQs
Can I use a substitute for Marsala wine?
Absolutely! While Marsala is traditional and adds a unique depth, you can substitute dry white wine, sherry, or even apple juice if you prefer a non-alcoholic option. Just keep it chilled and in the same quantity to keep the dough’s texture intact.
What can I use if I don’t have cannoli molds?
You can fashion your own molds using smooth wooden dowels or even metal tubes meant for rolling. Just make sure they’re about 1 inch in diameter and smooth to avoid tearing the dough.
How thin should I roll the dough?
Rolling the dough to about 1/8 inch thick is ideal—thin enough for crunch but thick enough to hold its shape when frying. If it’s too thick, the shells might be doughy; if too thin, they can burn or tear easily.
Why do my shells sometimes crack after frying?
Cracking often happens if the dough is too dry or the oil isn’t hot enough. Make sure the dough is nicely pliable, and the oil temperature remains between 350 and 380 degrees Fahrenheit for even frying and flexibility.
Can I prepare the shells in advance?
Yes! You can make and fry your shells several hours or even a day ahead of serving. Just keep them in an airtight container to maintain crispness, and wait to fill them until just before serving to prevent sogginess.
Final Thoughts
There’s nothing quite like the joy of biting into a crisp, golden cannoli shell that you made yourself, filled with your favorite indulgent filling. This Homemade Cannoli Shells Recipe opens the door to authentic, delicious Italian desserts right in your own kitchen. Once you try it, I promise you’ll be hooked on crafting these little crunchy tubes of happiness again and again. It’s time to roll up your sleeves and let these shells inspire your sweet creativity!
Print
Homemade Cannoli Shells Recipe
- Prep Time: 30 minutes
- Cook Time: 25 minutes
- Total Time: 55 minutes
- Yield: 12 cannoli shells
- Category: Dessert
- Method: Frying
- Cuisine: Italian
Description
This classic Italian recipe for Cannoli Shells delivers crisp, golden tubes perfect for filling with your favorite sweet ricotta filling. Made from a simple dough of flour, sugar, cinnamon, butter, egg, and Marsala wine, these shells are fried to perfection for an authentic crunchy texture. The ends dipped in melted chocolate add an indulgent finishing touch.
Ingredients
Dough
- 1 ½ cups all-purpose flour
- 2 Tablespoons granulated sugar
- ½ teaspoon ground cinnamon
- Pinch salt
- 3 Tablespoons butter (cold and cut into 6 pieces)
- 1 large egg
- 3 Tablespoons Marsala cooking wine (chilled)
Assembly & Frying
- 1 large egg white
- Vegetable oil or peanut oil for frying
- 1 cup semi-sweet chocolate chips (melted)
Instructions
- Prepare the dough base: Combine the flour, sugar, cinnamon, and salt together in a food processor. Add the cold butter pieces and pulse until the mixture resembles small pebbles, creating a crumbly texture.
- Form the dough: Add the egg and chilled Marsala wine to the processor and pulse just until the dough begins to come together. Transfer the dough to a floured surface and knead gently for 3-4 minutes until smooth.
- Chill the dough: Wrap the dough tightly in plastic wrap and refrigerate for at least 1 hour to relax the gluten and firm up the dough for easier rolling.
- Roll out the dough: Lightly flour your work surface and roll the dough as thin as possible, aiming for about 1/8-inch thickness to ensure crisp shells.
- Cut and shape: Use a 4-inch round cookie cutter to cut circles from the dough. Stretch each circle gently into a 5-inch oval shape. Gather and knead scraps to cut more ovals until you have a total of 12.
- Prepare frying setup: Place the egg white in a small bowl for sealing. Heat vegetable or peanut oil in a heavy-bottomed pot to 350-380°F (175-190°C). Line a large plate with paper towels for draining the fried shells.
- Wrap dough on molds: Loosely wrap each oval lengthwise around a cannoli form or a 1-inch diameter wooden dowel. Brush one edge with egg white, then fold the opposite edge over and press to seal firmly. Repeat until you have 4 shells ready to fry.
- Fry the shells: Using tongs, carefully lower the wrapped dough into the hot oil. Fry for 2-3 minutes, turning occasionally until the shells are evenly golden brown. Remove with tongs and place on paper towels to drain and cool.
- Repeat frying: Once the shells are cool enough to handle, gently slide the molds out to maintain the hollow shape. Continue frying remaining dough in batches until all 12 shells are cooked and cooled.
- Finish with chocolate: Dip the ends of each cooled cannoli shell into melted semi-sweet chocolate. Allow the chocolate to set and harden before filling and serving.
Notes
- Make sure the oil temperature stays between 350°F and 380°F for crispy, non-greasy shells.
- Refrigerating the dough is crucial for easy rolling and good texture.
- Use a light hand when stretching the dough circles into ovals to avoid tearing.
- If you don’t have cannoli forms, 1-inch diameter wooden dowels are a great substitute.
- Shells can be stored in an airtight container for several days and dipped in chocolate just before serving to maintain crispness.
