
If you have a craving for something crunchy, cheesy, and packed with rich, savory beef flavor, you are absolutely going to love this Crispy Beef and Cheese Chimichangas Recipe. This dish brings together tender, seasoned ground beef and gooey melted cheese wrapped in a golden, crisp tortilla, creating an irresistible combination that’s perfect for dinner, parties, or any time you want to treat yourself. The magic of these chimichangas lies not only in their crunchy texture but also in their easy preparation and bold, comforting flavors that everyone will adore.
Ingredients You’ll Need
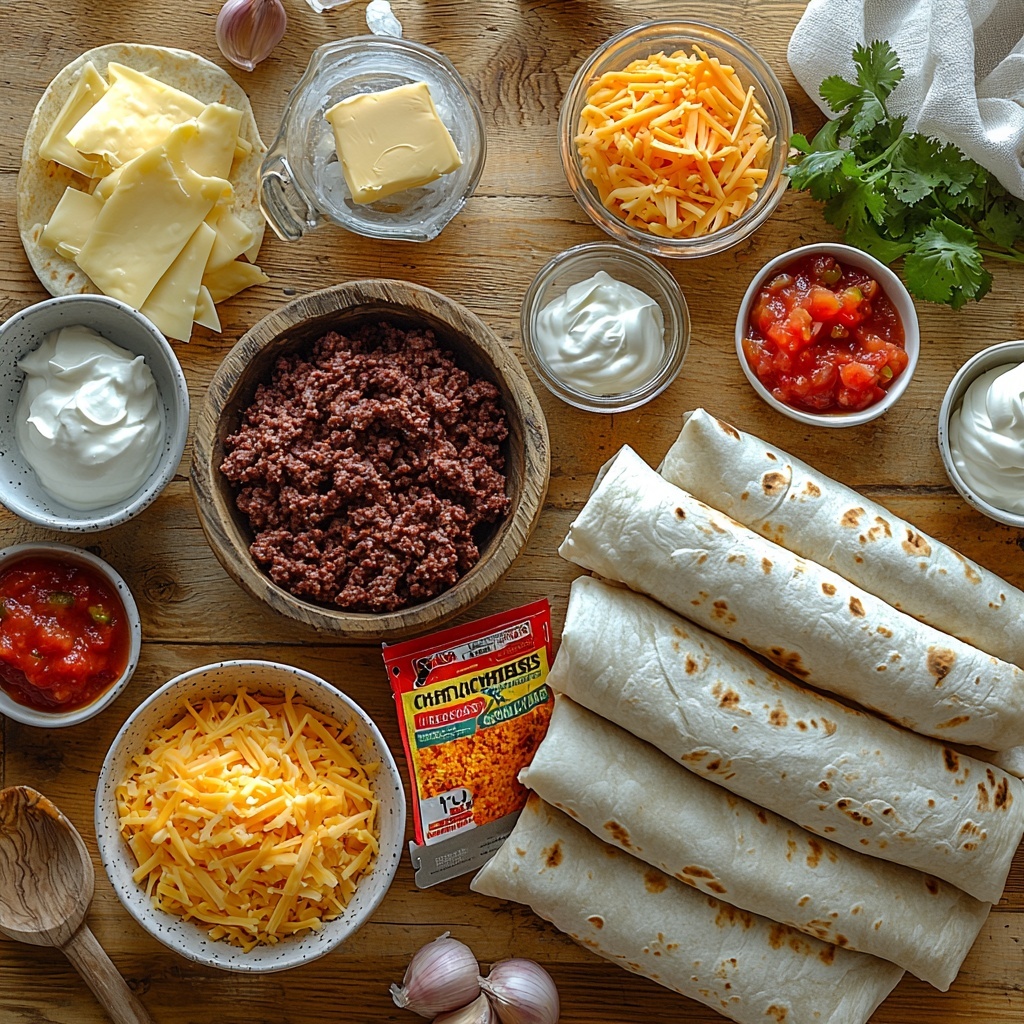
This Crispy Beef and Cheese Chimichangas Recipe is all about using simple, pantry-friendly ingredients that come together to create a flavor-packed filling and a perfectly crispy exterior. Each component plays its part — from the savory ground beef and aromatic onions to the melty cheeses and buttery brush on the tortillas, every ingredient adds a layer of texture and taste that elevates this dish.
- 1 lb ground beef: This forms the hearty base and main protein of the filling.
- 1/2 cup onion, finely chopped: Adds sweetness and depth to the beef mixture.
- 2 cloves garlic, minced: Provides a fragrant punch that complements the beef.
- 1 packet taco seasoning: Brings authentic Mexican spices that make the filling irresistibly flavorful.
- 1/2 cup water: Helps the seasoning blend evenly into the meat.
- 1 cup shredded cheddar cheese: For that sharp, melty cheesiness everyone loves.
- 1 cup shredded Monterey Jack cheese: Adds creamy, mild flavor and great meltability.
- 6 large flour tortillas: The wrappers that keep all your delicious filling inside while crisping up beautifully.
- 1/4 cup melted butter or vegetable oil: Used to brush the chimichangas for that stunning golden crunch.
- Sour cream, salsa, and chopped cilantro: Fresh and cool accompaniments to brighten every bite.
How to Make Crispy Beef and Cheese Chimichangas Recipe
Step 1: Brown the Ground Beef
Start by heating a skillet over medium heat and cooking the ground beef until it’s nicely browned. This step is key because browning develops deep flavors and ensures your filling isn’t bland. Once browned, drain off any excess fat to keep things from getting greasy.
Step 2: Sauté Onion and Garlic
Add finely chopped onions and minced garlic to the skillet with the beef. Cooking these together softens the onions and releases the garlic’s fragrant aroma, creating the perfect foundation for your filling.
Step 3: Season the Filling
Sprinkle the taco seasoning over the beef mixture, pour in half a cup of water, and stir well. Let this simmer for about 5 minutes, allowing the flavors to meld and the filling to thicken slightly for a perfect consistency.
Step 4: Add the Cheeses
Remove the skillet from heat and stir in the shredded cheddar and Monterey Jack cheeses while the mixture is hot. This melts the cheeses just enough, making the filling creamy and irresistible inside each chimichanga.
Step 5: Assemble the Chimichangas
Spoon a generous amount of the beef and cheese filling onto each flour tortilla. Fold in the sides and roll tightly. To keep everything inside during cooking, secure the edges with toothpicks if needed.
Step 6: Brush with Butter or Oil
Brush each wrapped chimichanga with melted butter or vegetable oil. This simple step ensures your chimichangas get that perfectly crisp, golden exterior either in the oven or the fryer.
Step 7: Cook Until Crispy and Golden
Bake the chimichangas at 400°F for 15-20 minutes, turning halfway through to ensure even crisping, or fry them in hot oil until they’re crisp and golden brown. Either way, you’ll end up with crunchy, savory chimichangas that are bursting with cheesy, beefy goodness.
Step 8: Serve and Enjoy
Once cooked, serve your chimichangas hot with sour cream, salsa, and fresh chopped cilantro. These toppings add a cool, zesty balance to the rich filling and crunchy shell, making each bite an absolute delight.
How to Serve Crispy Beef and Cheese Chimichangas Recipe
Garnishes
Simple garnishes like dollops of sour cream and vibrant salsa add fresh, tangy contrast to the hearty chimichangas. A sprinkle of chopped cilantro not only gives a pop of color but also brightens the flavors beautifully. Feel free to add sliced jalapeños or avocado slices for a little extra flair!
Side Dishes
Pair your chimichangas with a side of Mexican rice or refried beans to make the meal more complete and satisfying. A crisp green salad with lime dressing can provide a refreshing counterpoint to the deep, rich flavors of the dish.
Creative Ways to Present
For a fun twist, slice the chimichangas into bite-size portions for party platters, or serve them in individual cast-iron skillets for an impressive presentation. You can also try topping them with melted cheese and jalapeños post-baking for extra indulgence.
Make Ahead and Storage
Storing Leftovers
If you have leftovers, place the cooled chimichangas in an airtight container and store them in the refrigerator. They will stay fresh for up to 3 days, ready to be reheated without losing their crispiness.
Freezing
You can freeze assembled chimichangas before baking by wrapping each tightly in plastic wrap and then foil. Freeze for up to 2 months. When you’re ready to cook, bake them from frozen, adding a few extra minutes to the baking time.
Reheating
To keep that glorious crunch, reheat leftover or frozen chimichangas in the oven at 375°F rather than the microwave. A quick 10-15 minute bake will warm them through and revive the crisp exterior perfectly.
FAQs
Can I use a different type of cheese for this chimichangas?
Absolutely! While cheddar and Monterey Jack are classic choices for their meltiness and flavor, you can experiment with mozzarella, pepper jack for spice, or even a Mexican blend cheese to suit your taste.
Is it better to bake or fry chimichangas?
Both methods work beautifully. Frying gives you an ultra-crispy exterior with a bit more richness, while baking is a lighter option that still yields a nicely crisp crust — perfect if you want to keep things healthier.
Can I prepare the filling in advance?
Yes! The beef and cheese filling can be made a day ahead and refrigerated until you’re ready to assemble and cook the chimichangas. This makes it a great dish for busy weeknights or meal prepping.
What can I add to customize the filling?
Try adding chopped bell peppers, jalapeños, or even black beans to your filling for extra texture and flavor. You can also swap ground beef for ground chicken or turkey for a leaner option.
How do I prevent chimichangas from getting soggy?
The key is to ensure the filling is thick and not watery before assembling, and brushing the tortillas with butter or oil before cooking. Baking or frying at a high temperature also helps freeze that crisp exterior quickly.
Final Thoughts
This Crispy Beef and Cheese Chimichangas Recipe has quickly become one of my absolute favorites, and once you try it, I bet it will be for you too. It’s a deliciously satisfying dish that’s perfect for sharing, impressively flavorful, and surprisingly easy to make. Whether for a casual dinner or a fun gathering, these chimichangas bring warmth, comfort, and that perfect crunch that keeps everyone coming back for more. Give it a go and enjoy every crispy, cheesy bite!
Print
Crispy Beef and Cheese Chimichangas Recipe
- Prep Time: 10 minutes
- Cook Time: 25 minutes
- Total Time: 35 minutes
- Yield: 6 servings
- Category: Main Dish
- Method: Baking
- Cuisine: Mexican
Description
Deliciously crispy beef and cheese chimichangas combine seasoned ground beef, sautéed onions and garlic, and a blend of cheddar and Monterey Jack cheeses wrapped in large flour tortillas. Baked to golden perfection and served with sour cream, salsa, and fresh cilantro, these chimichangas make a satisfying Mexican-inspired meal perfect for family dinners or casual gatherings.
Ingredients
Beef Filling
- 1 lb ground beef
- 1/2 cup onion, finely chopped
- 2 cloves garlic, minced
- 1 packet taco seasoning
- 1/2 cup water
- 1 cup shredded cheddar cheese
- 1 cup shredded Monterey Jack cheese
Tortillas & Topping
- 6 large flour tortillas
- 1/4 cup melted butter or vegetable oil (for brushing)
- Sour cream, for serving
- Salsa, for serving
- Chopped cilantro, for garnish
Instructions
- Cook the Ground Beef: In a skillet over medium heat, cook the ground beef until it is fully browned, breaking it apart as it cooks. Once browned, drain any excess fat from the skillet to keep the filling from becoming greasy.
- Sauté Onion and Garlic: Add the finely chopped onion and minced garlic to the skillet with the beef. Cook, stirring occasionally, until the onions are softened and translucent, about 3-4 minutes, to build flavor.
- Season the Meat: Sprinkle the packet of taco seasoning over the beef mixture and pour in 1/2 cup of water. Stir well to combine and allow the mixture to simmer for 5 minutes, letting the flavors meld and liquid reduce slightly.
- Add the Cheeses: Remove the skillet from heat and stir in both the shredded cheddar and Monterey Jack cheeses until melted and fully incorporated into the beef filling.
- Assemble the Chimichangas: Lay out each large flour tortilla on a flat surface. Spoon a generous portion of the beef and cheese filling onto the center of each tortilla. Fold in the sides and roll tightly to enclose the filling, securing with toothpicks if necessary to hold the shape while baking.
- Brush with Butter or Oil: Lightly brush the outside of each rolled chimichanga with melted butter or vegetable oil. This will help the tortilla crisp up beautifully during baking.
- Bake the Chimichangas: Preheat the oven to 400°F (200°C). Place the prepared chimichangas on a baking sheet lined with parchment paper or a lightly greased rack. Bake for 15-20 minutes, turning halfway through, until they are golden brown and crispy on all sides. Alternatively, you can fry them in hot oil until golden and crisp if you prefer a more traditional method.
- Serve: Remove toothpicks if used, and serve the chimichangas hot, accompanied by sour cream, salsa, and a sprinkle of fresh chopped cilantro for an added burst of flavor and freshness.
Notes
- You can substitute the ground beef with ground turkey or chicken for a lighter option.
- For extra crispiness, fry the chimichangas in oil instead of baking.
- Use flour tortillas large enough to fully enclose the filling without tearing.
- Make sure to drain excess fat from the beef to avoid soggy chimichangas.
- Customize toppings by adding guacamole, diced tomatoes, or hot sauce as desired.


