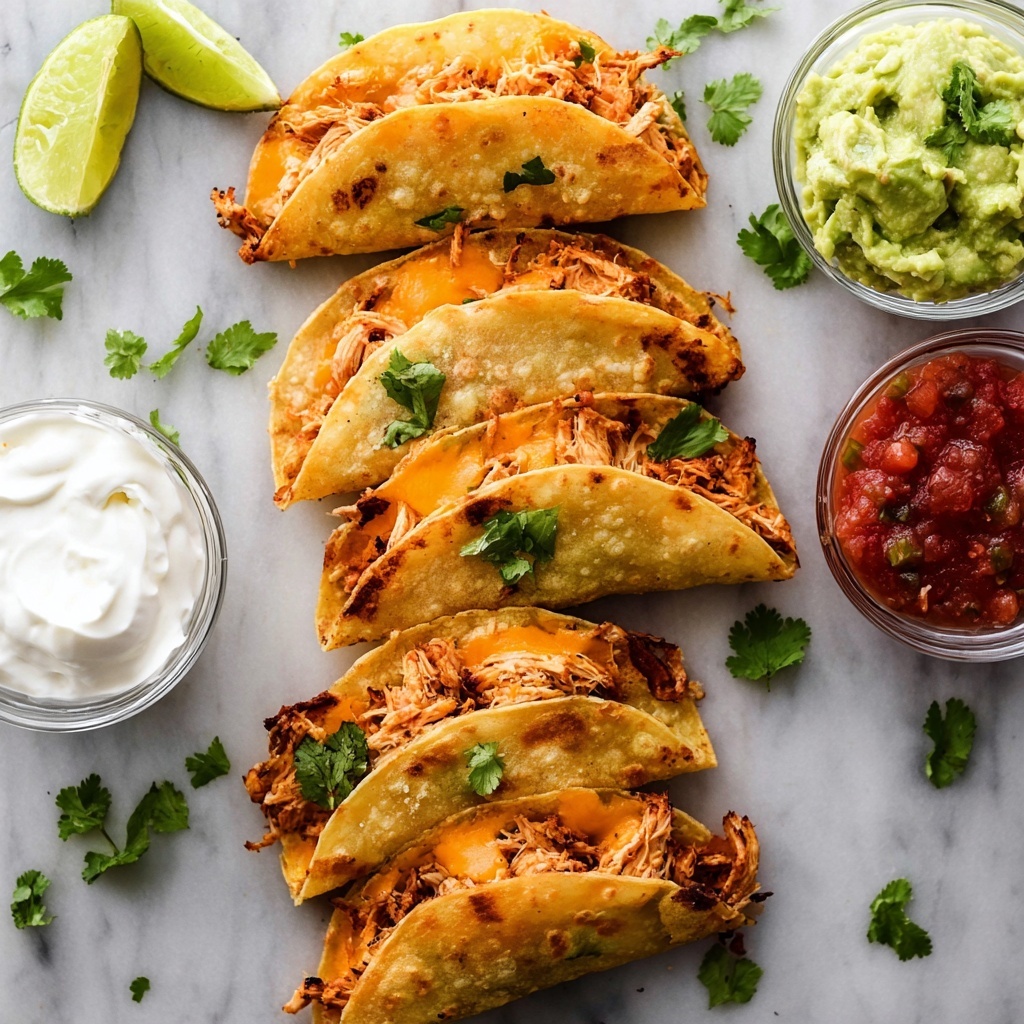
If you are searching for a vibrant, crowd-pleasing dinner idea that combines bold flavors with irresistible crunch, this Baked Chicken Tacos Recipe is exactly what you need. Perfectly crispy corn tortillas cradle tender, seasoned shredded chicken and a melty mix of Colby-jack and Pepper-Jack cheeses, creating a mouthwatering bite that’s easy to make and even easier to love. Whether you’re feeding a family or hosting friends, these tacos bring festive fun and satisfying comfort to any table.
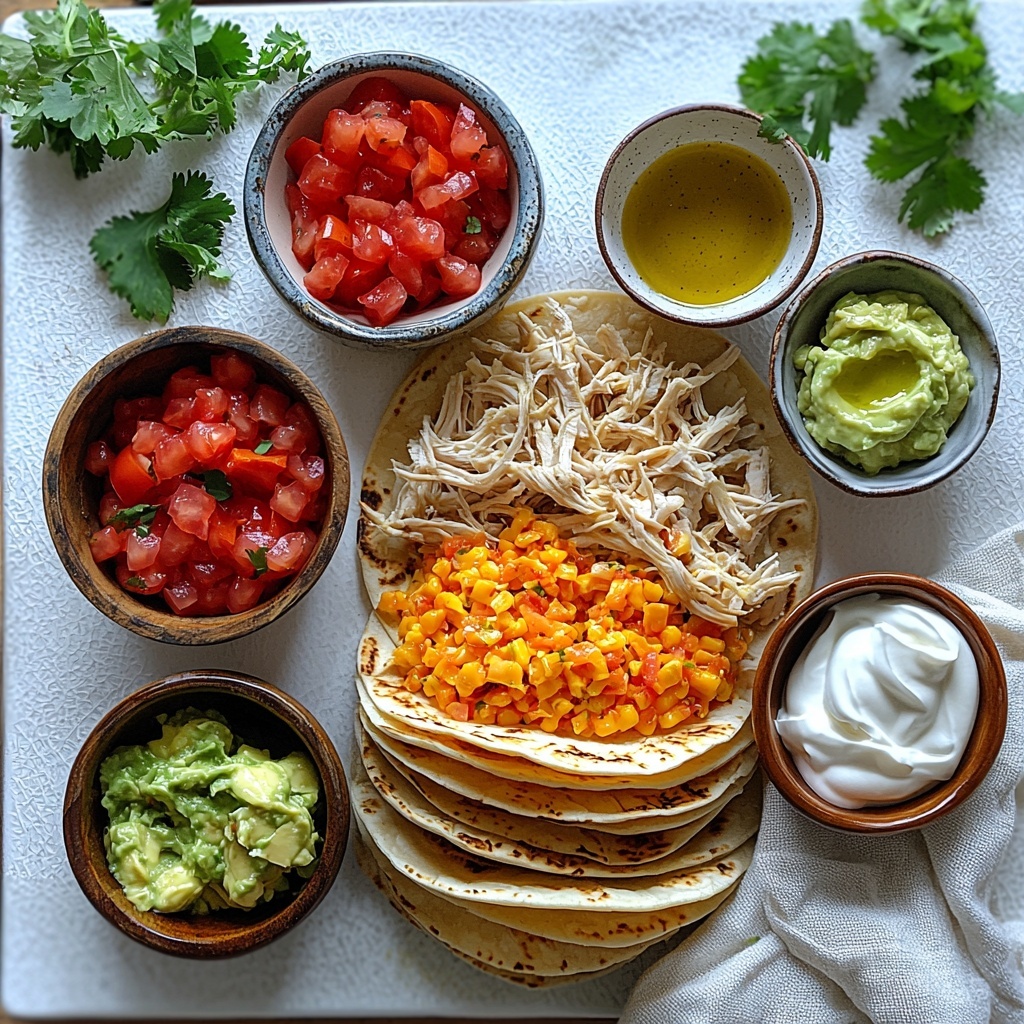
Ingredients You’ll Need
Simple ingredients make this Baked Chicken Tacos Recipe effortlessly delicious, allowing each component to shine. Every item on the list adds a unique layer of flavor, texture, or vibrant color to these outstanding tacos.
- 1 lb. cooked, seasoned shredded chicken: The hearty protein base that’s packed with savory flavor and perfectly tender texture.
- 1 ½ cups freshly grated Colby-jack cheese: A mild, creamy cheese that melts beautifully and complements the spicy kick of Pepper-Jack.
- 1 ½ cups freshly grated Pepper-Jack cheese: Adds a subtle spicy zing and gooey texture that elevates every bite.
- 20 street taco corn tortillas: These smaller tortillas crisp up fantastically in the oven and hold all the goodness together perfectly.
- Olive oil or olive oil cooking spray: Used to brush the tortillas, ensuring they bake to golden, crispy perfection without drying out.
- Salsa: A bright, tangy topping that adds freshness and balances the richness of the cheese and chicken.
- Diced tomato: Adds a juicy, colorful burst of flavor and texture as a classic taco topping.
- Guacamole: Creamy and rich, this brings coolness and an extra layer of lusciousness to the tacos.
- Sour cream: Adds a smooth, tangy finish that pairs beautifully with the spiced chicken and melted cheese.
- Cilantro: Fresh chopped cilantro brightens every bite with its herbaceous aroma and vibrant green hue.
How to Make Baked Chicken Tacos Recipe
Step 1: Prepare the Oven and Tortillas
Preheat your oven to 425 degrees Fahrenheit and line two large baking sheets with parchment paper—this keeps things clean and your tacos from sticking. Lay the corn tortillas flat on the sheets, then lightly brush both sides with olive oil or a quick spray of olive oil cooking spray. This step is crucial for achieving that perfect crispy texture on the tortilla once baked.
Step 2: Assemble Your Tacos
Place about two tablespoons of your cooked, seasoned shredded chicken right down the center of each tortilla. Next, crown the chicken with two heaping tablespoons of the combined freshly grated Colby-jack and Pepper-Jack cheeses. This cheese duo offers a smooth, melty chew with just the right amount of kick from the Pepper-Jack.
Step 3: Melt the Cheese
Pop the trays into the oven and bake for about 2 minutes—just long enough for that gorgeous cheese to melt perfectly. Keep an eye on them because you want that luscious melt without burning the tortillas.
Step 4: Fold and Crisp
Carefully remove the trays from the oven and gently fold each tortilla in half, pressing lightly so they hold their taco shape. Return them to the oven for another 12 to 14 minutes. This longer bake crisps up the corn tortillas to a satisfying crunch while heating everything through completely. This step makes all the difference in texture and flavor that defines the Baked Chicken Tacos Recipe.
How to Serve Baked Chicken Tacos Recipe
Garnishes
The toppings are where you can truly personalize these baked chicken tacos. Salsa adds a bright, zesty pop, while diced tomato brings a fresh juiciness. Creamy guacamole and sour cream create cooling contrasts to the warm, cheesy chicken inside. To finish, sprinkle with freshly chopped cilantro for a burst of herbal brightness and beautiful color.
Side Dishes
Keep it simple and complementary by serving these tacos alongside a fresh Mexican-style street corn salad or a crisp cabbage slaw. Black beans or cilantro-lime rice work well too, offering classic textures and flavors that round out the meal without overshadowing the star of the show—the tacos themselves.
Creative Ways to Present
If you want to impress at your next gathering, arrange the tacos standing upright in a baking dish or taco holder. Use colorful plates and small bowls for toppings, inviting everyone to customize their own. Another fun idea is to serve with a vibrant, festive side like quick pickled onions or jalapeño slices for those who love a bit of heat.
Make Ahead and Storage
Storing Leftovers
Once cooled, store any leftover baked chicken tacos in an airtight container in the refrigerator for 3-4 days. The crispy tortillas may soften slightly, but reheating will restore much of their crunch and freshness.
Freezing
To freeze leftover tacos, wrap them individually in foil or plastic wrap and place in a freezer-safe container or bag. They will keep well for up to 2 months. Thaw in the refrigerator overnight before reheating to preserve texture and flavor.
Reheating
For best results, reheat the tacos in a preheated 375-degree oven for about 10 minutes. This method crisps back up the tortilla while warming the chicken and cheese inside perfectly. Microwaving is quick but may yield softer shells, so use it if you’re short on time.
FAQs
Can I use flour tortillas instead of corn for this recipe?
While corn tortillas provide the best authentic flavor and crispiness that define this Baked Chicken Tacos Recipe, you can use flour tortillas if you prefer. Just note that flour tortillas may become softer and won’t crisp up quite the same way in the oven.
What kind of seasoning works best for the shredded chicken?
A mix of classic taco spices like cumin, chili powder, garlic powder, onion powder, and a touch of smoked paprika works wonderfully. You want the chicken to be flavorful but not overpower the cheese and toppings.
Can I prepare these tacos vegetarian style?
Absolutely! Swap the shredded chicken for seasoned roasted vegetables, black beans, or even a plant-based meat substitute. The cheese and crispy tortillas will still give you that satisfying taco experience.
Is it okay to assemble the tacos ahead of time before baking?
It’s best to assemble just before baking to keep the tortillas from getting soggy. However, you can prep your shredded chicken and grate the cheese up to a day ahead to streamline the cooking process.
What are some alternative toppings I can try?
Feel free to get creative with your toppings! Pickled jalapeños, shredded lettuce, radishes, chopped green onions, or even a drizzle of hot sauce can add exciting new flavors and textures to this classic Baked Chicken Tacos Recipe.
Final Thoughts
This Baked Chicken Tacos Recipe is a true crowd-pleaser that brings warmth, flavor, and crunch together effortlessly. The combination of tender, seasoned chicken and melty cheeses tucked into crisply baked tortillas is comfort food at its finest—and it is so easy to make! I can’t wait for you to try it and make it a regular favorite in your kitchen.
Print
Baked Chicken Tacos Recipe
- Prep Time: 10 minutes
- Cook Time: 16 minutes
- Total Time: 26 minutes
- Yield: 20 servings
- Category: Main Course
- Method: Baking
- Cuisine: Mexican
Description
These Baked Chicken Tacos are a delicious and quick way to enjoy flavorful shredded chicken with melted cheese in crispy corn tortillas. Perfect for a casual meal or party snack, they are baked to a golden crisp and topped with your favorite fresh salsa, guacamole, sour cream, and cilantro for a mouthwatering taste experience.
Ingredients
Main Ingredients
- 1 lb. cooked, seasoned shredded chicken
- 1 ½ cups freshly grated Colby-Jack cheese
- 1 ½ cups freshly grated Pepper-Jack cheese
- 20 street taco corn tortillas
- Olive oil or olive oil cooking spray, for brushing or spraying
Toppings
- Salsa, to taste
- Diced tomato, to taste
- Guacamole, to taste
- Sour cream, to taste
- Fresh cilantro, chopped, to taste
Instructions
- Preheat Oven and Prepare Baking Sheets: Heat your oven to 425 degrees F (220 degrees C). Line two large baking sheets with parchment paper to prevent sticking and for easy cleanup.
- Prepare Tortillas: Lay the street taco corn tortillas flat on the prepared baking sheets. Lightly brush both sides of each tortilla with olive oil or spray them with olive oil cooking spray. This will help achieve a crispy texture once baked.
- Add Chicken and Cheese: Place approximately two tablespoons of the cooked, seasoned shredded chicken down the center of each tortilla. Top each with two heaping tablespoons of grated Colby-Jack and Pepper-Jack cheese combined. The cheese will melt nicely adding flavor and binding the taco together.
- Initial Bake: Bake the tortillas in the preheated oven for about 2 minutes, or until the cheese is melted and bubbly.
- Fold and Final Bake: Carefully remove the baking sheets from the oven. Gently fold each tortilla in half to form the taco shape, pressing slightly to keep them together without breaking. Return the tacos to the oven and bake for an additional 12 to 14 minutes or until the corn tortillas are crispy and golden on the outside.
- Serve and Garnish: Remove the baked chicken tacos from the oven and transfer to a serving platter. Garnish with salsa, diced tomato, guacamole, sour cream, and chopped fresh cilantro according to your taste. Serve immediately and enjoy your crispy, flavorful tacos!
Notes
- Use freshly grated cheese for better melting and flavor.
- If you prefer softer tacos, reduce the final baking time slightly.
- You can substitute street taco corn tortillas with small flour tortillas if preferred, though texture will differ.
- Season the shredded chicken prior to use with your favorite taco spices for enhanced flavor.
- These tacos are best enjoyed fresh out of the oven for optimal crispiness.


