
If you have a soft spot for the iconic duo of chocolate and peanut butter, then you are in for an absolute treat with this Homemade Reese’s Peanut Butter Cups Recipe. This delightful recipe captures the magic of those classic peanut butter cups we all adore, but with the warmth and satisfaction that comes from making them right in your own kitchen. Creamy peanut butter meets silky, melted chocolate, creating an irresistible combination that is both nostalgic and downright delicious. Perfect for sharing, gifting, or savoring on your own, these homemade cups will quickly become a beloved favorite whenever you need a sweet pick-me-up or a special homemade gift.
Ingredients You’ll Need
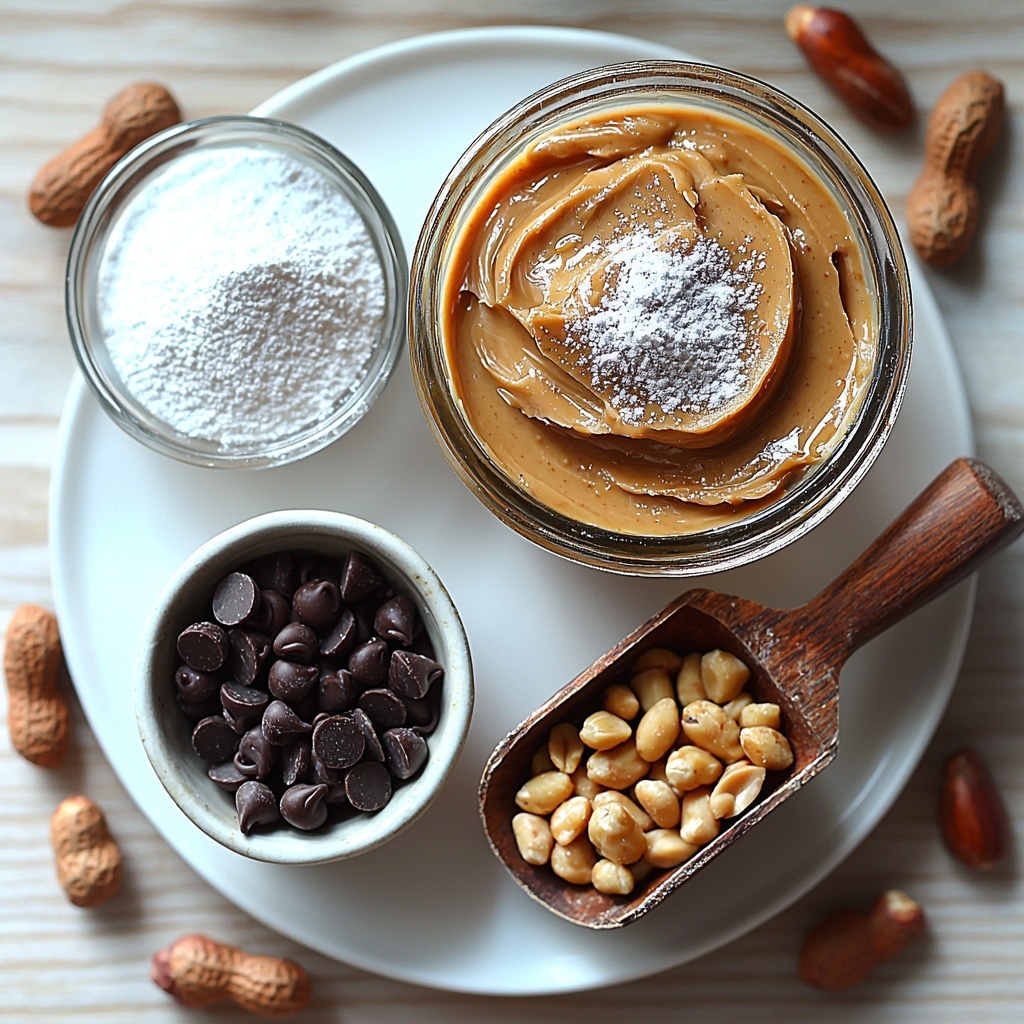
Creating these Homemade Reese’s Peanut Butter Cups is wonderfully simple, calling for just a handful of pantry staples that blend together for incredible flavor and texture. Each ingredient plays a vital role: creamy peanut butter gives the luscious, nutty center; powdered sugar adds subtle sweetness and structure; vanilla extract enhances the overall flavor; and rich chocolate chips wrap everything up in that smooth, melt-in-your-mouth chocolate coating.
- 1 cup creamy peanut butter: Use a smooth variety for the most luscious, creamy filling that melts on your tongue.
- 1/4 cup powdered sugar: Adds sweetness and helps to thicken the peanut butter filling while keeping it silky.
- 1/2 teaspoon vanilla extract: Enhances the depth of flavor with warm, fragrant notes.
- 1 1/2 cups chocolate chips: Choose good-quality semi-sweet or milk chocolate for the perfect balance of sweetness.
- Optional: 1/4 cup chopped peanuts for topping: Adds a delightful crunch and extra peanutty flavor on top.
How to Make Homemade Reese’s Peanut Butter Cups Recipe
Step 1: Mix the Peanut Butter Filling
Start by combining the creamy peanut butter, powdered sugar, and vanilla extract in a mixing bowl. Stir everything together until you get a smooth and thick filling that’s easy to spread but still rich and creamy. This mixture is the heart of your peanut butter cups and sets the perfect base for that sweet and nutty flavor.
Step 2: Melt the Chocolate
Melt the chocolate chips gently using a microwave-safe bowl or a double boiler, stirring frequently to ensure a smooth melt without scorching. The chocolate should be glossy and silky, ready to envelop your peanut butter filling in a luscious chocolate shell.
Step 3: Prepare the Muffin Tin
Line a muffin tin with cupcake liners or, if you prefer, silicone molds for easy removal. These’ll hold your peanut butter cups perfectly as they set and keep everything tidy while you build your layers.
Step 4: Create the Chocolate Base Layer
Pour a spoonful of melted chocolate into each liner, swirling it around to cover the bottom evenly. This step forms the sturdy chocolate foundation that supports the peanut butter filling; make sure the layer isn’t too thin or too thick for the ideal balance.
Step 5: Add the Peanut Butter Layer
Spoon the peanut butter mixture over the hardened chocolate bottom, spreading it evenly with the back of the spoon or a small spatula. Think of this as the creamy, dreamy center everyone loves — it’s the perfect contrast to the chocolate shell.
Step 6: Seal with More Chocolate
Cover the peanut butter layer with another generous spoonful of melted chocolate, smoothing it out to seal in all that peanut butter goodness. This top layer ensures your cups come together in a beautiful, chocolatey package that’s sturdy and luscious.
Step 7: Add Optional Toppings
If you love a little extra texture and crunch, sprinkle chopped peanuts on top while the chocolate is still warm. This little touch adds dimension and a bit of rustic charm to your homemade cups.
Step 8: Chill Until Firm
Refrigerate your cups for about 30 minutes, allowing the chocolate to harden completely. Once firm, they’re ready to be enjoyed, packed up for gifting, or stored for later indulgence.
How to Serve Homemade Reese’s Peanut Butter Cups Recipe
Garnishes
Serve these peanut butter cups as is, or dress them up with a light dusting of cocoa powder, a drizzle of white chocolate, or a pinch of flaky sea salt to elevate their appearance and deepen the flavor contrast. Garnishes are optional but can add a touch of elegance to these already irresistible treats.
Side Dishes
While these cups can shine as a standalone sweet, they also pair beautifully with a cold glass of milk, a scoop of vanilla ice cream, or even alongside a warm cup of coffee or hot chocolate for a cozy, decadent snack experience.
Creative Ways to Present
For parties or gift-giving, consider arranging the peanut butter cups in decorative boxes or wrapping them individually in festive foil. Using silicone molds shaped like hearts or stars adds fun shapes to the mix, perfect for holidays or special occasions where presentation makes all the difference.
Make Ahead and Storage
Storing Leftovers
Keep your Homemade Reese’s Peanut Butter Cups Recipe treats fresh by storing them in an airtight container in the refrigerator. They will stay delicious and firm for up to 3-4 days, making it easy to enjoy your homemade goodies throughout the week.
Freezing
If you want to keep these peanut butter cups longer, they freeze wonderfully. Place them in a freezer-safe container with parchment paper between layers to prevent sticking, and freeze for up to one month. Thaw in the fridge before serving for best texture.
Reheating
Since these are best enjoyed chilled, reheating is generally unnecessary. However, if the chocolate becomes too firm, you can let them sit at room temperature for a few minutes to soften slightly before indulging.
FAQs
Can I use crunchy peanut butter instead of creamy?
Absolutely! Using crunchy peanut butter will add an extra layer of texture with delightful little peanut bits, but the filling might be slightly less smooth. Both options are delicious, so choose based on your preference.
Is it necessary to refrigerate the peanut butter cups?
Refrigeration helps the chocolate set properly and keeps the peanut butter filling firm. While you can store them at room temperature for a short period in cooler climates, refrigerating for 3-4 days is best for optimal texture and freshness.
Can I substitute the powdered sugar with regular granulated sugar?
Powdered sugar dissolves more easily, ensuring a smooth filling without graininess. Granulated sugar might not blend as well and could create a gritty texture, so it’s best to stick with powdered sugar for this recipe.
What kind of chocolate works best for these peanut butter cups?
High-quality semi-sweet or milk chocolate chips work beautifully, offering a perfect balance of sweetness that complements the peanut butter. Dark chocolate can be used if you prefer a richer, slightly bitter contrast.
How do I prevent the chocolate from seizing during melting?
Melting chocolate slowly over low heat or microwaving in short bursts with frequent stirring helps prevent seizing. Avoid letting any water come into contact with the chocolate, as moisture causes it to seize and become grainy.
Final Thoughts
Making this Homemade Reese’s Peanut Butter Cups Recipe is not just about satisfying your sweet tooth; it’s about creating a little joy and magic right in your own kitchen. The simple ingredients come together to deliver a perfect balance of creamy, crunchy, sweet, and chocolatey that brings smiles every time. Go ahead, dive in, and share these delightful treats with loved ones — once you taste homemade, it’s hard to go back!
Print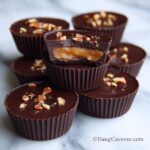
Homemade Reese’s Peanut Butter Cups Recipe
- Prep Time: 10 mins
- Cook Time: 10 mins
- Total Time: 40 mins
- Yield: 12 servings
- Category: Dessert
- Method: No-Cook
- Cuisine: American
Description
Homemade Reese’s Peanut Butter Cups are a delightful, easy-to-make treat combining creamy peanut butter and rich chocolate in perfect harmony. This recipe recreates the classic candy at home with simple ingredients, producing delicious individual cups that are perfect for snacking or gifting.
Ingredients
Peanut Butter Filling
- 1 cup creamy peanut butter
- 1/4 cup powdered sugar
- 1/2 teaspoon vanilla extract
Chocolate Coating
- 1 1/2 cups chocolate chips
- Optional: 1/4 cup chopped peanuts for topping
Instructions
- Prepare Peanut Butter Mixture: In a mixing bowl, combine the creamy peanut butter, powdered sugar, and vanilla extract. Mix thoroughly until smooth and well incorporated, forming a sweet and creamy filling.
- Melt Chocolate: Place chocolate chips into a microwave-safe bowl or prepare a double boiler on the stove. Melt the chocolate chips gently, stirring frequently until fully melted and smooth, ensuring no lumps remain.
- Line Muffin Tin: Line a standard muffin tin with cupcake liners or use silicone molds to prevent sticking and to shape your peanut butter cups.
- Form Chocolate Base: Pour some of the melted chocolate into each lined mold to cover the bottom completely. Use a spoon to spread it evenly. This forms the chocolate base layer.
- Add Peanut Butter Layer: Spoon an even layer of the prepared peanut butter mixture onto the chocolate base in each mold. Spread gently to cover the chocolate layer without mixing them.
- Seal with Chocolate: Pour the remaining melted chocolate over the peanut butter layer, covering it entirely to seal the cup. Spread evenly to the edges for a smooth finish.
- Add Toppings (Optional): If desired, sprinkle chopped peanuts on top of each cup for added texture and flavor.
- Chill to Set: Place the muffin tin in the refrigerator for about 30 minutes or until the peanut butter cups are firm and the chocolate has fully hardened.
Notes
- Use creamy peanut butter for a smooth filling.
- Adjust powdered sugar for desired sweetness.
- To melt chocolate without a microwave, use a double boiler method.
- Line muffin tins with parchment or silicone liners for easy removal.
- Store peanut butter cups in an airtight container in the refrigerator.
- For a richer chocolate flavor, use dark chocolate chips.
- Can be kept in the refrigerator for up to two weeks.
