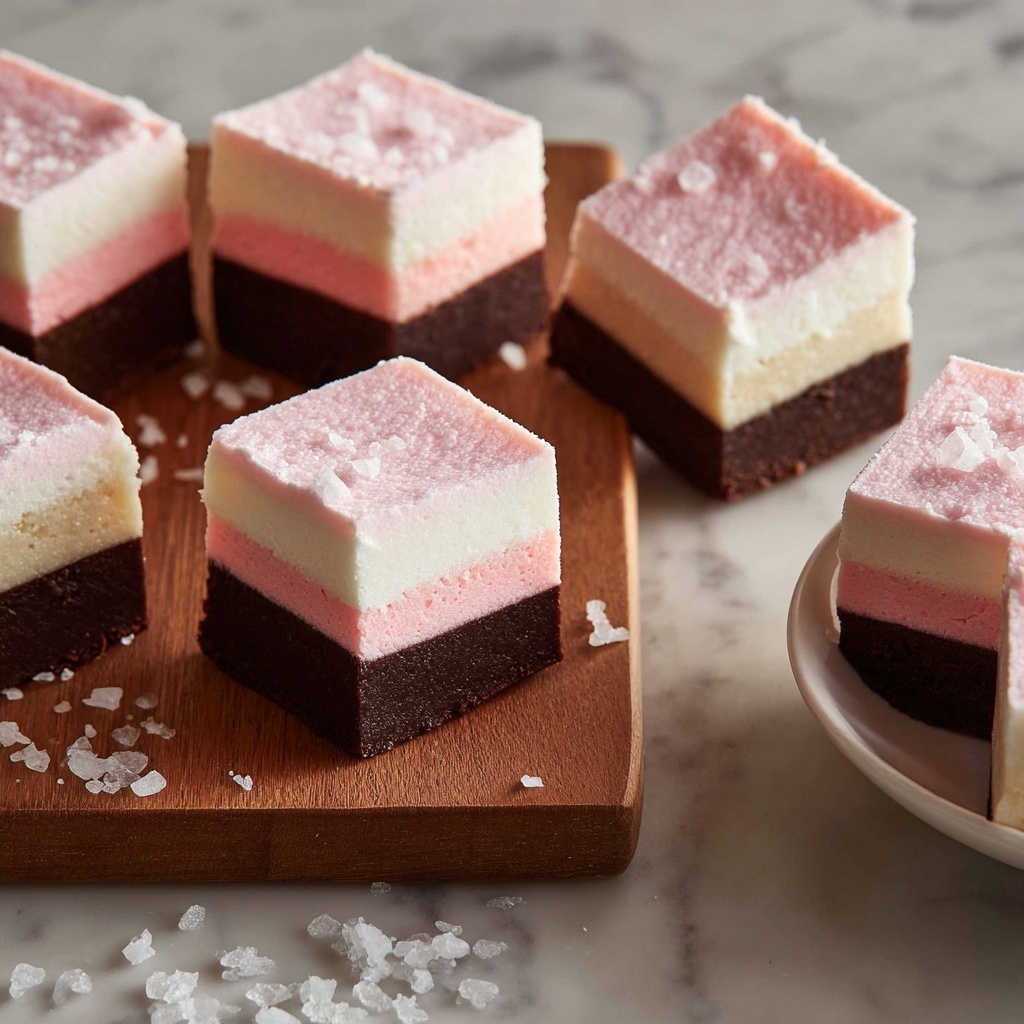
If you have a passion for rich, indulgent treats that combine the best of classic flavors into one perfect bite, then get ready to meet your new favorite dessert. The Brownie Neapolitan Fudge (No-Bake Layered Fudge) Recipe is a luscious, multi-layered delight that brings together chocolate, vanilla, and strawberry in smooth, creamy layers atop a crunchy cookie crust. This no-bake wonder is as simple to make as it is stunning to serve, showcasing a perfect balance of textures and flavors that will impress family and friends alike. Let me take you step-by-step through this irresistible dessert that’s sure to become a staple in your recipe collection.
Ingredients You’ll Need
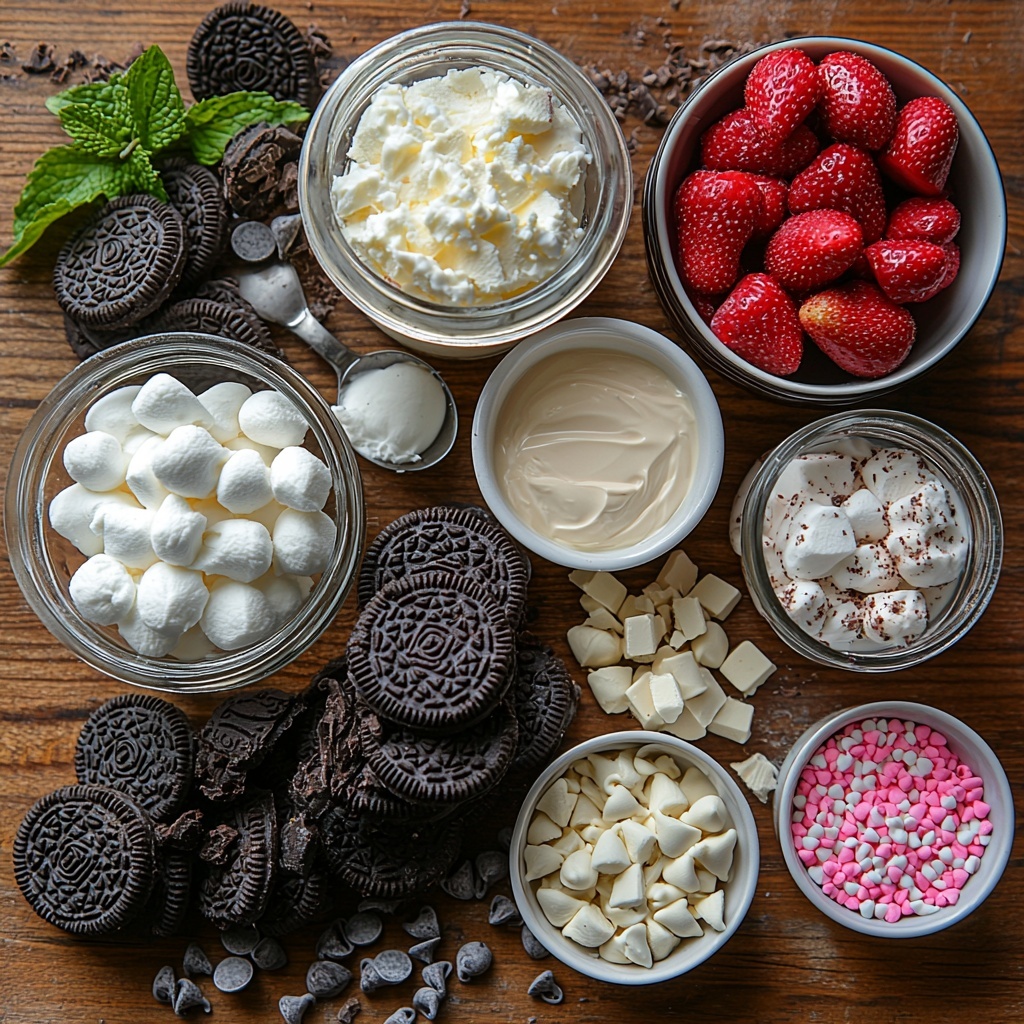
Each ingredient in this recipe plays a key role, with simple pantry staples coming together to create an extraordinary taste and texture experience. From the crunchy cookie crust to the velvety fudge layers, every component contributes to the final masterpiece.
- Oreo cookies (24 or about 2 ½ cups cookie crumbs): The base’s crisp texture and chocolate flavor perfectly anchor the fudge layers.
- Unsalted butter (6 tablespoons for crust + 1 cup total for fudge): Adds rich creaminess and helps bind the crust and fudge layers.
- White chocolate chips (4 cups): The star of the fudge layers, providing sweetness and smoothness in both vanilla and strawberry parts.
- Sweetened condensed milk (1 1/3 cups): Gives the fudge its classic creamy, dense texture that melts in your mouth.
- Marshmallow crème (2 jars, 7 oz each): Adds a fluffy, airy texture and helps the layers set perfectly.
- Strawberry extract (1 teaspoon): Delivers that authentic fruity flavor to the pink fudge layer without overpowering.
- Pink gel food coloring (optional): For a more vibrant strawberry layer, a little goes a long way for visual wow factor.
- Optional toppings (mini chocolate chips, crushed cookies, sprinkles): Fun and festive ways to add texture and color when serving.
How to Make Brownie Neapolitan Fudge (No-Bake Layered Fudge) Recipe
Step 1: Prep the Pan
Start by lining a 9×9-inch pan with parchment paper, making sure to leave an overhang on two sides for easy fudge removal later. Lightly spray the paper if you want extra non-stick assurance—this simple step will save you from any sticky situations down the line and keep the layers perfectly intact.
Step 2: Make the Crust
Next up, crush your Oreo cookies finely—this crumbly texture forms the sturdy yet crunchy foundation of the fudge. Mix the cookie crumbs with melted butter until every bit is evenly moistened. Press this mixture down firmly in the prepared pan, creating a uniform base that will hold up beautifully under the creamy fudge layers. Pop this in the fridge to chill while you whip up the layers.
Step 3: Make the Vanilla Fudge Layer
In a saucepan set to low heat, gently combine white chocolate chips, butter, and sweetened condensed milk. Stir continually so everything melts evenly without burning; patience here ensures a luscious, silky finish. Once smooth, remove from heat and fold in the marshmallow crème until perfectly blended. Pour this dreamy vanilla layer over the chilled crust, smoothing the top with a spatula. Chill this layer for about 15 to 20 minutes so it firms a bit before you add the next.
Step 4: Make the Strawberry Fudge Layer
Repeat the melting process with the same ingredients—white chocolate, butter, and condensed milk—in a clean saucepan. After melting and stirring to smoothness, remove from heat and mix in the marshmallow crème. Now, stir in the strawberry extract, which lends a delicate berry flavor without any artificial taste. For a pop of color, add a few drops of pink gel food coloring until the shade is just right. Gently pour this strawberry fudge over the vanilla layer and smooth the surface. Now your Brownie Neapolitan Fudge (No-Bake Layered Fudge) Recipe is nearly complete!
Step 5: Chill and Slice
Place the pan back into the fridge for at least two to three hours to let the fudge set completely firm. When ready, use the parchment overhang to lift it out in one clean piece. Using a sharp knife, cut into small, neat squares—wiping the blade between each cut helps keep those beautiful layered edges crisp and distinct. These bite-sized treats are perfect for sharing or savoring all by yourself.
How to Serve Brownie Neapolitan Fudge (No-Bake Layered Fudge) Recipe
Garnishes
Sprinkle mini chocolate chips, crushed Oreo cookie crumbs, or bright sprinkles on top just before the fudge sets for extra texture and a playful pop of color. A light dusting of powdered sugar can also add a pretty, snowy finish that contrasts beautifully with the vibrant pink strawberry layer.
Side Dishes
This fudge pairs wonderfully with fresh berries, whipped cream, or even a scoop of vanilla ice cream if you want to turn it into an indulgent dessert plate. The cold cream cuts the richness while complementing the Neapolitan flavors perfectly.
Creative Ways to Present
For parties or gift-giving, try cutting the fudge into fun shapes using cookie cutters. Or arrange bite-sized squares on a decorative platter with colorful doilies and edible flowers to wow your guests visually as well as with taste. Adding a drizzle of melted dark chocolate over the top just before serving also amps up the richness and looks stunning.
Make Ahead and Storage
Storing Leftovers
Keep your leftover Brownie Neapolitan Fudge (No-Bake Layered Fudge) Recipe in an airtight container in the refrigerator, where it will stay fresh for up to one week. This way, you can snack on small pieces anytime without any worry about it drying out or losing flavor.
Freezing
Want to save this treat for a later occasion? Wrap the fudge tightly in plastic wrap and foil, then freeze in a sealed container. It will hold beautifully for up to two months. Thaw overnight in the fridge before slicing, and the texture will remain creamy and delicious.
Reheating
This fudge is best enjoyed chilled or at room temperature. If you prefer a softer texture, let pieces sit at room temperature for about 15 minutes before serving. Avoid microwaving as it can soften the layers too much and lose that classic fudge bite.
FAQs
Can I use other cookies besides Oreos for the crust?
Absolutely! While Oreos give a familiar rich chocolate base, you can experiment with graham crackers, chocolate wafers, or even biscotti crumbs. Just be sure to finely crush and mix with butter for the best crust consistency.
Is it necessary to use marshmallow crème in this recipe?
Yes, the marshmallow crème gives the fudge its signature airy and smooth texture as well as helping the layers set perfectly. Substituting might change the texture, but you could try marshmallow fluff alternatives if needed.
Can I make this recipe vegan or dairy-free?
This recipe relies heavily on dairy ingredients like butter, condensed milk, and white chocolate. To make a vegan or dairy-free version, you’d need specialized substitutes, but it may alter the classic taste and texture. Experimentation is encouraged if you’re up for a challenge!
How do I get clean, neat layers when cutting the fudge?
Use a sharp knife and wipe it clean between cuts to avoid mixing the layers. Also, letting the fudge chill fully ensures firm layers that slice without smudging. Patience here really pays off!
Can I add other flavors to customize this fudge?
Definitely! The vanilla and strawberry layers offer a great base for experimentation. Try adding peppermint extract, orange zest, or even a hint of espresso powder to one layer for a unique twist that suits your taste buds.
Final Thoughts
There’s something undeniably joyful about the Brownie Neapolitan Fudge (No-Bake Layered Fudge) Recipe—a treat that’s both fun to make and truly delightful to eat. Its effortless assembly and stunning presentation make it a winning choice for any occasion, whether it’s a special celebration or just a sweet weekend pick-me-up. I can’t wait for you to try it yourself and experience every luscious, creamy, crunchy bite!
Print
Brownie Neapolitan Fudge (No-Bake Layered Fudge) Recipe
- Prep Time: 15 minutes
- Cook Time: 15 minutes
- Total Time: 3 hours 30 minutes
- Yield: 16 small squares
- Category: Dessert
- Method: Stovetop
- Cuisine: American
Description
This Brownie Neapolitan Fudge is a decadent, no-bake layered treat featuring a chocolate cookie crust, creamy vanilla fudge, and a strawberry fudge layer infused with strawberry extract and optional pink gel coloring. Perfectly sweet and smooth, this easy-to-make dessert is chilled to set, then sliced into bite-sized squares for a delightful multi-flavored fudge experience.
Ingredients
Chocolate Cookie Crust
- 24 Oreo cookies (or about 2 ½ cups cookie crumbs)
- 6 tablespoons unsalted butter, melted
Vanilla Fudge Layer
- 2 cups white chocolate chips
- ½ cup unsalted butter
- ⅔ cup sweetened condensed milk
- 1 jar (7 oz) marshmallow crème (marshmallow fluff)
Strawberry Fudge Layer
- 2 cups white chocolate chips
- ½ cup unsalted butter
- ⅔ cup sweetened condensed milk
- 1 jar (7 oz) marshmallow crème
- 1 teaspoon strawberry extract (adjust to taste)
- Pink gel food coloring (optional, for a stronger pink color)
Optional Toppings
- Mini chocolate chips
- Crushed cookies
- Sprinkles
Instructions
- Prep the pan: Line a 9×9-inch pan with parchment paper, leaving overhang on two sides to easily lift the fudge out once set. Lightly spray the parchment if you want extra insurance against sticking.
- Make the crust: Crush the Oreo cookies into fine crumbs. Mix the crumbs with the melted unsalted butter until evenly moistened. Press the mixture firmly and evenly into the bottom of the prepared pan. Place the pan in the refrigerator to chill while you prepare the fudge layers.
- Make the vanilla fudge layer: Using a saucepan over low heat, combine white chocolate chips, unsalted butter, and sweetened condensed milk. Stir constantly until the mixture is fully melted and smooth, taking care to keep the heat low to prevent scorching. Remove from heat and quickly stir in the marshmallow crème until well blended. Pour this vanilla fudge mixture evenly over the chilled crust and smooth the top with a spatula. Refrigerate the pan for 15–20 minutes to allow the vanilla layer to firm slightly before adding the next layer.
- Make the strawberry fudge layer: Clean the saucepan and repeat the melting process over low heat with white chocolate chips, unsalted butter, and sweetened condensed milk. Stir constantly until smooth and melted. Remove from heat, then stir in the marshmallow crème until fully blended. Mix in the strawberry extract and add pink gel food coloring a little at a time if desired for a brighter pink hue. Pour this strawberry fudge gently over the vanilla layer, smoothing the top carefully to avoid mixing layers.
- Chill and slice: Refrigerate the assembled fudge for at least 2–3 hours or until completely set and firm. Use the parchment paper overhang to lift the fudge out of the pan. Cut into small squares with a sharp knife, wiping the knife clean between cuts for neat layers. Optionally, sprinkle with mini chocolate chips, crushed cookies, or sprinkles before serving.
Notes
- Keep the heat low while melting chocolate to prevent scorching and ensure smooth fudge.
- Use parchment paper with overhang for easy removal of the fudge from the pan.
- Wipe the knife clean between cuts for clean, layered squares.
- Optional pink gel food coloring can be used to intensify the strawberry fudge color.
- Store the fudge in the refrigerator in an airtight container for up to a week.
- Add toppings like mini chocolate chips, crushed cookies, or sprinkles for extra texture and flavor.


