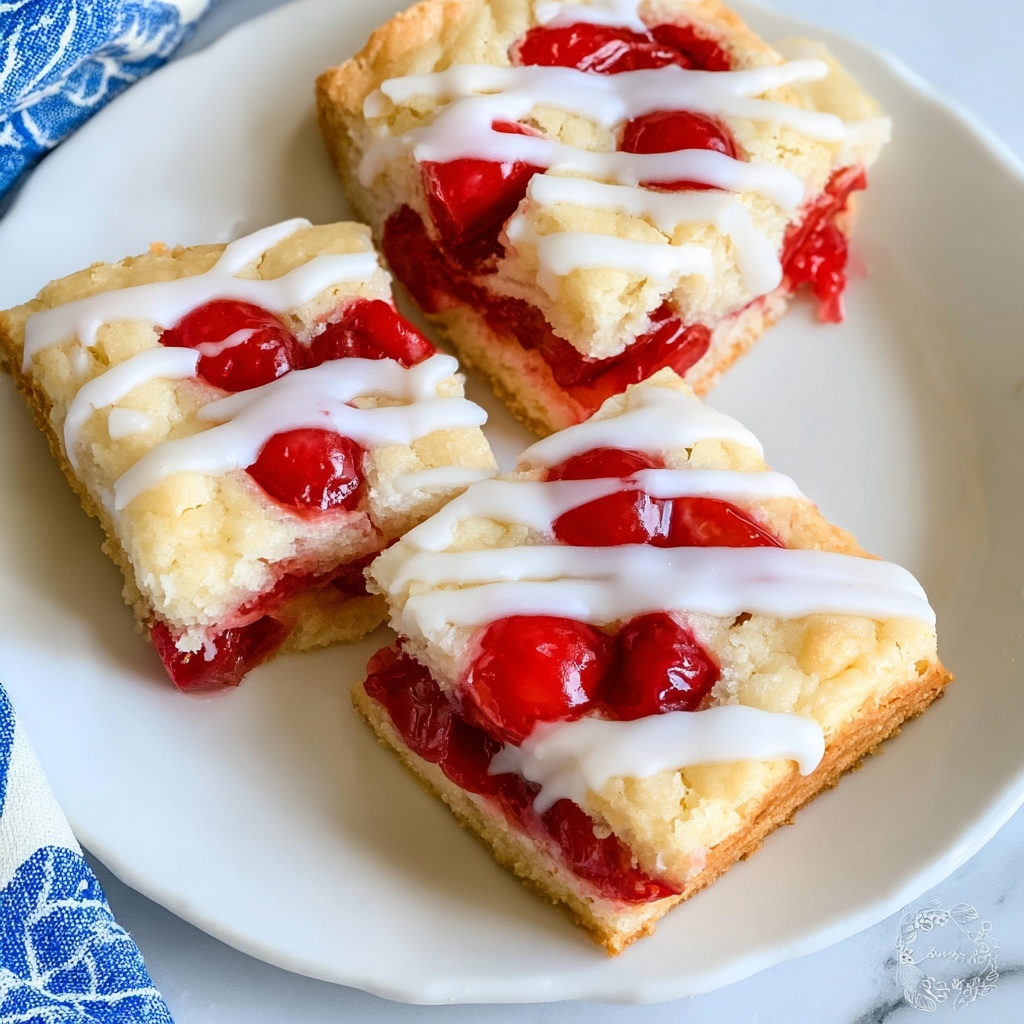
If you have a soft spot for cherry desserts that blend crumbly sweetness with juicy, tangy bursts of fruit, then this Cherry Pie Bars Recipe is about to become your new favorite treat. Imagine buttery, tender cookie dough layered with luscious cherry pie filling, finished with a simple yet irresistible glaze—all baked to golden perfection and cut into perfect squares that are as lovely to look at as they are to eat. These bars bring together the comfort of a classic cherry pie but in a quick, grab-and-go format that’s ideal for family gatherings, potlucks, or just a cozy night in. Trust me, once you try this Cherry Pie Bars Recipe, you’ll want to share it with everyone you know!
Ingredients You’ll Need
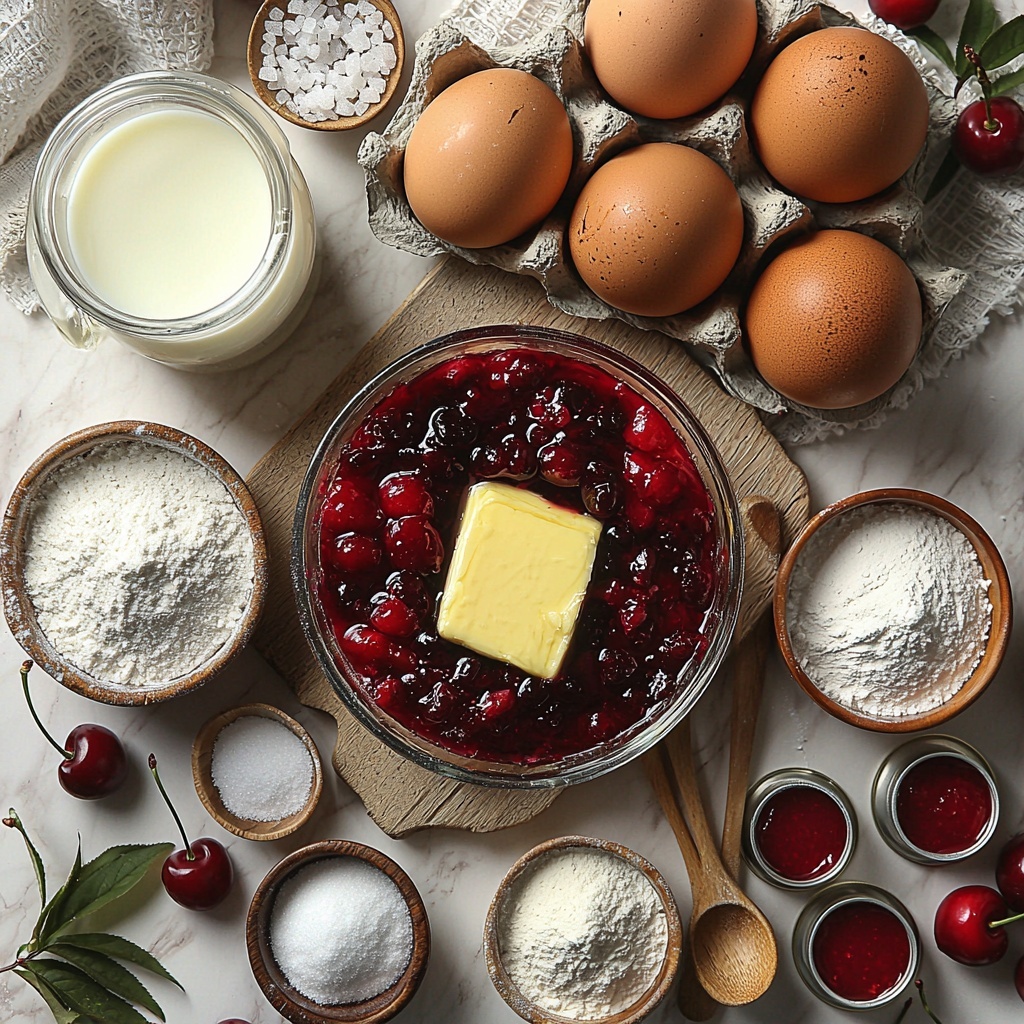
Simple, pantry-friendly ingredients come together effortlessly in this recipe, each playing a key role in creating the perfect balance of flavor, texture, and color. From rich butter that provides that melt-in-your-mouth quality to the bright cherry pie filling that bursts with juicy sweetness, every component matters.
- Butter (softened): The base for your dough, offering richness and tenderness with every bite.
- Sugar & Brown Sugar: A combo that sweetens the bars and adds subtle molasses depth from the brown sugar.
- Eggs: Bind everything together and contribute to a soft but structured texture.
- Milk: Adds moisture for a tender crumb; a little goes a long way.
- Vanilla & Almond Extracts: These extracts bring warmth and a hint of nutty sophistication to the flavor profile.
- Flour: The foundation of your dough, ensuring it holds shape and gives the bars a satisfying bite.
- Baking Powder & Salt: Help the bars rise slightly and balance all the sweetness.
- Cherry Pie Filling (canned): The star ingredient providing vibrant color and that unmistakably delicious cherry flavor.
- Powdered Sugar (for icing): A silky finish that complements the cherries perfectly.
How to Make Cherry Pie Bars Recipe
Step 1: Prepare Your Pan and Preheat
Get started by preheating your oven to 350°F and preparing a 9×13-inch baking dish. I find lining the dish with parchment paper to be a complete game-changer because it lets you lift the bars out easily when they’re baked and cooled. Plus, no sticking and less mess equals more joy.
Step 2: Make the Dough
In a large bowl, cream together the softened butter with both sugars until the mixture is light and fluffy—this step is key for a tender bar. Then, beat in the eggs one at a time, ensuring each is fully incorporated before adding the next. Stir in the milk along with the vanilla and almond extracts to bring a subtle depth of flavor. Finally, gently fold in the flour, baking powder, and salt just until combined; overmixing here could make the bars tough, and we definitely want them soft and yielding.
Step 3: Assemble Your Bars
Use about two-thirds of your dough to press evenly into the bottom of the pan. The dough will be soft, so damp fingers or a spatula make this step easier. Next, spoon the cherry pie filling evenly over the dough layer—this is where all the juicy flavor shines through. Finally, drop spoonfuls of the remaining dough over the cherries; don’t worry if it doesn’t cover everything because those pops of cherry peeking through are part of the charm.
Step 4: Bake to Golden Perfection
Pop your layered masterpiece in the oven and bake for 35 to 45 minutes. You’re looking for a lightly golden top that’s cooked through but still soft inside. Let the bars cool completely in the pan—this step helps them set, making for perfect square cuts later.
Step 5: Glaze and Cut
Whisk up a quick icing with powdered sugar, milk, and a touch of almond extract if you love that flavor boost. Drizzle it generously over the cooled bars for a sweet, glossy finish. For neat, clean slices, chill the bars in the refrigerator for 30 to 60 minutes before cutting into 24 squares or 18 large bars, depending on your crowd. If you’re feeling extra indulgent, serve with a scoop of vanilla ice cream on top—the ultimate game day or dessert hack.
How to Serve Cherry Pie Bars Recipe
Garnishes
While these bars are stunning all on their own, a sprinkle of toasted sliced almonds or a few fresh cherries on top can elevate their presentation and texture. If you want a little flair, a dusting of powdered sugar right before serving adds a delicate, snowy touch perfect for festive occasions.
Side Dishes
Cherry Pie Bars pair beautifully with a scoop of creamy vanilla ice cream or a dollop of freshly whipped cream to balance the tartness of the cherries. For a brunch treat, serve alongside hot coffee or a fruity herbal tea to complement the bars’ sweetness.
Creative Ways to Present
These bars make a fantastic treat for parties—try placing them on a wooden board with fresh mint sprigs scattered around for a rustic look. You can also cut them into mini squares and stick a pretty toothpick in each for easy grab-and-go fun. If you want to go fancy, drizzle some melted dark chocolate on top for a decadent twist everyone will remember.
Make Ahead and Storage
Storing Leftovers
Once cooled completely, store your Cherry Pie Bars in an airtight container at room temperature for up to three days. If your kitchen feels warm, popping them in the fridge can help maintain their texture and freshness.
Freezing
Want to save some for later? Wrap the bars tightly in plastic wrap, then place them in a freezer-safe container or bag. They freeze beautifully for up to two months—just thaw them overnight in the fridge before enjoying.
Reheating
For that freshly baked feel, warm the bars in a preheated oven at 300°F for about 10 minutes or microwave individual pieces for 15-20 seconds. If you’re serving with ice cream, a warm bar with cold ice cream is a match made in heaven.
FAQs
Can I use fresh cherries instead of canned pie filling?
Absolutely! Fresh or frozen cherries can be used, but you’ll want to cook them down with sugar and a little lemon juice to mimic the texture and sweetness of pie filling before layering them into the bars.
Is it possible to make this recipe gluten-free?
Yes! Replace the all-purpose flour with a gluten-free flour blend that measures cup for cup. Just be sure it contains xanthan gum or another binding agent to keep the dough from crumbling.
Can I omit the almond extract?
Definitely. Almond extract adds a lovely nuance that pairs well with cherries, but the bars will still be delicious with just vanilla extract or even without any extract at all.
How do I prevent the top dough from sinking into the cherry filling?
Dropping spoonfuls of dough loosely over the filling rather than spreading it ensures the cherry filling stays visible and the dough bakes up nicely without sinking. This creates that delightful texture and appearance unique to this recipe.
Can I make smaller or larger bars?
Yes! This recipe is flexible. You can cut smaller bite-sized bars for parties or larger squares to serve as substantial dessert portions. Just adjust baking time slightly if bars are very small or very large.
Final Thoughts
Getting to share this Cherry Pie Bars Recipe with you feels like passing along one of my most cherished kitchen treasures. It’s easy to make, bursting with the familiar comfort of cherry pie, but so much more fun to eat as a bar. From casual family get-togethers to special celebrations, these bars bring a smile to every occasion. Promise me you’ll give this recipe a try soon — it might just become your go-to cherry dessert too!
Print
Cherry Pie Bars Recipe
- Prep Time: 15 minutes
- Cook Time: 35 minutes
- Total Time: 50 minutes
- Yield: 24 bars
- Category: Dessert
- Method: Baking
- Cuisine: American
Description
Cherry Pie Bars are a delightful combination of buttery cookie dough and sweet cherry pie filling baked into a delicious dessert bar. With a tender crumb base and juicy cherry pockets peeking through the top, these bars are perfect for potlucks, snack times, or a simple homemade treat. The bars are finished with a light almond-flavored icing drizzle adding a perfect touch of sweetness and flavor.
Ingredients
For the Dough
- 1 cup Butter (softened)
- 1 1/2 cups Sugar
- 1/4 cup Brown Sugar
- 3 large Eggs
- 1 Tablespoon Milk
- 1 teaspoon Vanilla Extract
- 1/2 teaspoon Almond Extract
- 2 3/4 cups Flour
- 3/4 teaspoon Baking Powder
- 3/4 teaspoon Salt
For the Filling
- (2) 21-ounce cans Cherry Pie Filling
For the Icing
- 1 cup Powdered Sugar
- 2 to 3 Tablespoons Milk
- 1/4 teaspoon Almond Extract (optional)
Instructions
- Preheat and Prepare Pan: Preheat your oven to 350°F. Grease or line a 9×13-inch baking dish with parchment paper for easy removal of the bars later.
- Make the Dough: In a large bowl, cream together the softened butter, sugar, and brown sugar until the mixture is light and fluffy, about 3 to 4 minutes. Add the eggs one at a time, beating well after each addition. Stir in the milk, vanilla extract, and almond extract. Add the flour, baking powder, and salt, mixing just until combined to form the dough.
- Assemble the Bars: Spread about two-thirds of the cookie dough evenly over the bottom of the prepared baking pan using damp fingers or a spatula. Spoon the cherry pie filling evenly on top of this dough layer. Drop the remaining dough by spoonfuls over the cherry filling; it won’t cover the filling entirely, which allows some cherries to peek through.
- Bake: Bake the bars in the preheated oven for 35 to 45 minutes or until the top is lightly golden and the bars are cooked through. Remove from oven and let cool completely in the pan.
- Prepare and Drizzle Icing: While the bars cool, whisk together the powdered sugar and milk to make the icing. Optionally, add 1/4 teaspoon almond extract for extra flavor. Once bars are cool, drizzle the icing evenly over the top.
- Chill and Slice: For easier cutting, refrigerate the bars for 30 to 60 minutes after they have cooled. Use a sharp knife, wiping between cuts, to cut into 24 equal squares or 18 larger bars.
- Serve: Serve the cherry pie bars as is, or with a scoop of vanilla ice cream for an extra special treat.
Notes
- Use parchment paper for easy removal and cleaner edges.
- The almond extract in the dough and icing can be omitted if desired or substituted with pure vanilla extract.
- Make sure bars are completely cooled before drizzling icing to prevent melting.
- Chilling bars before cutting helps achieve clean and neat slices.
- For a dairy-free option, substitute butter and milk with plant-based alternatives.
- These bars keep well at room temperature for 2 days or refrigerated for up to 5 days.
