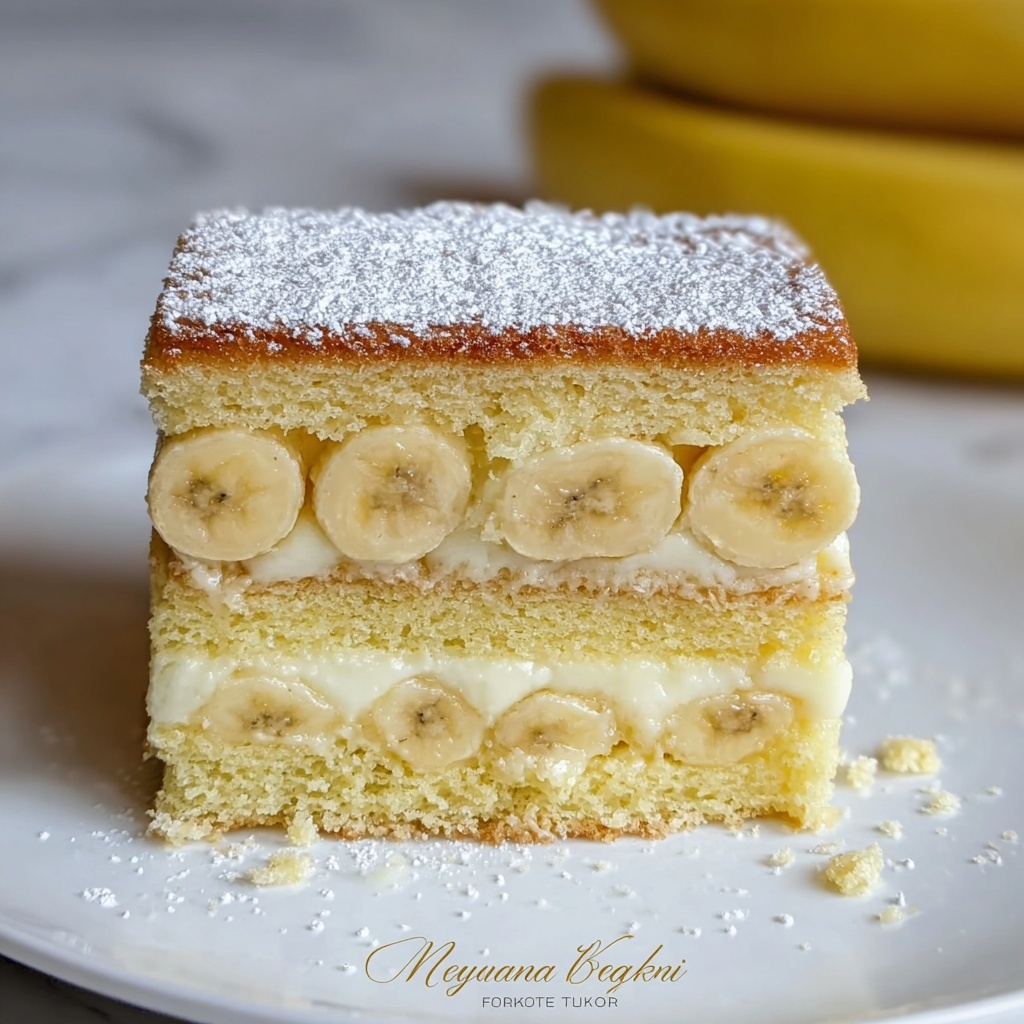
If you’ve ever dreamed of a dessert that somehow magically transforms simple ingredients into a mesmerizing, multi-layered delight, then you are in for a treat. This Irresistibly Easy Banana Magic Cake with Layered Delights Recipe is exactly that kind of wonder. With each bite, you’ll experience an enchanting contrast of textures and flavors — creamy custard, tender cake, and slightly caramelized banana, all harmonizing beautifully. It’s a perfect way to enjoy bananas in a new, exciting, and absolutely crave-worthy way that’s as straightforward to make as it is delicious.
Ingredients You’ll Need
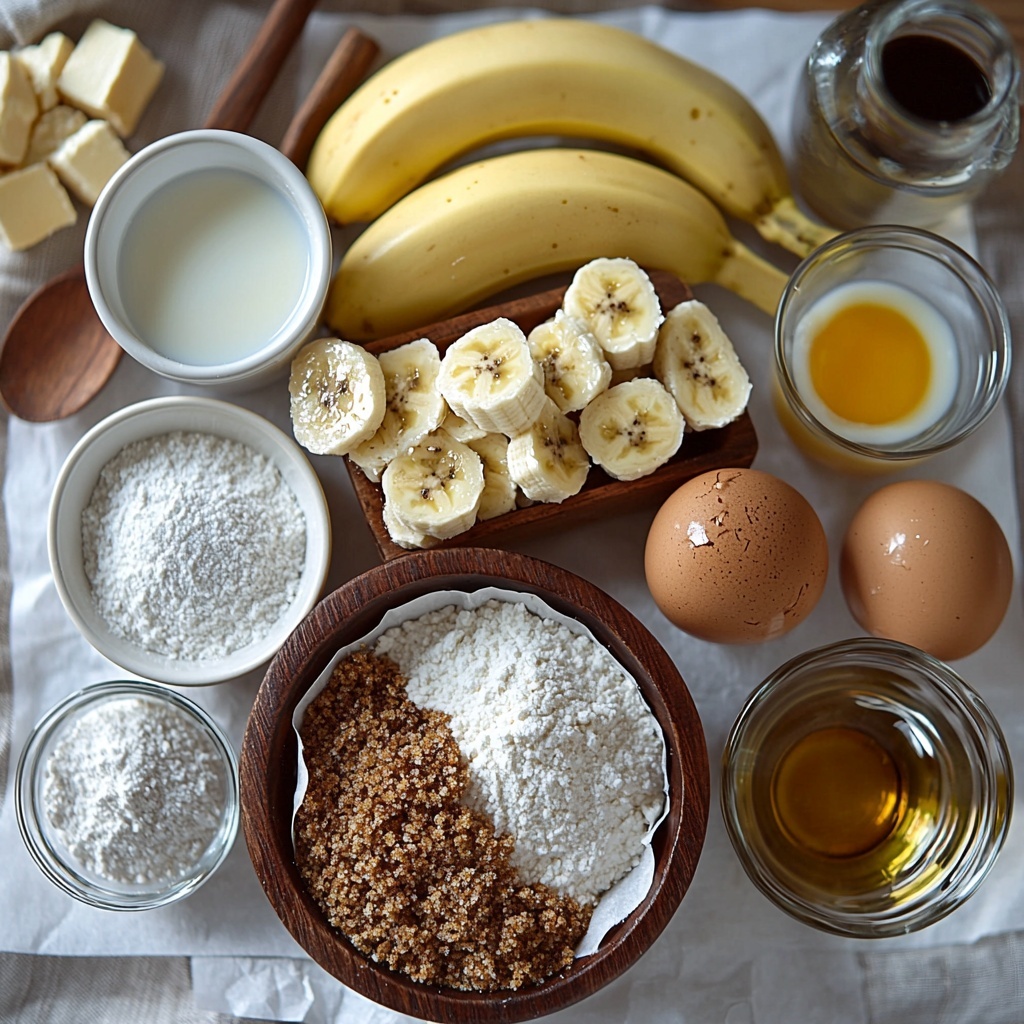
These ingredients are straightforward pantry staples, yet each plays a crucial role, giving this cake its signature layers, richness, and that comforting homemade charm.
- 3 medium ripe bananas (mashed): The star of the show, bananas bring natural sweetness and a creamy texture that defines the cake’s character.
- 2 eggs (separated): Eggs add structure and help create the ethereal layering effect when the whites are whipped to perfection.
- 1 cup granulated sugar: Provides sweetness and a tender crumb; feel free to adjust according to your taste buds.
- 1/2 cup brown sugar: Adds a deep, caramel-like flavor and moistness, but granulated sugar works fine as a substitute if needed.
- 1 cup all-purpose flour: Gives the cake body and helps create the cake layer amidst the creamy custard.
- 1 cup milk (whole or dairy-free): Moistens the batter and contributes to the custard’s smooth consistency.
- 1/2 cup melted butter (unsalted recommended): Infuses the cake with richness and ensures a tender crumb.
- 1 teaspoon vanilla extract: Adds warmth and depth, balancing the banana’s natural sweetness perfectly.
- 1/4 cup water (adjust for consistency): Helps loosen the batter to achieve those beautiful layered textures during baking.
How to Make Irresistibly Easy Banana Magic Cake with Layered Delights Recipe
Step 1: Prepare and Preheat Your Oven
Start by preheating your oven to 350°F (175°C) — this ensures the entire cake bakes evenly. Grease an 8×8-inch baking dish thoroughly; this simple prep step guarantees your cake releases easily without a hitch.
Step 2: Combine the Wet Ingredients
In a large mixing bowl, mash the ripe bananas until smooth and luscious, then add the separated egg yolks, melted butter, milk, and vanilla extract. Whisk everything together until the mixture is silky and uniform. This blend sets the foundation for your creamy custard and cake layers.
Step 3: Mix the Dry Ingredients
Using a separate bowl, combine the flour, granulated sugar, and brown sugar. Mixing these dry ingredients separately ensures they distribute evenly throughout the batter, helping create the flawless balance between sweetness and structure in your cake.
Step 4: Bring Wet and Dry Together
Gradually add the dry mixture to the wet ingredients. Stir gently until just incorporated — overmixing can toughen the cake, but gentle folding keeps it tender and light.
Step 5: Whip the Egg Whites
In a clean, dry bowl, beat the egg whites until stiff peaks form. This step is magic in itself: those fluffy whites will lift the batter and separate the layers beautifully when baked, creating the cake’s signature magic texture.
Step 6: Fold in the Egg Whites
Carefully fold the beaten egg whites into the batter, preserving as much air as possible. This gentle motion keeps the batter airy and light, essential for the layered, custardy cake you’re aiming for.
Step 7: Bake to Perfection
Pour your batter into the greased baking dish and place it in the oven. Bake for 45 to 50 minutes until the top turns a lovely golden brown. Resist the urge to cut into it immediately; it needs to firm up and allow those dreamy layers to set.
Step 8: Cooling Is Key
Once baked, let your banana magic cake cool in the dish for about 40 minutes. This resting time helps the custard layer solidify just right, making slicing precise and effortless.
How to Serve Irresistibly Easy Banana Magic Cake with Layered Delights Recipe
Garnishes
When serving, a dusting of powdered sugar or a drizzle of honey adds a simple elegance. For an extra touch, top with a few thin banana slices or a sprinkle of chopped walnuts to enhance texture and nutty flavor.
Side Dishes
This banana magic cake pairs wonderfully with a scoop of vanilla or cinnamon ice cream, a dollop of whipped cream, or a fresh fruit compote. The creamy accompaniments complement the cake’s layered delights perfectly, making each bite even more indulgent.
Creative Ways to Present
Try serving individual portions in pretty dessert dishes or mini ramekins for a charming presentation. You could also layer small squares between sheets of parchment in a cake box to gift a delicious surprise. The layered texture makes it a showstopper for any occasion.
Make Ahead and Storage
Storing Leftovers
Leftover banana magic cake keeps beautifully covered in the refrigerator for up to 3 days. Keeping it sealed prevents it from drying out, preserving the luscious custard and cake layers just as you made them.
Freezing
If you want to enjoy this delight later, wrap the cooled cake tightly in plastic wrap and then foil. Freeze for up to 2 months. Thaw slowly overnight in the fridge for best texture and flavor retention.
Reheating
Warm slices gently in the microwave for 15-20 seconds or in a low-heat oven for about 10 minutes. Reheating revives the custard’s creaminess and will invite those comforting aromas to fill your kitchen again.
FAQs
Can I use overripe bananas for this recipe?
Absolutely! Overripe bananas are perfect for this banana magic cake because they are sweeter and softer, making the batter extra flavorful and moist.
Is it possible to make this cake dairy-free?
Yes, you can substitute the milk with almond, oat, or coconut milk and use dairy-free butter alternatives. The texture might vary slightly, but the layered magic will still come through deliciously.
Why do I need to separate and whip the eggs?
Separating eggs and whipping the whites introduces air into the batter, which is essential for creating those beautiful, distinct layers that give this cake its unique custardy and sponge-like texture.
What if I don’t have brown sugar? Can I skip it?
You can replace brown sugar with extra granulated sugar, but the cake will miss a bit of the rich molasses flavor and moisture that brown sugar provides. It’s worth grabbing some if you can!
How can I tell when the cake is fully baked?
The top should be golden and set, but slightly jiggly in the center. A toothpick inserted might come out mostly clean but with tiny moist crumbs — that’s a sign the custard layer is perfectly set without overdrying.
Final Thoughts
There’s something truly special about the Irresistibly Easy Banana Magic Cake with Layered Delights Recipe that makes it a standout in any dessert lineup. It’s effortlessly charming, surprisingly simple, and deeply satisfying, perfect for sharing or treating yourself. I can’t wait for you to experience the magic of those dreamy layers and the cozy banana sweetness that brings this cake to life. Give it a try—you’re going to love every bite.
Print
Irresistibly Easy Banana Magic Cake with Layered Delights Recipe
- Prep Time: 20 minutes
- Cook Time: 45-50 minutes
- Total Time: 1 hour 10 minutes
- Yield: 8 servings
- Category: Dessert
- Method: Baking
- Cuisine: American
- Diet: Vegetarian
Description
This Irresistibly Easy Banana Magic Cake is a delightful layered dessert that combines ripe bananas with a light and fluffy texture created by folded egg whites. Perfectly sweetened with a mix of granulated and brown sugar, this cake offers a moist, flavorful experience with the classic richness of butter and vanilla. Its simple preparation and baked method make it an ideal treat for any occasion.
Ingredients
Banana Mixture
- 3 medium ripe bananas (mashed)
- 2 eggs (separated)
- 1 cup milk (whole or dairy-free)
- 1/2 cup melted butter (unsalted recommended)
- 1 teaspoon vanilla extract
- 1/4 cup water (adjust for consistency)
Dry Ingredients
- 1 cup all-purpose flour
- 1 cup granulated sugar (adjust to taste)
- 1/2 cup brown sugar (can substitute with granulated sugar)
Instructions
- Preheat Oven: Preheat your oven to 350°F (175°C) and grease an 8×8-inch baking dish to ensure the cake doesn’t stick.
- Mix Wet Ingredients: In a large mixing bowl, combine the mashed bananas, egg yolks (reserve whites separately), melted butter, milk, and vanilla extract. Whisk these ingredients together until the mixture is smooth and uniform.
- Combine Dry Ingredients: In a separate bowl, mix the all-purpose flour, granulated sugar, and brown sugar thoroughly.
- Incorporate Dry into Wet: Gradually add the dry ingredient mixture into the wet banana mixture, folding gently to combine without overmixing to maintain batter lightness.
- Beat Egg Whites: In a clean bowl, beat the reserved egg whites until stiff peaks form, which will help create the cake’s light texture.
- Fold Egg Whites: Gently fold the beaten egg whites into the batter, ensuring an even incorporation while retaining the fluffy structure.
- Bake the Cake: Pour the combined batter into the prepared baking dish and bake in the preheated oven for 45-50 minutes, or until a toothpick inserted comes out clean.
- Cool Before Slicing: Allow the cake to cool in the baking dish for about 40 minutes to set before cutting into slices and serving.
Notes
- You can substitute the brown sugar with more granulated sugar if desired, though brown sugar adds a subtle caramel flavor.
- Adjust the amount of water slightly if the batter seems too thick; it should be pourable but not runny.
- Ensure egg whites are beaten to stiff peaks for best volume and texture in the cake.
- This cake is best enjoyed within 2 days and can be stored covered at room temperature.
- For a dairy-free option, use plant-based milk and a suitable butter substitute.

