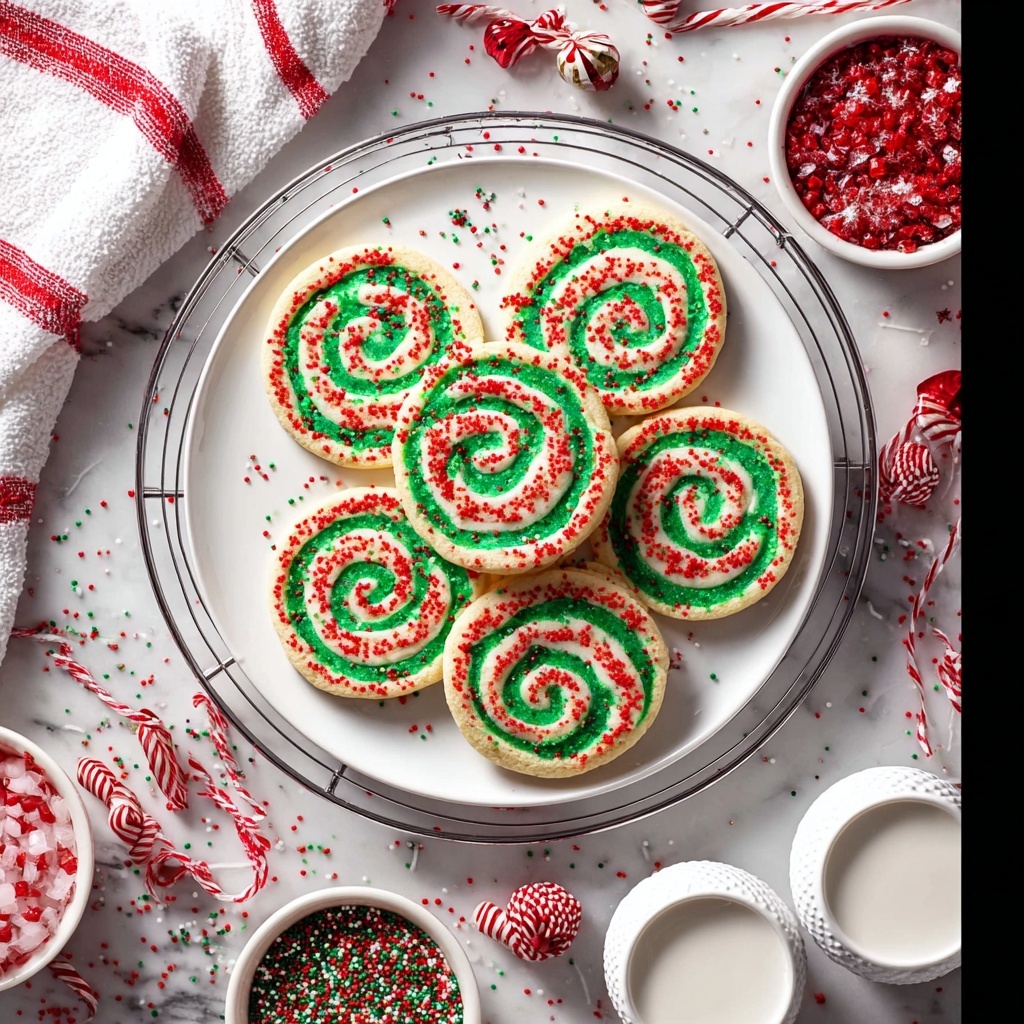
There’s something truly magical about the holiday season, and nothing captures that festive spirit quite like a batch of Peppermint Pinwheel Cookies Recipe. These charming, colorful pinwheels swirl with vibrant red, green, and white dough, bursting with delightful peppermint flavor in every bite. Soft yet slightly crisp, with a playful sprinkle coating, they’re not just cookies—they’re a celebration. If you love treats that look amazing and taste even better, this Peppermint Pinwheel Cookies Recipe will become one of your all-time favorites to bake and share.
Ingredients You’ll Need
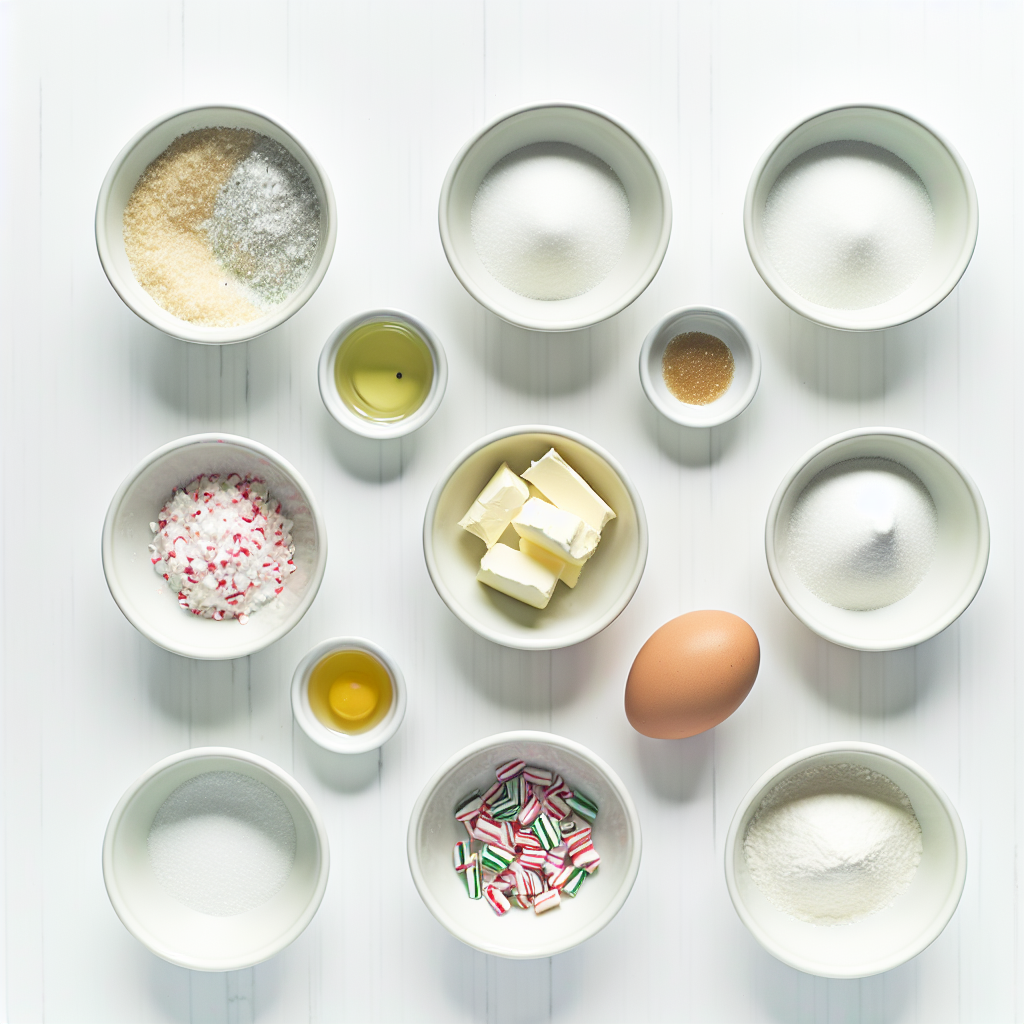
These ingredients are simple pantry staples, each playing a special role in bringing the perfect texture, flavor, and festive color to your Peppermint Pinwheel Cookies Recipe.
- Unsalted butter (1 cup/227 grams): The base for rich, tender cookies with a melt-in-your-mouth feel.
- Confectioners’ sugar (¾ cup/90 grams): Adds sweetness and contributes to the cookie’s delicate crumb.
- White sugar (¾ cup/150 grams): Offers sweetness and helps give the cookies a slight crisp edge.
- Vanilla extract (1 ½ teaspoons): Enhances the overall flavor depth and warmth.
- Peppermint extract (1 teaspoon): The star flavor that gives these cookies their refreshing, festive twist.
- Eggs (2): Bind the dough while adding moisture and tenderness.
- All-purpose flour (4 cups/480 grams): The structure that holds the cookies together.
- Baking powder (¾ teaspoon): A gentle lift for light, soft texture.
- Salt (¼ teaspoon): Balances and enhances the sweetness and peppermint flavors.
- Nonpareil sprinkles (½ cup, red, white, and green): Adds vibrant color and a festive crunch as a final coating.
How to Make Peppermint Pinwheel Cookies Recipe
Step 1: Mix Dry Ingredients
Start by whisking together the flour, baking powder, and salt in a large bowl. This ensures each cookie gets an even rise and a balanced flavor. Set this aside while you work on the wet ingredients.
Step 2: Cream Butter and Sugars
In another large bowl, beat the softened butter with the confectioners’ sugar and white sugar until the mixture is light, fluffy, and pale. This step is crucial as it incorporates air, making for soft, tender cookies.
Step 3: Add Flavors and Eggs
Now mix in the vanilla extract, peppermint extract, and eggs. Beat everything until the mixture is smooth and thoroughly combined. The peppermint extract is what gives these cookies their unforgettable holiday punch.
Step 4: Combine Wet and Dry Ingredients
Gradually add your flour mixture into the wet ingredients, beating gently until the dough forms but doesn’t become sticky. You want a soft dough that’s easy to handle without being overly tacky.
Step 5: Divide and Chill the Dough
Divide the dough evenly into three parts. Wrap one portion as the plain white dough and refrigerate it. This plain layer will be the perfect contrast for the colored doughs.
Step 6: Color Your Dough
Add green food coloring to one portion and red food coloring to the other. Mix well, using a hand mixer or hands with gloves to evenly tint the dough. Wrap each colored dough piece separately in cling wrap and chill for at least an hour. This chilling step is important so the dough firms up and is easier to roll later.
Step 7: Roll Out the Dough Layers
Once chilled, roll each dough portion out on a lightly floured parchment paper into a 9×12-inch rectangle. Keeping the dough uniform in size helps with an even layered pinwheel effect.
Step 8: Assemble the Dough Stack
Stack the dough rectangles carefully: green on the bottom, then the plain white layer, topped by the red. Trim the edges to form a neat, even rectangle ensuring the dough layers align perfectly when rolled.
Step 9: Roll Into a Log
Starting from the long edge, roll the stacked dough tightly into a log. This rolling action is how the iconic pinwheel swirl is created inside the cookie.
Step 10: Coat with Sprinkles
Pour the festive nonpareil sprinkles into a shallow dish. Roll your dough log over the sprinkles, gently pressing to ensure an even coating all around. This adds extra holiday sparkle and texture.
Step 11: Chill Again
Wrap the sprinkle-coated log in plastic wrap and refrigerate for at least 4 hours. This firm chill is essential for cleanly slicing the cookies without smushing the layers.
Step 12: Prepare to Bake
Preheat your oven to 350°F and line two baking sheets with parchment paper. Having everything ready means the dough won’t have time to soften too much before baking.
Step 13: Slice the Cookies
Remove the chilled log from the fridge and carefully cut into ¼-inch slices using a sharp knife. Thin slices help the pinwheel pattern be more visible and ensure perfect baking.
Step 14: Bake and Cool
Arrange the cookies on your baking sheets, leaving space between each slice. Bake for 9 to 11 minutes until the cookies are set but still soft. Let them cool briefly on the sheet, then transfer to a wire rack to cool completely for best texture.
How to Serve Peppermint Pinwheel Cookies Recipe
Garnishes
For an extra festive touch, add a light dusting of powdered sugar over the cooled cookies or a drizzle of white chocolate. These garnishes complement the peppermint flavor and add an elegant finish.
Side Dishes
These cookies pair beautifully with a warm cup of hot cocoa or peppermint-spiked coffee. Their minty freshness also balances perfectly with creamy vanilla ice cream or a simple glass of cold milk.
Creative Ways to Present
Arrange your peppermint pinwheel cookies on a holiday-themed platter surrounded by pine sprigs or place them in clear cellophane bags tied with red and green ribbon for charming edible gifts. You can also stack them in clear jars for a delightful countertop decoration.
Make Ahead and Storage
Storing Leftovers
Store your baked peppermint pinwheel cookies in an airtight container at room temperature. They will stay fresh and chewy for up to one week, making them perfect for planned celebrations or a sweet snack anytime.
Freezing
You can freeze unbaked dough logs wrapped tightly in plastic wrap for up to 3 months. When ready, thaw in the fridge overnight, slice, and bake as usual. Baked cookies also freeze well; just thaw them at room temperature before serving.
Reheating
If you prefer your cookies warm, reheat them briefly in a preheated 300°F oven for 5 minutes or microwave for about 10 seconds. This softens the edges just enough to revive that freshly-baked feel.
FAQs
Can I substitute peppermint extract with peppermint oil?
Yes, but peppermint oil is much stronger and more concentrated. Use it sparingly—start with half the amount and adjust to taste to avoid overpowering the cookies.
What if I don’t have red and green food coloring?
You can get creative by using other colors or natural colorings such as beet juice for red and spinach powder for green. The cookies will still look festive and taste amazing.
Are these cookies gluten-free?
This Peppermint Pinwheel Cookies Recipe calls for all-purpose flour, so it’s not gluten-free as is. To make a gluten-free version, substitute with a 1:1 gluten-free baking flour blend, but be aware texture may differ slightly.
Can I make these cookies vegan?
To veganize this recipe, use vegan butter, replace eggs with flax eggs (1 tablespoon flaxseed meal + 3 tablespoons water per egg), and ensure your sugar and sprinkles are vegan-friendly.
Why do I need to chill the dough multiple times?
Chilling prevents spreading during baking, helps the dough firm for rolling and slicing, and solidifies the layer colors and sprinkles for distinct pinwheel patterns. It’s key to beautiful cookies!
Final Thoughts
These Peppermint Pinwheel Cookies Recipe are more than just a treat—they’re a joyful baking experience and a festive showstopper on any holiday table. Give this recipe a try and watch as the colorful swirls and refreshing peppermint flavor bring smiles to everyone lucky enough to taste them. Happy baking and may your holidays be deliciously merry!
Print
Peppermint Pinwheel Cookies Recipe
- Prep Time: 25 minutes
- Cook Time: 10 minutes
- Total Time: 35 minutes plus chilling time
- Yield: 20-24 cookies
- Category: Dessert
- Method: Baking
- Cuisine: American
Description
These Peppermint Pinwheel Cookies are festive and delicious, featuring swirls of red, green, and white dough flavored with peppermint and vanilla. Soft and buttery, they are coated with colorful sprinkles and perfect for holiday celebrations or any time you want a delightful minty treat.
Ingredients
Dry Ingredients
- 4 cups (480 grams) all purpose flour
- 3/4 teaspoon baking powder
- 1/4 teaspoon salt
Wet Ingredients
- 1 cup (227 grams) unsalted butter, softened
- 3/4 cup (90 grams) confectioners’ sugar
- 3/4 cup (150 grams) white sugar
- 1 1/2 teaspoons vanilla extract
- 1 teaspoon peppermint extract
- 2 eggs
Other Ingredients
- Red and green food coloring
- 1/2 cup nonpareil sprinkles (red, white, and green)
Instructions
- Mix Dry Ingredients: In a large mixing bowl, whisk together the flour, baking powder, and salt until well combined. Set aside for later use.
- Cream Butter and Sugars: In another large bowl, beat the softened butter, confectioners’ sugar, and white sugar on medium speed until the mixture is light and fluffy, approximately 3 minutes.
- Add Flavors and Eggs: Incorporate the vanilla extract, peppermint extract, and eggs into the butter mixture. Beat again until fully combined and smooth.
- Combine Wet and Dry Mixtures: Gradually add the flour mixture to the wet ingredients, beating until a soft but not sticky dough forms.
- Divide Dough: Separate the dough into three equal parts. Wrap one portion with cling wrap and refrigerate as the plain white dough.
- Color Dough: Add green food coloring to one portion and mix thoroughly using a hand mixer or your hands with gloves. Color the remaining dough portion red. Wrap each colored dough separately with cling wrap and refrigerate for at least 1 hour.
- Roll Out Dough: After chilling, roll each dough portion individually on lightly floured parchment paper into 9×12-inch rectangles.
- Stack Dough Layers: Place the dough rectangles on top of each other with green on the bottom, plain white in the middle, and red on top. Trim edges to form an even rectangle.
- Form Log: Starting from the long side, roll the stacked dough tightly into a log shape.
- Coat with Sprinkles: Pour the colorful sprinkles into a rimmed baking sheet or container. Roll the dough log over the sprinkles, pressing gently to coat the entire surface.
- Chill the Log: Wrap the sprinkled dough log tightly in plastic wrap and refrigerate for at least 4 hours to firm up.
- Prepare for Baking: Preheat the oven to 350°F (175°C) and line two baking sheets with parchment paper.
- Slice Cookies: Remove the chilled log from the refrigerator and cut into 1/4-inch thick slices using a sharp knife.
- Bake Cookies: Arrange the cookie slices on the prepared baking sheets and bake for 9-11 minutes, until they are set but still soft. Allow to cool briefly on the baking sheet before transferring to a wire rack to cool completely.
Notes
- For best results, make sure the dough is well chilled before slicing to maintain the pinwheel shape.
- Handle the colored dough with gloves to avoid staining your hands.
- You can store the dough log wrapped in the refrigerator for up to 24 hours before baking.
- Use a sharp knife for clean slices and to prevent the cookies from losing their shape.
- Cookies can be stored in an airtight container for up to one week or frozen for longer storage.
