
If you are searching for a show-stopping dessert that is as delightful to the eyes as it is to the palate, then this Pink Velvet Cake with Cream Cheese Frosting Recipe is going to be your new best friend. With its vibrant pink layers, tender crumb, and luscious cream cheese frosting, this cake is a perfect slice of happiness for any occasion. The subtle cocoa undertone in the batter complements the tangy, creamy frosting so beautifully, it feels like a celebration in every bite. I can’t wait to share all the tips to make this cake perfect every time!
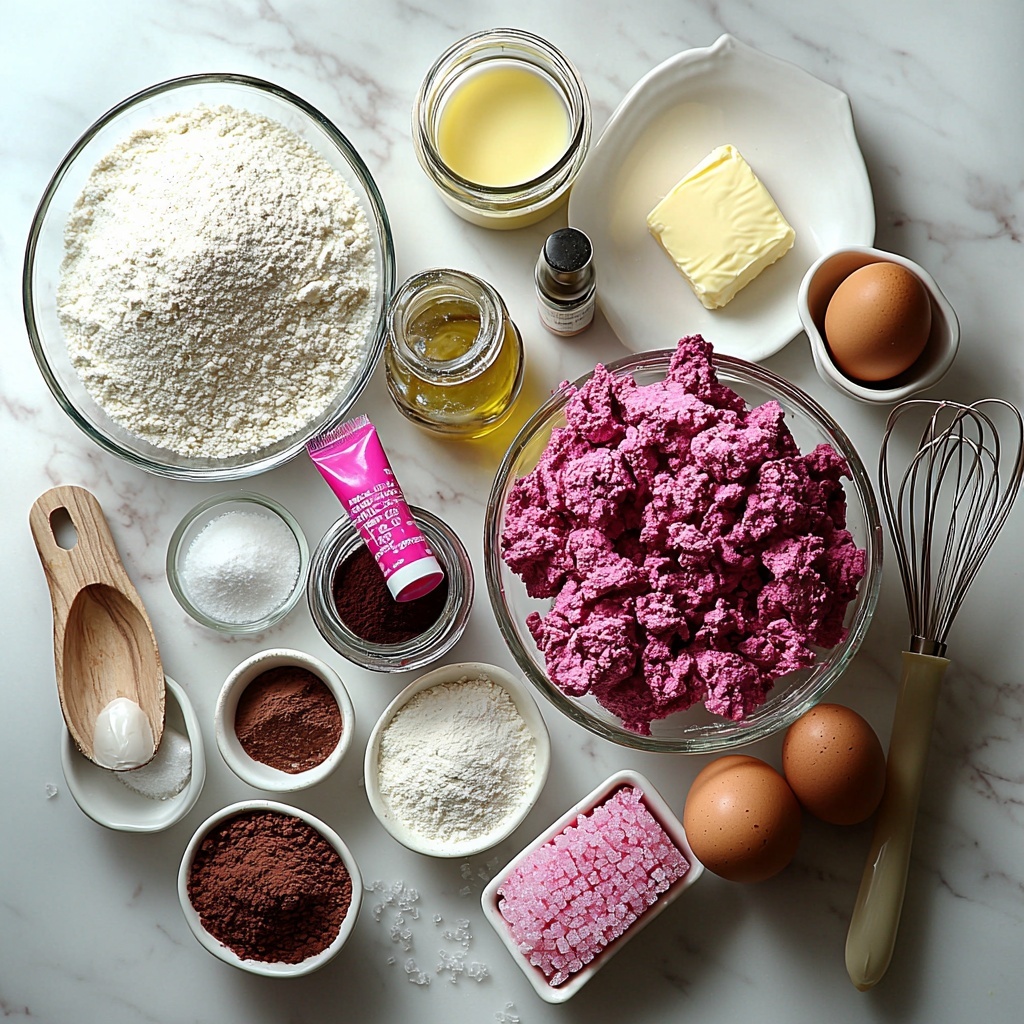
Ingredients You’ll Need
Each ingredient in the Pink Velvet Cake with Cream Cheese Frosting Recipe plays a crucial role in creating that perfect balance of flavor, texture, and color. These simple, pantry-friendly ingredients come together to transform into a delightful dessert that’s as fun to make as it is to eat.
- All-purpose flour: Provides the structure and tender crumb of the cake layers.
- Granulated sugar: Adds sweetness and helps tenderize the cake.
- Baking soda: Leavens the cake for a light, fluffy texture.
- Cocoa powder (unsweetened): Gives the cake its subtle, classic velvet hint without overpowering the pink color.
- Salt: Enhances and balances the flavors.
- Eggs (room temperature): Bind the ingredients and provide richness and moisture.
- Buttermilk (room temperature): Adds tanginess and creates a tender crumb using its acidity.
- Vegetable oil: Keeps the cake moist and soft.
- White vinegar: Reacts with baking soda to lighten the texture and heighten flavor.
- Vanilla extract: Adds warmth and depth to every bite.
- Pink gel food coloring: Creates those stunning, vibrant layers that make this cake unforgettable.
- Cream cheese (softened): The star of the frosting, delivering tangy creaminess.
- Unsalted butter (softened): Adds richness and a smooth texture to the frosting.
- Powdered sugar (sifted): Sweetens the frosting perfectly while keeping it silky.
- Pinch of salt: Balances the sweetness in the frosting beautifully.
How to Make Pink Velvet Cake with Cream Cheese Frosting Recipe
Step 1: Prep Like a Pro
Preheat your oven to 350°F (175°C). Grease and flour two 8-inch round cake pans, or line them with parchment paper for easy release. This prep step is the foundation to making sure your cake layers come out smooth and perfect every time, setting you up for frosting success.
Step 2: Mixing the Wet Ingredients
In a large bowl, whisk together the buttermilk, vegetable oil, white vinegar, vanilla extract, and eggs until combined. Now, add the pink gel food coloring a little at a time until your batter reaches a bright, cheerful hue that will make this Pink Velvet Cake with Cream Cheese Frosting Recipe truly stand out. The color is part of the fun here!
Step 3: Combining Wet and Dry
In a separate bowl, sift and whisk the flour, sugar, baking soda, cocoa powder, and salt. Gradually pour the wet mixture into the dry ingredients. Using an electric mixer on low speed or a sturdy spoon, fold the mixture gently until just combined to keep the cake layers tender and airy—overmixing can lead to a dense cake, and we definitely don’t want that!
Step 4: Baking to Perfection
Divide the batter evenly between your prepared pans and smooth the tops with a spatula. Place them in the oven and bake for 25 to 30 minutes. To check if your cake is ready, insert a wooden skewer in the center; it should come out clean or with a few moist crumbs attached. Let your cakes cool in their pans for 10 minutes before turning them out onto a wire rack. Cool completely before frosting to avoid any melty mishaps.
Step 5: Crafting the Cream Cheese Frosting
Beat the softened cream cheese and unsalted butter together until smooth and creamy. Gradually add the sifted powdered sugar, one cup at a time, ensuring each is fully mixed in before adding more. This slow process is the secret to achieving that light yet luscious texture everyone raves about. Stir in the vanilla extract and a pinch of salt to perfectly balance the sweetness.
Step 6: Assembling Your Masterpiece
Once your cake layers are completely cooled, place one layer on your serving plate. Spread a generous layer of cream cheese frosting on top, then carefully place the second cake layer on top. Finish by frosting the entire cake, smoothing the sides and top. This part is where your cake really starts to feel like the joyful, beautiful dessert it is meant to be.
Step 7: Decorate and Dive In!
Use an offset spatula to create a smooth, elegant finish. Decorate with your favorite sprinkles, fresh berries, or edible flowers to add personality and charm. And there you have it: a stunning Pink Velvet Cake with Cream Cheese Frosting Recipe that’s ready to wow your family and friends. Slice a generous piece and savor every bite!
How to Serve Pink Velvet Cake with Cream Cheese Frosting Recipe
Garnishes
A sprinkle of fresh raspberries, strawberries, or even edible rose petals can elevate your pink cake to a refined, delicate presentation. These fresh accents add bursts of color and natural sweetness that beautifully complement the creamy frosting. It’s a simple touch that makes your dessert feel extra special.
Side Dishes
This cake pairs wonderfully with a light, fruity beverage like sparkling rosé or a chilled berry-infused lemonade. A scoop of vanilla bean ice cream also never goes amiss alongside each slice, providing a creamy contrast and an indulgent balance that keeps your palate happy.
Creative Ways to Present
Consider serving your cake on a pretty cake stand surrounded by fresh flowers or colorful napkins for a festive vibe. Alternatively, slice it into petite cupcakes or cake pops coated with the same cream cheese frosting to share the magic in a bite-sized form. This Pink Velvet Cake with Cream Cheese Frosting Recipe is versatile enough to wow at a formal gathering or a casual brunch.
Make Ahead and Storage
Storing Leftovers
Keep leftover cake tightly covered in an airtight container or wrapped with plastic wrap to lock in moisture. It will stay fresh in the refrigerator for up to 3 days, and the flavors actually deepen after resting for a bit. Before serving again, allow the cake to come to room temperature for the best texture and flavor.
Freezing
You can freeze the un-frosted cake layers wrapped securely in plastic wrap and then in aluminum foil for up to 2 months. When you’re ready to enjoy, thaw the layers in the fridge overnight and frost as usual. If you freeze a fully frosted cake, it’s best to freeze it uncovered for a few hours to set the frosting then wrap gently to avoid damaging the decoration.
Reheating
This cake is best served fresh or at room temperature. If you want to gently warm a slice, pop it in the microwave for 10-15 seconds, but avoid overheating so the frosting doesn’t melt. Enjoy every bite as if it just came out of the oven!
FAQs
What is the difference between pink velvet cake and red velvet cake?
Pink velvet cake uses less cocoa powder and vibrant pink food coloring to achieve a softer cocoa flavor and a bright pink color, whereas red velvet cake traditionally has a deeper red tone and a slightly stronger cocoa presence. Both rely on a tangy buttermilk base and cream cheese frosting.
Can I use regular food coloring instead of gel?
You can, but gel food coloring is preferred because it provides a more intense color without adding extra liquid that could affect the cake’s texture or consistency. Regular liquid food coloring may require a larger quantity to achieve the same vibrant pink hue.
How do I prevent my cake from drying out?
Using vegetable oil instead of butter keeps the cake moist, and don’t overbake the layers. Also, cooling the cake properly before frosting helps lock in moisture. Storing the cake wrapped well will maintain softness for days.
Can I make this recipe dairy-free or vegan?
For dairy-free, substitute the cream cheese and butter with plant-based alternatives and use a dairy-free buttermilk substitute (like almond milk with vinegar). Vegan adaptations will also require an egg replacer. The flavor and texture will vary but can still be delicious!
How thick should I frost the layers?
A generous layer of frosting, about ¼ to ½ inch thick, ensures the perfect balance of creamy sweetness paired with the tender cake. It keeps every bite moist and flavorful without overwhelming the delicate cake.
Final Thoughts
There’s nothing quite like the joy of baking and sharing a Pink Velvet Cake with Cream Cheese Frosting Recipe that looks as stunning as it tastes. Whether for a special celebration or a sweet treat to brighten an ordinary day, this cake is sure to become a beloved classic in your recipe collection. So grab your ingredients, roll up your sleeves, and dive into a baking adventure that will fill your kitchen with smiles and a gorgeous blast of pink!
Print
Pink Velvet Cake with Cream Cheese Frosting Recipe
- Prep Time: 15 minutes
- Cook Time: 25-30 minutes
- Total Time: 1 hour
- Yield: 8-10 servings
- Category: Dessert
- Method: Baking
- Cuisine: American
Description
This Pink Velvet Cake recipe features moist, vibrant pink cake layers paired with a dreamy cream cheese frosting. Perfectly balanced with subtle cocoa and a splash of buttermilk, this cake is a stunning treat for celebrations or any special occasion. Follow the simple steps to create a beautifully frosted masterpiece that’s as delightful to look at as it is to eat.
Ingredients
For the Moist Pink Velvet Cake Layers
- 2 ½ cups all-purpose flour
- 1 ½ cups granulated sugar
- 1 teaspoon baking soda
- 1 teaspoon cocoa powder (unsweetened)
- ½ teaspoon salt
- 2 large eggs, at room temperature
- 1 cup buttermilk, at room temperature
- ½ cup vegetable oil
- 1 tablespoon white vinegar
- 1 teaspoon vanilla extract
- Pink gel food coloring (adjust to desired shade)
For the Dreamy Cream Cheese Frosting
- 16 oz (two 8-oz blocks) cream cheese, softened
- ½ cup unsalted butter, softened
- 4–5 cups powdered sugar, sifted
- 1 teaspoon vanilla extract
- Pinch of salt
Instructions
- Prep Like a Pro: Preheat your oven to 350°F (175°C). Grease and flour two 8-inch round cake pans or line them with parchment paper to ensure the cake layers release easily after baking.
- Mixing the Wet Ingredients: In a large bowl, whisk together the buttermilk, vegetable oil, white vinegar, vanilla extract, and eggs. Add pink gel food coloring gradually until you achieve a vibrant pink shade that suits your preference.
- Combining Wet and Dry: In a separate large bowl, whisk together the flour, granulated sugar, baking soda, cocoa powder, and salt. Gradually pour the wet ingredients into the dry and mix on low speed with an electric mixer or by hand just until combined, careful not to overmix to maintain tender cake layers.
- Baking to Perfection: Divide the batter evenly between the prepared pans. Bake in the preheated oven for 25-30 minutes, or until a wooden skewer inserted in the center comes out clean. Allow the cakes to cool in the pans for 10 minutes before transferring them onto a wire rack to cool completely.
- Crafting the Cream Cheese Frosting: In a large bowl, beat the softened cream cheese and unsalted butter together until smooth and creamy. Gradually add sifted powdered sugar, one cup at a time, beating until fully incorporated and fluffy. Stir in vanilla extract and a pinch of salt for balance.
- Assembling Your Masterpiece: Once cake layers are fully cooled, place one layer on your serving plate or cake stand. Spread a generous layer of cream cheese frosting on top, then carefully place the second cake layer. Apply another layer of frosting on top.
- Decorate and Dive In! Frost the sides of the cake evenly with the remaining cream cheese frosting using an offset spatula to smooth it out. Decorate with sprinkles, fresh berries, or edible flowers as desired. Slice and enjoy your stunning pink velvet cake!
Notes
- Ensure all wet ingredients are at room temperature for the best batter consistency.
- Do not overmix the batter to keep the cake tender and moist.
- If you prefer a deeper pink color, add more gel food coloring in small increments.
- Let the cake cool completely before frosting to avoid melting or sliding of the frosting.
- The cream cheese frosting can be stored covered in the refrigerator for up to 3 days; bring it to room temperature and re-whip before using.


