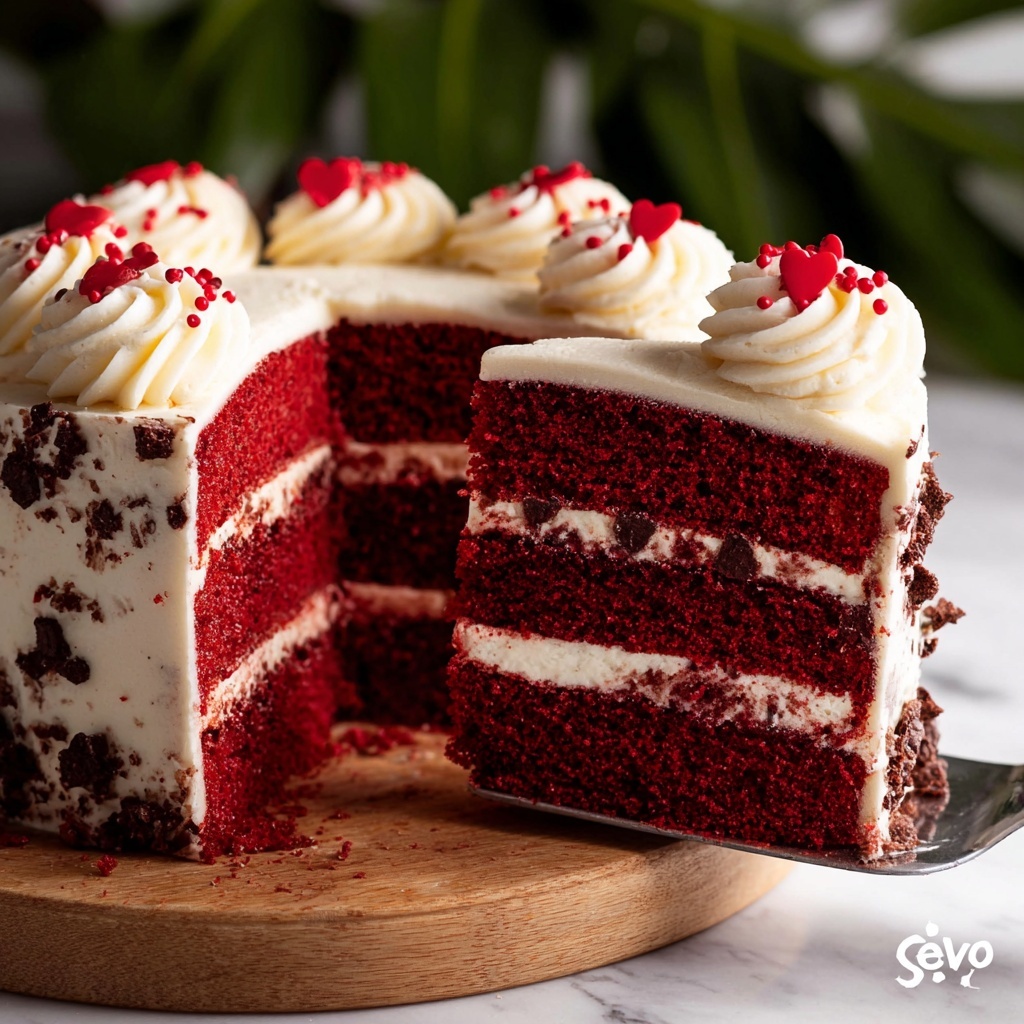
If you’ve been searching for an irresistible treat that combines classic charm with a delightful twist, this Red Velvet Chocolate Chip Cake Recipe is your answer. Picture layers of soft, velvety red cake boasting just the right hint of cocoa, studded with melty mini chocolate chips in every bite, all enveloped in the creamiest, tangiest cream cheese frosting. This cake is a showstopper for celebrations or just a weekend indulgence. Trust me, once you try this recipe, it will become your go-to for impressing friends and family with rich flavor and stunning color.
Ingredients You’ll Need
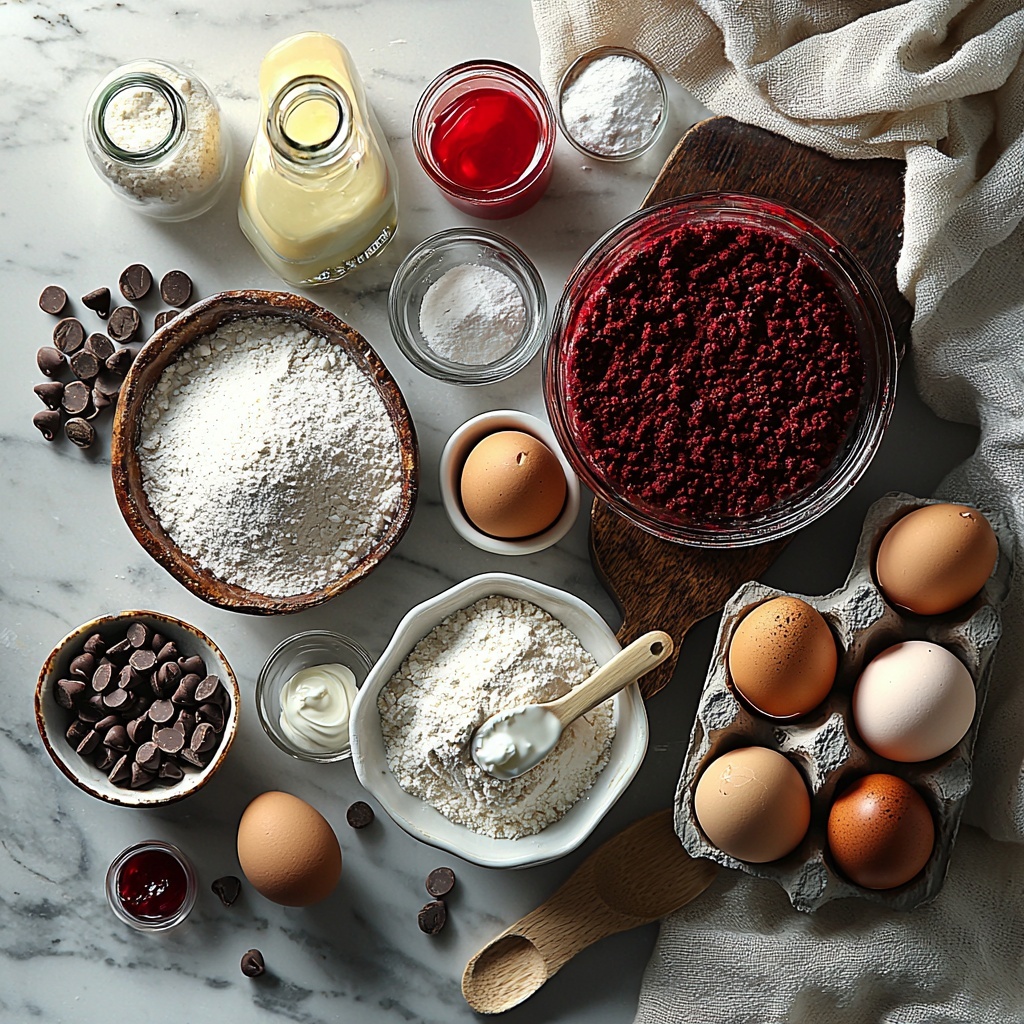
All the ingredients in this recipe are straightforward pantry staples, but combined, they create something truly magical. Each one plays a crucial role: from the cocoa powder giving that subtle chocolate depth, to the buttermilk keeping the cake moist and tender, and the red food gel dye bringing that iconic hue which is essential for a perfect red velvet cake.
- 3 1/2 cups All-purpose flour: The backbone of your cake, providing structure and crumb.
- 1/4 cup Unsweetened cocoa powder (dutch process preferred): Adds a gentle chocolate flavor that balances the sweet and tangy notes.
- 2 tsp Baking powder: Helps the cake rise and stay light.
- 1/2 tsp Baking soda: Works with the vinegar for a tender crumb and slight lift.
- 1 tsp Salt: Enhances the flavors in every ingredient.
- 1/2 cup Oil (canola or vegetable): Keeps the cake wonderfully moist.
- 1/2 cup Unsalted butter (room temperature): Adds richness and smoothness to the texture.
- 1 3/4 cup White granulated sugar: Sweetens without overpowering the other flavors.
- 1 tsp Pure vanilla extract: Brings warmth and depth to the batter and frosting alike.
- 1 tsp White vinegar: Reacts with baking soda to help the cake rise and adds a subtle tang.
- 1/3 cup Sour cream (or Greek yogurt, room temperature): Adds moisture and a subtle tang for balance.
- 4 Large eggs (room temperature): Essential for structure and binding all ingredients.
- 1 tsp Red food gel dye: Provides that vibrant red color without adding extra liquid.
- 1 cup Buttermilk (room temperature): Makes the crumb tender and adds a slight tang.
- 1 1/2 cups Mini chocolate chips: Bursts of melty sweetness throughout every slice.
- 2 cups Unsalted butter (room temperature): For the cream cheese frosting’s luscious texture.
- 8 oz Cream cheese (room temperature): Gives the frosting its signature tang and creaminess.
- 5 cups Powdered sugar (sifted): Sweetens and thickens the frosting perfectly.
- 1/2 cup Mini chocolate chips (for filling): Adds delightful texture in the frosting layers.
How to Make Red Velvet Chocolate Chip Cake Recipe
Step 1: Prepare Your Pans and Preheat Oven
Start your journey by preheating your oven to 350℉. It’s important to prepare your cake pans properly, so spray three 8-inch cake pans with a nonstick spray, line them with parchment paper, and spray again to ensure your cakes come out clean and smooth every time.
Step 2: Mix Dry Ingredients
In a medium mixing bowl, sift together the flour, cocoa powder, baking powder, baking soda, and salt. Sifting not only combines but also aerates these ingredients, ensuring your cake layers will be tender and evenly textured.
Step 3: Cream Butter, Oil, and Sugar
In a large bowl with a hand or stand mixer, beat the butter, oil, and sugar together on high speed for about 2 minutes. This step is key for creating a fluffy base that traps air, giving your cake a light, soft crumb. You’ll notice the mixture becomes pale and creamy — that’s exactly what you want!
Step 4: Add Wet Ingredients and Color
Next, toss in the vanilla extract, white vinegar, sour cream (or Greek yogurt), eggs, and the red food gel dye. Mix on medium speed until everything is well combined and beautifully red. The eggs add moisture and structure while vinegar reacts with baking soda for that signature red velvet texture.
Step 5: Combine Dry Ingredients and Buttermilk
Add your sifted dry ingredients and buttermilk alternately into the wet mixture on low speed. Mix just until combined — overmixing can lead to a dense cake. Finish by folding in the mini chocolate chips gently with a rubber spatula, making sure each bite will have a sweet surprise.
Step 6: Bake the Cake Layers
Divide the batter evenly between your three prepared pans and smooth the tops. Pop them into the oven and bake for 25-30 minutes. You’ll know they’re ready when a toothpick inserted in the center comes out clean. Let them rest in the pans for 10 minutes before turning out onto a wire rack to cool completely.
Step 7: Prepare the Cream Cheese Frosting
For the decadent frosting, sift the powdered sugar to avoid clumps and set aside. Beat the butter first until light and fluffy, then add the cream cheese and continue beating until perfectly smooth. Slowly incorporate the powdered sugar in two additions, mixing on low to avoid a sugar cloud. Finish with vanilla and mix on high for that velvety texture.
Step 8: Assemble Your Cake
Place your first cake layer on the serving board, spread a generous cup of frosting, and sprinkle a third of the mini chocolate chips on top. Repeat this with the second layer. For the final layer, flip it so the bottom faces up to get the flattest surface. Apply a thin crumb coat of frosting and chill the cake briefly to set.
Step 9: Final Frosting and Decorating
Once your cake has firmed up, frost it generously with the remaining cream cheese frosting. Don’t forget to finish off with a decorative scattering of mini chocolate chips for that extra touch of charm and texture.
How to Serve Red Velvet Chocolate Chip Cake Recipe
Garnishes
A sprinkle of additional mini chocolate chips over the frosting adds a delightful crunch and a beautiful contrast against the creamy frosting. You might also dust light cocoa powder or garnish with fresh berries for an elegant, fresh pop of color.
Side Dishes
This cake pairs wonderfully with light and simple accompaniments. Consider serving with a dollop of whipped cream, a scoop of vanilla ice cream, or fresh fruit salad to balance the richness with a hint of brightness.
Creative Ways to Present
Want to make your cake the centerpiece at your next gathering? Try layering it in a glass trifle dish showing off those vibrant red and white layers, or create pretty single-serving mini cakes using a ring mold. For a festive look, add edible gold leaf or rose petals on top for a special occasion.
Make Ahead and Storage
Storing Leftovers
Wrap leftover cake tightly in plastic wrap or an airtight container and store it in the refrigerator. The cream cheese frosting keeps the cake moist, and it will stay fresh for up to 3-4 days. Allow slices to come to room temperature before serving for best flavor.
Freezing
You can freeze this cake either baked or fully assembled. For baked layers, wrap them tightly in plastic wrap and place in a freezer-safe bag for up to 2 months. When ready to enjoy, thaw overnight in the refrigerator. If freezing the assembled cake, flash freeze it after the crumb coat and then wrap well to avoid freezer burn.
Reheating
Since this cake tastes best cool or at room temperature, reheating isn’t usually necessary. If you prefer warm cake, gently heat a slice in the microwave for 10-15 seconds, but avoid heating too long to prevent melting the frosting or toughening the crumb.
FAQs
Can I use regular food coloring instead of gel for the red velvet cake?
While regular liquid food coloring works, gel food dye is preferred because it gives a more vibrant red color without altering the batter’s consistency. Gel also prevents adding extra liquid, which could affect texture.
What can I substitute for buttermilk in this recipe?
If you don’t have buttermilk on hand, mix 1 cup of milk with 1 tablespoon of white vinegar or lemon juice and let it sit for 5 minutes. This homemade buttermilk substitute creates the acidity necessary for a tender crumb and proper rise.
Why is vinegar used in this Red Velvet Chocolate Chip Cake Recipe?
Vinegar reacts with the baking soda to create carbon dioxide bubbles which help the cake rise and achieve a soft texture. It also enhances the subtle tanginess that is characteristic of red velvet cake.
Can I make this cake dairy-free or vegan?
To make a dairy-free version, substitute the butter and cream cheese with plant-based alternatives and replace sour cream or yogurt with coconut or almond-based yogurt. For vegan, use flax eggs and vegan dairy substitutes, though slight texture differences may occur.
How do I prevent the chocolate chips from sinking to the bottom?
Coating the mini chocolate chips lightly in flour before folding them into the batter helps keep them suspended evenly throughout the cake layers rather than sinking to the bottom.
Final Thoughts
This Red Velvet Chocolate Chip Cake Recipe has truly won my heart, and I know it will become a favorite in your kitchen too. With its luscious layers, pops of chocolate, and creamy frosting, it’s perfect for sharing moments of pure joy with those you love. Give it a try and watch it become the star of your celebrations and everyday indulgences alike!
Print
Red Velvet Chocolate Chip Cake Recipe
- Prep Time: 40 minutes
- Cook Time: 30 minutes
- Total Time: 2 hours 25 minutes
- Yield: 16 servings
- Category: Dessert
- Method: Baking
- Cuisine: American
Description
A rich and moist Red Velvet Chocolate Chip Cake made with a tender cocoa-infused batter, layered generously with smooth cream cheese frosting studded with mini chocolate chips. This decadent dessert combines classic red velvet flavor with delightful chocolatey bites, perfect for celebrations or any special occasion.
Ingredients
Dry Ingredients
- 3 1/2 cups All-purpose flour
- 1/4 cup Unsweetened cocoa powder (Dutch process recommended)
- 2 tsp Baking powder
- 1/2 tsp Baking soda
- 1 tsp Salt
Wet Ingredients
- 1/2 cup Oil (canola or vegetable)
- 1/2 cup Unsalted butter (room temperature)
- 1 3/4 cup White granulated sugar
- 1 tsp Pure vanilla extract
- 1 tsp White vinegar
- 1/3 cup Sour cream (room temperature) or Greek yogurt
- 4 Large eggs (room temperature)
- 1 tsp Red food gel dye (e.g., Americolor super red)
- 1 cup Buttermilk (room temperature)
Add-ins and Toppings
- 1 1/2 cups Mini chocolate chips (for batter)
- 1/2 cup Mini chocolate chips (for filling and topping)
Cream Cheese Frosting
- 2 cups Unsalted butter (room temperature)
- 8 oz Cream cheese (room temperature)
- 5 cups Powdered sugar (sifted)
- 1 tsp Pure vanilla extract
Instructions
- Preheat and Prepare Pans: Preheat your oven to 350℉ (175℃). Spray three 8-inch cake pans with nonstick baking spray, then line the bottoms with parchment paper and spray again to ensure the cakes come out easily. Set pans aside.
- Mix Dry Ingredients: In a medium bowl, sift together the all-purpose flour, cocoa powder, baking powder, baking soda, and salt. Set this mixture aside for later.
- Beat Wet Ingredients: Using a stand mixer fitted with a large bowl, beat the unsalted butter, oil, and white granulated sugar on high speed for about 2 minutes until the mixture is very pale and fluffy.
- Add Additional Wet Ingredients: Add the vanilla extract, white vinegar, sour cream (or Greek yogurt), eggs, and red food gel dye to the butter mixture. Mix on medium speed until fully combined.
- Combine Dry and Wet: Gradually add the dry ingredient mixture alternately with the buttermilk to the wet ingredients, mixing on low speed just until combined. Stop mixing to avoid overworking the batter. Fold in the mini chocolate chips gently using a rubber spatula.
- Divide Batter and Bake: Evenly divide the batter among the prepared cake pans, smoothing the tops. Bake in the preheated oven for 25 to 30 minutes, or until a toothpick inserted into the center comes out clean.
- Cool Cakes: Allow the cakes to rest in the pans for 10 minutes to settle, then transfer them to a cooling rack. Let cool completely before assembling and frosting.
- Prepare Cream Cheese Frosting – Sift Sugar: Sift the powdered sugar into a large bowl and set aside to ensure a smooth frosting.
- Beat Butter and Cream Cheese: In a separate large bowl, beat the unsalted butter on high speed for 2 minutes until light and fluffy. Scrape down the sides, add the cream cheese, and beat on high speed for another minute until completely smooth with no lumps.
- Add Powdered Sugar and Vanilla: Add half of the sifted powdered sugar and mix on low speed until almost combined. Then add the remaining powdered sugar and mix on low again. Finally, add the vanilla extract and beat on high speed until the frosting is creamy and well combined.
- Assemble the Cake Layers: Place a small dollop of frosting on your working surface to stabilize the cake. Put the first cake layer down and spread approximately 1 cup of frosting evenly over it. Sprinkle about 1/3 cup of mini chocolate chips over the frosting.
- Repeat and Finish Layering: Repeat the frosting and chocolate chip layering with the second cake layer. For the third layer, invert it so the bottom faces up, then place it on top.
- Crumb Coat and Chill: Apply a thin, light layer of frosting all around the assembled cake to seal in crumbs. Place the cake in the freezer for 15 minutes to set the crumb coat firmly.
- Final Frosting and Decoration: Remove the cake from the freezer and apply the remaining frosting evenly over the entire cake. Decorate the top generously with mini chocolate chips for a final touch.
Notes
- Make sure all dairy ingredients and eggs are at room temperature to ensure a smooth batter and proper emulsification.
- Using Dutch-process cocoa powder adds a deeper chocolate flavor; avoid using natural cocoa powder unless adjusted for acidity.
- For more intense red color, use gel-based food coloring rather than liquid dyes.
- Do not overmix the batter once dry ingredients and buttermilk are added to keep the cake tender.
- Cooling the cake layers completely before frosting helps prevent the frosting from melting and sliding off.
- If you prefer, you can substitute sour cream with Greek yogurt to add a slight tang and moisture.


