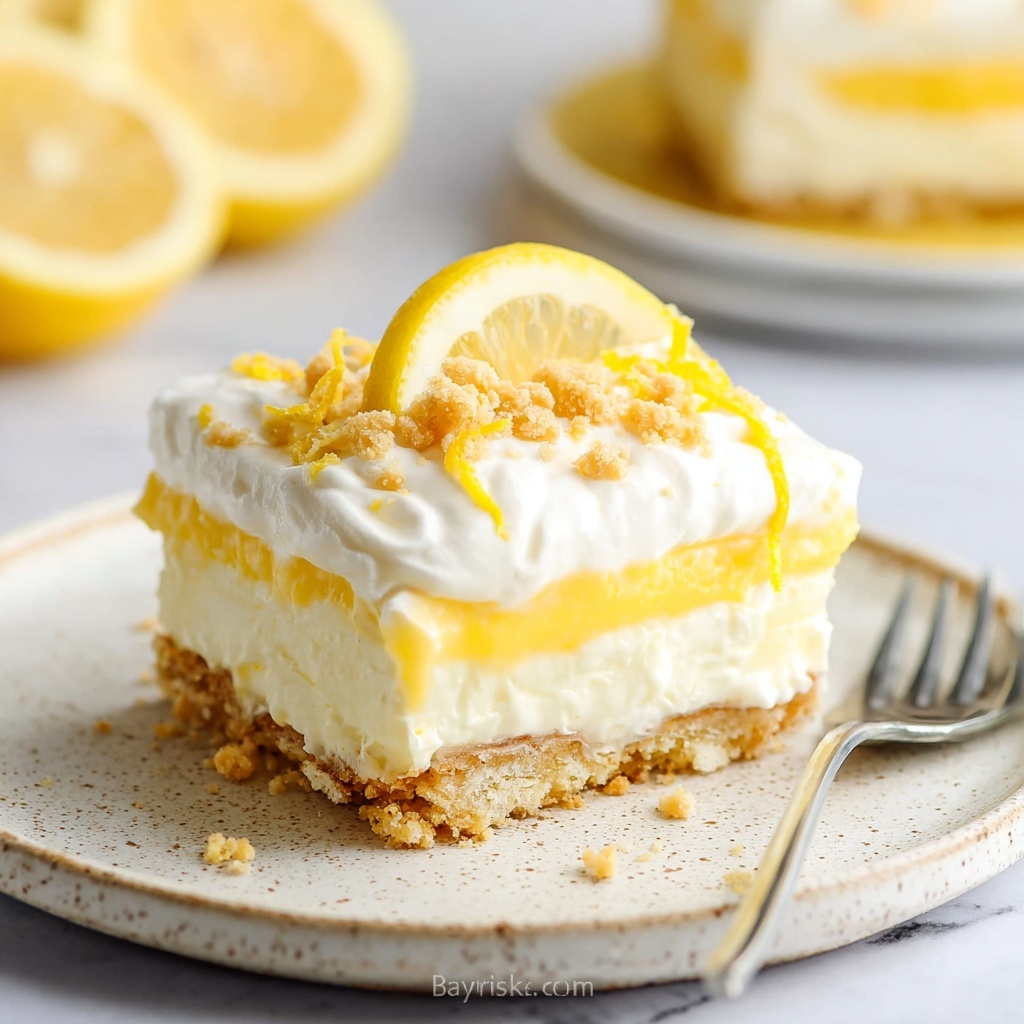
There’s something truly magical about a dessert that layers bright, zesty lemon flavors with rich, creamy textures, all while keeping it entirely plant-based. This Vegan Lemon Lush Recipe is my absolute favorite for those moments when you crave a tangy yet indulgent treat that’s a feast for both the eyes and the palate. With crisp cookie crust, luscious lemon cream cheese, smooth curd, and fluffy coconut cream on top, this dessert effortlessly combines fresh citrus notes with velvety layers, making it a guaranteed showstopper at any gathering. Trust me, once you try this Vegan Lemon Lush Recipe, it will quickly become a beloved staple in your recipe collection!
Ingredients You’ll Need
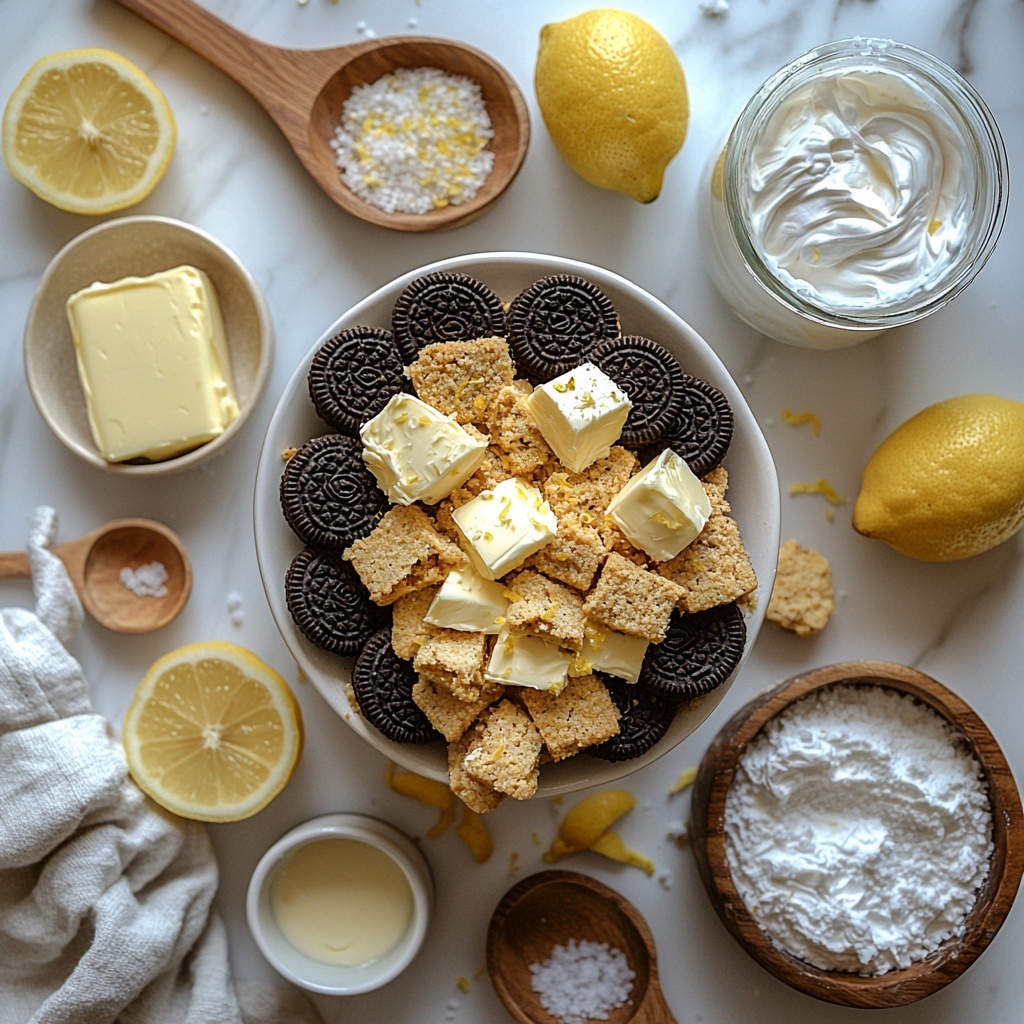
These ingredients are wonderfully simple yet essential, each playing a crucial role in building the vibrant flavor and delightful texture of the Vegan Lemon Lush Recipe. From vegan cookie crumbs creating that perfect crumbly base to fresh lemon zest packing in lively citrus brightness, every component contributes to making this dessert truly unforgettable.
- 200 g golden Oreos (or other vegan cookies): The cookie base delivers the perfect sweet and crunchy foundation for the dessert.
- ¼ teaspoon sea salt: Enhances the flavors and balances the sweetness throughout the layers.
- 60 g vegan butter (room temperature): Helps bind the cookie crust with a smooth, buttery consistency.
- 100 g vegan butter (room temperature): Makes the lemon cream cheese layer silky and rich.
- 400 g vegan cream cheese: Provides a creamy, tangy texture that mimics the classic cheesecake feel.
- 100 g sweetened condensed coconut milk: Sweetens and adds body to the cream cheese layer while keeping it vegan.
- 2 tablespoons lemon zest (freshly grated): Delivers bright, fresh citrus aroma and flavor to the cream cheese mixture.
- 50 g powdered sugar (icing sugar): Adds a gentle sweetness and helps with the smooth texture of the cream cheese layer.
- 60 g cornstarch (cornflour): Thickens the lemon curd for that perfect, luscious consistency.
- 236 ml lemon juice (freshly squeezed): Brings the vibrant, zesty tang essential to making this dessert pop.
- 220 g sweetened condensed coconut milk: Sweetens and enriches the lemon curd layer beautifully.
- 2 tablespoons lemon zest (freshly grated): Boosts the lemon curd with intense citrus notes.
- 50 g vegan butter (room temperature): Adds creaminess and a luxurious mouthfeel to the curd.
- 500 g coconut whipping cream: Whipped into a fluff that crowns the dessert with a light, creamy finish.
How to Make Vegan Lemon Lush Recipe
Step 1: Prepare the Cookie Crust
Start by lightly greasing an 8×8″ dish with oil to ensure easy removal later. Pulse the golden Oreos and sea salt in a food processor until you achieve a fine, even crumb. Add 60 g of room-temperature vegan butter and blend until the mixture sticks together beautifully when pressed between your fingers. This step creates the buttery, crumbly base that sets the stage for all the luscious layers to come.
Step 2: Form and Chill the Crust
Press the cookie mixture firmly into the bottom of the prepared dish, smoothing it evenly with the back of a spoon. It’s important to get this layer compact so it holds together well. Once set, transfer the dish to the fridge to chill while you prepare the dreamy lemon cream cheese layer.
Step 3: Make the Lemon Cream Cheese Layer
In a large mixing bowl, whisk together 100 g vegan butter and the vegan cream cheese for 2 to 3 minutes until combined, even if it looks a bit split—that’s totally normal at this stage. Next, whisk in 100 g sweetened condensed coconut milk, then stir in 2 tablespoons of freshly grated lemon zest. Add the powdered sugar and whisk again until smooth.
Step 4: Blend the Cream Cheese Mixture
Transfer the cream cheese mixture into a high-speed blender and blend on low power, pausing occasionally to scrape down the sides. At first, it may appear a bit separated, but soon it’ll transform into a thick, smooth, marshmallow-fluff texture that’s simply irresistible.
Step 5: Set the Cream Cheese Layer
Gently spoon or pipe this luscious mixture over the chilled crust, smoothing it out evenly. Place it back in the fridge and let it set for about an hour. This step helps the layer firm up so the dessert holds its signature structure.
Step 6: Cook the Lemon Curd
Combine cornstarch and freshly squeezed lemon juice in a saucepan, whisking until smooth. Stir in lemon zest and sweetened condensed coconut milk, then place the pan over medium-high heat. Bring to a simmer, then reduce heat to maintain a gentle simmer, stirring constantly with a spatula and whisk for 8 to 10 minutes. The curd will thicken and coat the back of the spatula—this constant stirring is key to achieving that perfect smooth texture.
Step 7: Finish the Lemon Curd
Remove the curd from heat and stir in 50 g of vegan butter until fully incorporated, yielding an indulgently smooth and glossy lemon filling. Allow it to cool to room temperature for about 20 minutes before moving on.
Step 8: Layer the Lemon Curd
Spread or pipe the cooled lemon curd evenly over the cream cheese layer. Smooth the top with a spoon and pop the dish back into the fridge for another hour to let this vibrant layer set firmly.
Step 9: Whip the Coconut Cream
Using a large mixing bowl, whip the coconut whipping cream for 1 to 2 minutes until it becomes light and fluffy. This airy topping adds a delightful contrast to the tangy lemon layers beneath.
Step 10: Top and Chill
Spoon the whipped coconut cream over the lemon curd layer and smooth it out. For best results, chill the dish for at least 1 to 2 hours, or even overnight. This final chilling step lets all the flavors meld and the textures truly shine.
Step 11: Garnish and Serve
Before serving, sprinkle crushed golden Oreos and a little more freshly grated lemon zest on top for an extra burst of flavor and texture. Slice into 12 generous portions and enjoy! If the dessert has been in the fridge for a few hours, I recommend allowing it to sit at room temperature for about an hour to enhance the softness and fluffiness of the layers.
How to Serve Vegan Lemon Lush Recipe
Garnishes
Freshly grated lemon zest sprinkled on top is not only beautiful but adds a refreshing zing that intensifies the citrus aroma. Crushed vegan cookies scattered across the surface bring a lovely crunch and a familiar sweetness that perfectly complements the creamy layers.
Side Dishes
This dessert pairs beautifully with a simple cup of herbal tea or a chilled glass of sparkling water infused with fresh mint or cucumber. For a brunch spread, serve alongside fresh berries or a vibrant fruit salad to add a refreshing balance to the richness.
Creative Ways to Present
For an impressive twist, serve individual portions in clear glasses to showcase the stunning layers. Add a sprig of fresh mint or an edible flower on top for elegance. You can also cut the dessert into small squares and arrange them on a decorative platter with lemon wedges and fresh berries for a vibrant display.
Make Ahead and Storage
Storing Leftovers
You can keep your Vegan Lemon Lush Recipe fresh in the fridge for up to 3 to 4 days. Make sure to cover it well with plastic wrap or store it in an airtight container to prevent it from drying out or absorbing other fridge odors. Avoid stacking slices on top of each other to preserve the integrity of the beautifully distinct layers.
Freezing
While this dessert is best enjoyed fresh, you can freeze it for up to one month. Wrap individual slices tightly in plastic wrap and then place them in an airtight freezer-safe container. To thaw, move them to the fridge overnight and allow them to come to room temperature for an hour before serving to regain that luscious texture.
Reheating
This dessert is best served chilled and not reheated. If you want the perfect texture, simply leave it at room temperature for about an hour before enjoying. This little step lets the layers soften and the flavors become more pronounced.
FAQs
Can I use regular Oreos instead of golden Oreos?
While regular Oreos aren’t typically vegan due to the cream filling, golden Oreos or other vegan cookies are preferred to keep the recipe fully plant-based and aligned with the Vegan Lemon Lush Recipe’s spirit.
Is it possible to make this recipe nut-free?
Absolutely! The recipe already avoids nuts by using coconut-based ingredients. Just ensure the vegan butter and cream cheese you use don’t contain nuts for a safe, nut-free dessert.
Can I substitute lemon juice with bottled lemon juice?
Freshly squeezed lemon juice offers a brighter and more vibrant flavor, which is key to this recipe. However, you can use bottled lemon juice if fresh isn’t available, though the taste might be a little less fresh.
How do I get the lemon curd to thicken properly?
Constant stirring during cooking is essential to prevent lumps and sticking. Make sure to simmer gently and whisk the mixture to achieve that silky, thickened curd that perfectly coats the spatula.
What’s the best way to make sure the layers don’t mix together?
Chilling each layer before adding the next is your best friend here. Patience during these chilling steps allows every layer to set firmly so your Vegan Lemon Lush Recipe keeps those gorgeous, distinct layers intact.
Final Thoughts
I can’t recommend this Vegan Lemon Lush Recipe enough—it’s such a wonderful blend of zesty freshness, creamy richness, and crunchy texture, all wrapped up in a vegan-friendly treat. Whether you’re treating yourself or impressing friends, this dessert brings joy with every bite. You really have to try making it to understand why it’s such a cherished recipe in my kitchen. Get ready for some serious indulgence that’s surprisingly light and totally delicious!
Print
Vegan Lemon Lush Recipe
- Prep Time: 30 minutes
- Cook Time: 15 minutes
- Total Time: 3 hours 20 minutes (including chilling time)
- Yield: 12 servings
- Category: Dessert
- Method: No-Cook
- Cuisine: Vegan American
- Diet: Vegan
Description
Lemon Lush is a decadent layered vegan dessert featuring a crispy golden Oreo cookie crust, a tangy lemon cream cheese layer, a smooth homemade lemon curd, and a fluffy coconut whipped cream topping. Perfectly balanced with sweet and tart flavors, this no-bake treat is ideal for spring and summer gatherings or any time you want a refreshing citrus dessert.
Ingredients
Crust
- 200 g golden Oreos (or other vegan cookies)
- ¼ teaspoon sea salt
- 60 g vegan butter (room temperature)
Lemon Cream Cheese Layer
- 100 g vegan butter (room temperature)
- 400 g vegan cream cheese
- 100 g sweetened condensed coconut milk
- 2 tablespoons lemon zest (freshly grated)
- 50 g powdered sugar (icing sugar)
Lemon Curd
- 60 g cornstarch (cornflour)
- 236 ml lemon juice (freshly squeezed)
- 220 g sweetened condensed coconut milk
- 2 tablespoons lemon zest (freshly grated)
- 50 g vegan butter (room temperature)
Topping
- 500 g coconut whipping cream
Instructions
- Make the crust: Lightly grease the bottom and sides of an 8×8″ dish with oil. Add the cookies and salt to a food processor and blitz for about 30 seconds until finely ground. Add vegan butter and blend again until the mixture sticks together between your fingers.
- Press and chill the crust: Press the cookie mixture firmly into the base of the pan using the back of a spoon to smooth it out. Place it in the fridge to set while you prepare the next layer.
- Prepare lemon cream cheese: In a large bowl, whisk together softened vegan butter and vegan cream cheese for 2-3 minutes until combined. Add sweetened condensed coconut milk and mix. Stir in lemon zest, then powdered sugar, whisking until smooth.
- Blend for smooth texture: Transfer the lemon cream cheese mix to a high-speed blender and blend on low power, stopping to scrape down the edges as needed. The mixture will become thick, smooth, and have a marshmallow-fluff consistency.
- Assemble cream cheese layer: Pipe or spoon the lemon cream cheese onto the chilled cookie crust, smoothing the surface with the back of a spoon. Refrigerate for 1 hour to set.
- Make lemon curd: In a saucepan, whisk cornstarch and lemon juice until smooth. Add lemon zest and sweetened condensed coconut milk and whisk again.
- Cook lemon curd: Place the saucepan over medium-high heat and bring to a simmer. Reduce heat to a gentle simmer and cook for 8-10 minutes, stirring constantly with a rubber spatula and whisk to prevent sticking. The curd will thicken and coat the back of the spatula.
- Finish lemon curd: Remove from heat and stir in vegan butter until fully incorporated and smooth. Allow to cool to room temperature for 20 minutes.
- Add lemon curd layer: Pipe or spoon the cooled lemon curd over the cream cheese layer, smoothing with the back of a spoon. Refrigerate for another hour to set.
- Prepare whipping cream topping: Whisk coconut whipping cream in a large bowl for 1-2 minutes until light and fluffy.
- Top and chill: Spoon the whipped cream over the lemon curd layer and smooth out. Refrigerate for 1-2 hours or overnight for best results.
- Serve: Sprinkle crushed cookies and extra grated lemon zest on top. Slice into 12 portions. For best texture, remove from fridge and let sit at room temperature for 1 hour before serving.
- Storage: Store leftover lemon lush in the refrigerator covered with plastic wrap or in an airtight container for up to 3-4 days. Avoid stacking slices to keep the layers distinct.
Notes
- Use vegan cookies and dairy-free butter and cream cheese to keep the dessert fully vegan.
- Freshly squeezed lemon juice and zest are key for bright, authentic lemon flavor.
- Allowing the dessert to rest at room temperature before serving helps the layers become fluffy and enhances texture.
- Do not stack pieces during storage to maintain layer separation.
- For a firmer crust, you can chill the crust for 30 minutes before assembling the other layers.


