“`html
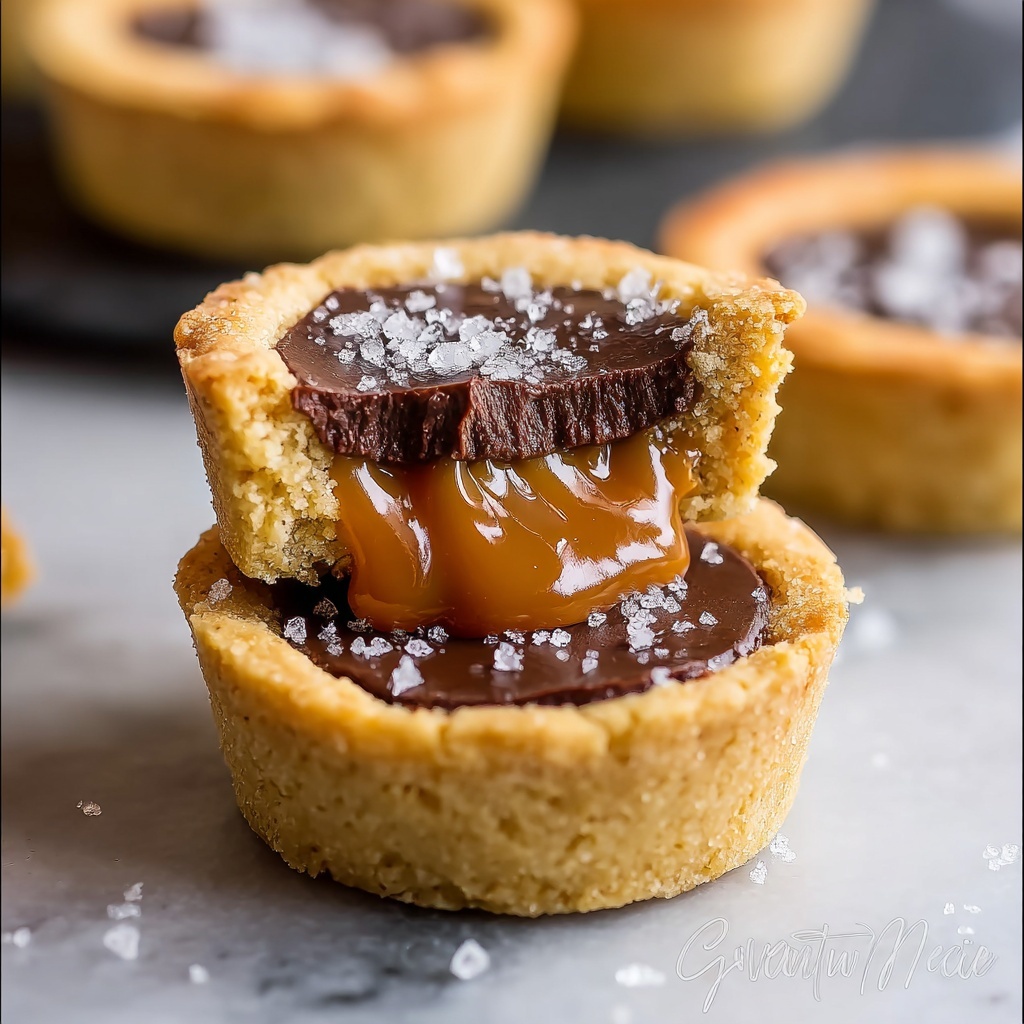
There is something truly magical about the way a Twix Cookie Cups Recipe brings together buttery cookie shells, luscious caramel, and silky melted chocolate into one irresistible bite-sized treat. These little delights beautifully capture all the flavors you love from a classic Twix bar but in a homemade, baked form that’s perfect for sharing or savoring solo. Once you try these, they will quickly become a go-to dessert for any occasion, offering that perfect balance of sweet, chewy, and crisp textures that will have you coming back for more.
Ingredients You’ll Need
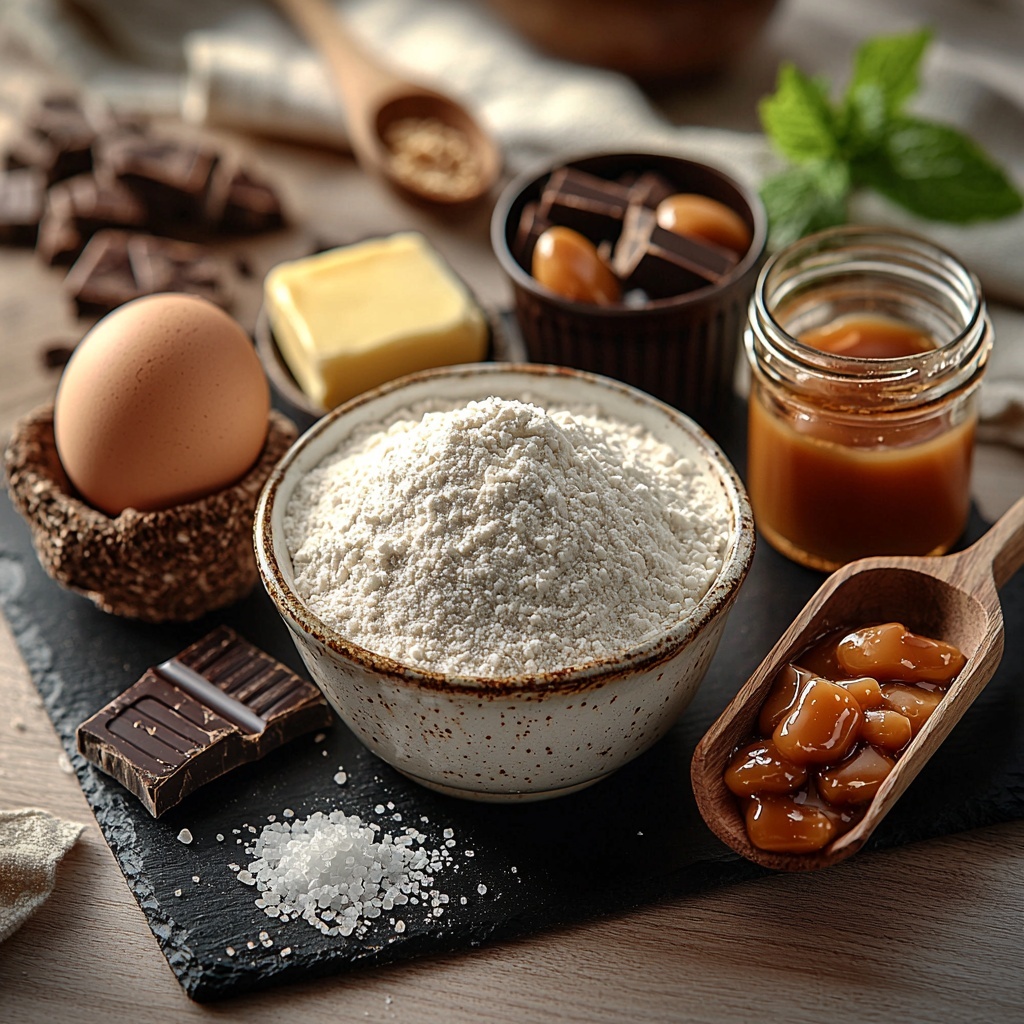
This Twix Cookie Cups Recipe relies on simple pantry staples that each play a crucial role in creating the perfect cookie cup. From the richness of butter to the sweet depth of brown sugar, every ingredient works in harmony to develop a buttery, tender cookie that holds the irresistible caramel and chocolate layers.
- 1 cup All-Purpose Flour: The foundation of the cookie, providing structure and tenderness in each bite.
- 1/2 cup Butter, softened: Adds richness and helps create that soft but sturdy shell for the cups.
- 1/2 cup Brown Sugar: Brings a deep sweetness with a hint of molasses, enhancing flavor and chewiness.
- 1 large Egg: Binds the dough together while adding moisture and a little lift.
- 1/4 teaspoon Salt: Balances the sweetness and amplifies all the other flavors.
- 1 teaspoon Vanilla Extract: Infuses warmth and subtle aromatic notes that make the cookies irresistible.
- Caramel Sauce or Soft Caramels (about 1 tablespoon per cup): Creates the gooey, luscious filling that’s essential for a true Twix experience.
- Chocolate Chips or Chopped Chocolate (about 1 tablespoon per cup): Melts over the caramel to form a silky, decadent topping that finishes each cup perfectly.
How to Make Twix Cookie Cups Recipe
Step 1: Prepare the Cookie Dough
Start by creaming the softened butter and brown sugar together until the mixture is wonderfully light and fluffy—this step is key for a tender texture. Next, mix in the egg and vanilla extract until everything is fully combined, then slowly stir in the flour and salt. Keep stirring gently until you have a soft, slightly sticky dough that’s ready for shaping. This dough forms the perfect base to hold all the luscious layers that make these cookie cups so special.
Step 2: Form the Cookie Cups
Grease your muffin tin well to ensure easy removal later. Then press the cookie dough evenly into each cup, making sure to create a little well in the center. This indentation is essential because it will cradle the caramel and chocolate layers, ensuring every bite bursts with gooey, melty goodness.
Step 3: Bake the Cookie Shells
Bake your cookie shells at 350°F (175°C) for 10 to 12 minutes, or until the edges just begin to turn a lovely golden hue. Don’t overbake because the cookie cups will continue to set as they cool. Once out of the oven, let them rest in the muffin tin for a few minutes so they firm up enough to hold the fillings.
Step 4: Add the Caramel Layer
While the cookie cups are still warm, add about a tablespoon of caramel sauce or soft caramel candies into each well. Gently press and spread the caramel so it fills the space evenly but doesn’t spill over the edges. This warm caramel layer is what truly transforms simple cookie cups into a Twix-inspired delight.
Step 5: Top with Chocolate
Immediately sprinkle chocolate chips or chopped chocolate over the soft caramel in each cup. The residual warmth will melt the chocolate just enough to form a shiny, smooth topping. This finishing touch locks in the caramel and adds the perfect chocolatey contrast every Twix lover dreams of.
Step 6: Chill and Set
Place the muffin tin in the refrigerator for at least 30 minutes to allow the chocolate to harden and the flavors to meld. Once set, carefully pop each Twix Cookie Cup out of the tin and get ready to enjoy a little piece of homemade magic.
How to Serve Twix Cookie Cups Recipe
Garnishes
While these cookie cups are stunning on their own, adding a light sprinkle of sea salt on top enhances the caramel’s sweetness and deepens the flavor complexity. For a festive touch, try a dusting of crushed pretzels or a drizzle of extra melted chocolate right before serving—both bring additional texture and flair.
Side Dishes
These cookie cups pair beautifully with a scoop of vanilla ice cream or a dollop of whipped cream to balance their richness. A hot cup of coffee or a cold glass of milk is also a classic match that beautifully complements the buttery cookie and luscious caramel layers.
Creative Ways to Present
For parties or gifting, arrange the Twix Cookie Cups Recipe treats in mini cupcake liners set on a decorative platter. You can also stack them in a layered jar with parchment paper in between for a charming homemade gift. Their bite-sized shape makes them perfect for indulging without any fuss.
Make Ahead and Storage
Storing Leftovers
Keep any leftover Twix Cookie Cups in an airtight container in the refrigerator for up to 3-4 days. The cool temperature helps the caramel and chocolate stay firm while preserving the cookie’s tender texture, so you can enjoy them fresh and delicious days after baking.
Freezing
You can freeze these cookie cups for longer storage by placing them in a single layer on a baking sheet and freezing until solid. Then transfer them to a freezer-safe container or bag for up to 2 months. When you’re ready to indulge, just thaw at room temperature for about an hour before serving.
Reheating
If you prefer your Twix Cookie Cups slightly warm, briefly microwave them for 10-15 seconds or place them in a low oven around 300°F to gently soften the caramel and chocolate. Be careful not to overheat as the cookie cups could get too soft and lose their shape.
FAQs
Can I use store-bought caramel sauce for this recipe?
Absolutely! Store-bought caramel sauce works perfectly and saves time. Just be sure it’s slightly thick or allow it to cool a bit before adding it to the cookie cups to avoid it running over the edges.
What type of chocolate is best to use?
Either chocolate chips or chopped chocolate bars work beautifully here. Semi-sweet or milk chocolate are popular choices, but feel free to use dark chocolate if you prefer a richer, less sweet topping.
Can I make the cookie dough ahead of time?
Yes! The cookie dough can be prepared a day in advance and stored refrigerated. Just bring it back to room temperature before pressing into the muffin tins for best results.
Are these cookie cups gluten-free?
The recipe as is uses all-purpose flour, which contains gluten. However, you can substitute a gluten-free all-purpose flour blend to make the recipe gluten-free, ensuring it’s suitable for those with gluten sensitivities.
How do I prevent the caramel from leaking out during baking?
This recipe adds the caramel layer after baking the cookie shells, so there’s no risk of caramel leakage during baking. Just be gentle while pressing the caramel to keep it contained within the cup.
Final Thoughts
Making the Twix Cookie Cups Recipe is like creating little bites of joy that bring out all the best parts of a classic candy bar in a charming homemade package. They’re simple to make but spectacular to enjoy and share, guaranteed to win over anyone lucky enough to try one. So gather your ingredients and give this recipe a whirl—you’ll be thanking yourself for every caramel-filled, chocolate-topped, buttery bite.
“`
Print
Twix Cookie Cups Recipe
- Prep Time: 20 minutes
- Cook Time: 12 minutes
- Total Time: 1 hour
- Yield: 12 servings
- Category: Dessert
- Method: Baking
- Cuisine: American
Description
These Twix Cookie Cups are a delightful treat combining buttery cookie shells with gooey caramel and rich melted chocolate. Perfect for parties or a sweet indulgence, these cups offer the classic flavors of a Twix bar in an easy-to-make, bite-sized dessert.
Ingredients
Cookie Dough
- 1 cup All-Purpose Flour
- 1/2 cup Butter, softened
- 1/2 cup Brown Sugar
- 1 large Egg
- 1/4 teaspoon Salt
- 1 teaspoon Vanilla Extract
Filling & Topping
- Caramel Sauce or Soft Caramels (about 1 tablespoon per cup)
- Chocolate Chips or Chopped Chocolate (about 1 tablespoon per cup)
Instructions
- Prepare the Cookie Dough: Start by creaming softened butter and brown sugar together until the mixture is light and fluffy. Then mix in the egg and vanilla extract until fully combined. Gradually add the all-purpose flour and salt, stirring continuously until a soft dough forms.
- Form the Cookie Cups: Press the cookie dough evenly into greased muffin tins, creating small wells in the center of each cup to hold the layers of caramel and chocolate later on.
- Bake the Cookie Shells: Bake the cookie shells in a preheated oven at 350°F (175°C) for 10 to 12 minutes or until the edges turn lightly golden. Remove from oven and allow them to cool slightly, leaving them in the muffin tin.
- Add the Caramel Layer: Place a spoonful of caramel sauce or soft caramel candies into each cookie well. Gently press the caramel to spread it evenly without overflowing the edges.
- Top with Chocolate: Sprinkle chocolate chips or chopped chocolate over the warm caramel layer so it melts slightly, creating a smooth, glossy chocolate topping.
- Chill and Set: Transfer the muffin tin to the refrigerator and chill for at least 30 minutes to let the chocolate harden. Once set, carefully remove the Twix Cookie Cups from the tin and serve.
Notes
- Use softened butter for easier creaming.
- Ensure not to overfill the cookie cups to avoid caramel overflow.
- Chilling is essential for the chocolate to set properly.
- You can substitute the caramel with store-bought caramel sauce for convenience.
- Use a non-stick muffin tin or grease well to remove cookie cups easily.
